Web-service capabilities in TopBraid EDG
The purpose of this document is to showcase how web services can be created and deployed within TopBraid Enterprise Data Governance (referred to as EDG).
The document will walk through the steps to create a new web service in EDG and demonstrate how, when combined with Active Data Shapes (ADS),
EDG can be used to support the definition of several different web services for importing data.
You will need to have access to an instance of EDG to complete the tutorials. The tutorial is presented in three parts:
The first demonstrates how to create a simple web service in EDG (working with Ontology collection).
The second extends the first by demonstrating how to configure the web service to take an input file, import it into your collection, and then run the EDG OWL2SHACL validator on it (working with Ontology collection).
Finally, the thirds converts an input JSON string into Data Assets (working with Ontology and Data Asset collections). This tutorial also covers some basic error handling.
This guide builds on the existing documentation ADS-based Web Services, and is intended to provide a step by step approach to help create your first web service, and also provide some typical functionality you may use web services for, such as to support data import.
Contents
1. Creating your first web service in EDG
To create a web service, we can recommend working with Files (for more info see Working with Files). You can also work with Ontologies, but if you wish to use version control, working within the projects workspace is required, as the files are stored there.
Regardless of the option you use you need to include the created file/ontology into the asset collection where you wish to run your web service.
The web service will then be assigned a URL based on the asset collections URI, e.g. in the form: <server_url>/tbl/service/<current_asset_collection>/<service_definition_file>/<service_name>
e.g. for the service in this example, when run from a local instance of EDG, from an ontology called “test_ontology”, the URL would look like this: http://localhost:8083/tbl/service/test_ontology/edg_custom_web_services/TestGraphService
Again, more description of this can be found at ADS-based Web Services.
1.1 Creating a graph service instance
To create a web service, we first create a File (see Working with Files). In your Workspace create a new folder, call it something like “webservices.topbraidlive.org”. Next create a file in this folder, and call it “EDG Custom Web Services”. You can also specify a prefix and namespace. In these examples, the prefix is declared as “edg_custom_web_services”. In this File you will now create an instance of the “Graph service” class.
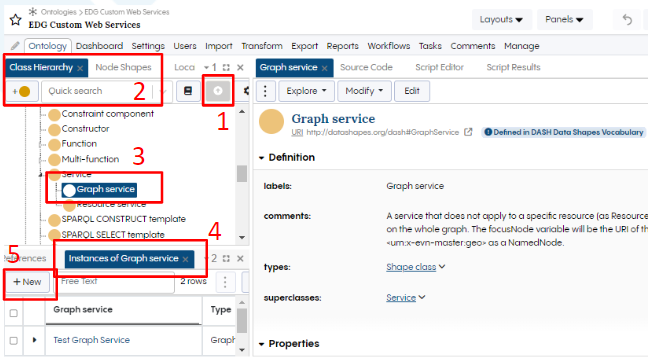
To do this, navigate to the “Class Hierarchy” panel on the left of your new file, and press the button with an upward pointing arrow inside a circle (red Number 1 in image “Creating a graph service instance”). This will make all instances of rdfs:Resource visible in the class hierarchy panel, giving you access to System classes.
Search for Graph service in the “Quick search” bar in the class hierarchy (2). It should now appear in the hierarchy when selected (3). From the “Panels” drag the instances panel onto the screen (4) and click “+New” (5) to create a “Graph service” instance. From the pop up dialogue, give the graph service a label “Test Graph Service”.
Creating a graph service instance
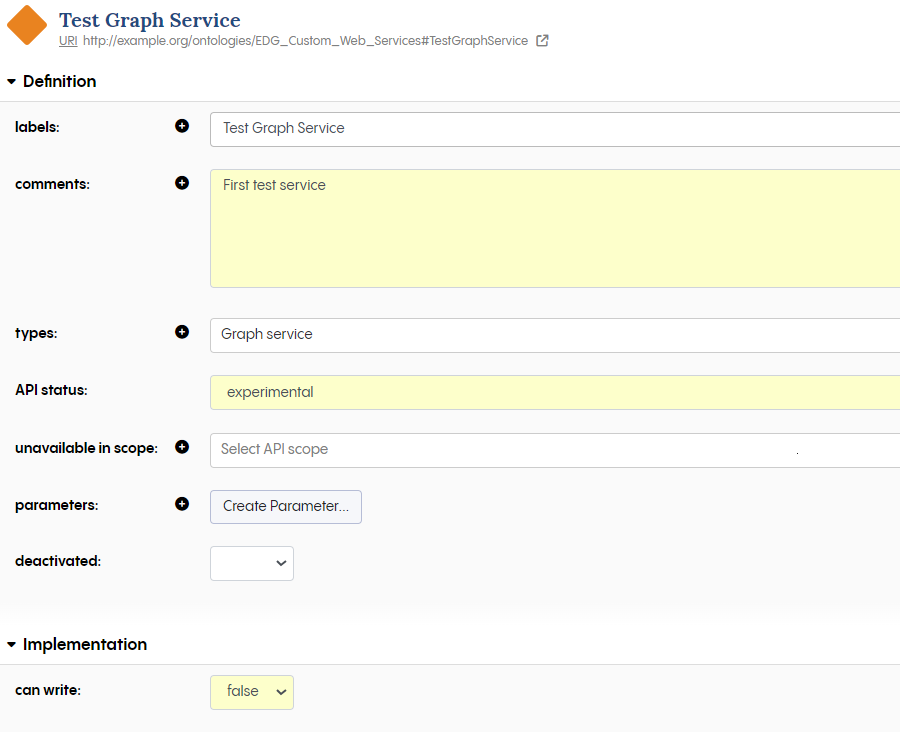
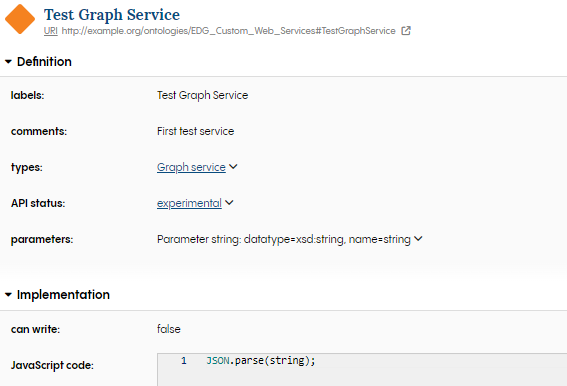
Once the service is created you can add a comment to describe it, e.g. “First test service”. Next you need to configure the “API status” so as to make it visible in SWAGGER (again, for more on SWAGGER and web services see ADS-based Web Services). You can always access the instance again either via the instance panel as before, or also via the “Local Assets” panel. We are not going to do anything with this service other than execute it and return a response message, so under implementation set “can write” to “false”. In later examples, we shall be writing data, and so will set this to true. Finally let us set an input parameter. Click on “Create Parameter” under “parameters”, and name it string. Next give it a datatype “jsonString”.
Configuring a graph service instance
To finish our web service, let us write some sample JS code in the JavaScript code area. This is done by clicking on it. Let us write some code which converts a JSON string into JSON and returns this as a response.
JSON.parse(jsonString);
It should now look like this in EDG.
Test web service completed
Finally, let us test the web service. To do this, first create an Ontology in EDG, e.g. “Test Ontology”. In Test Ontology go to includes and include your file. It should be called something like “New File (EDG Custom Web Service.ttl)” and click “done”. Go to the “Reports” tab in EDG, select “Web Services Swagger UI”, and navigate to the “EDG_CUSTOM_WEB_SERVICES Services” and select your new TestGraphService.
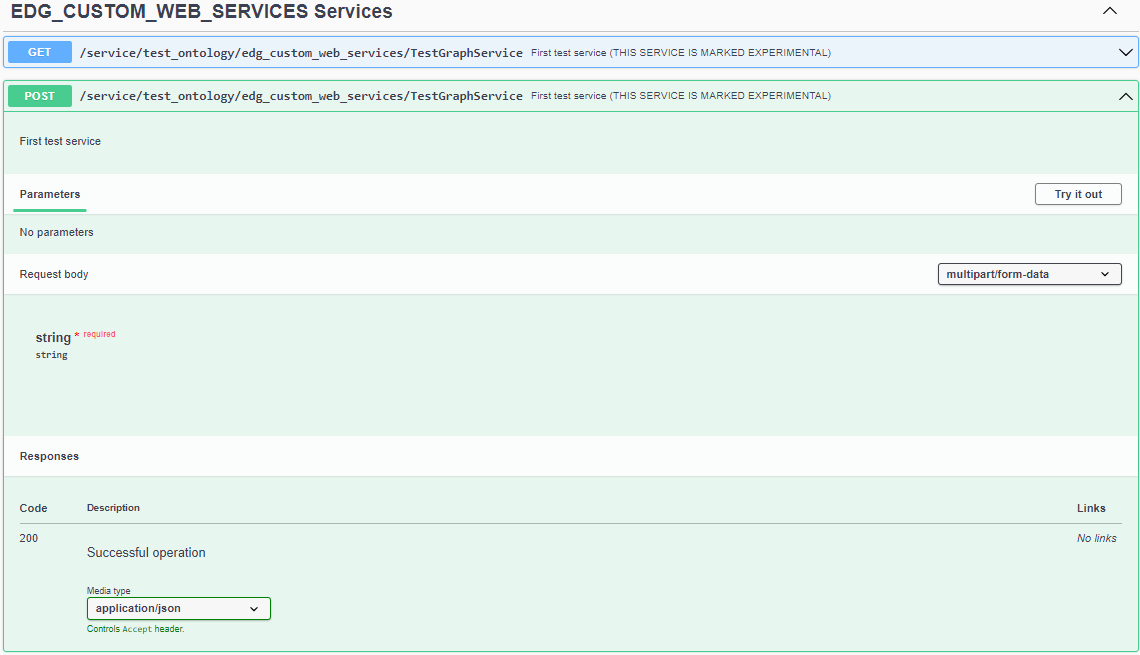
Viewing your web service in SWAGGER
Click the “try it out” button, and enter the following string into the “string” field:
{"name": "John Doe"}
You should now see a response with the string returned as a JSON object, displayed via SWAGGER UI as a string.
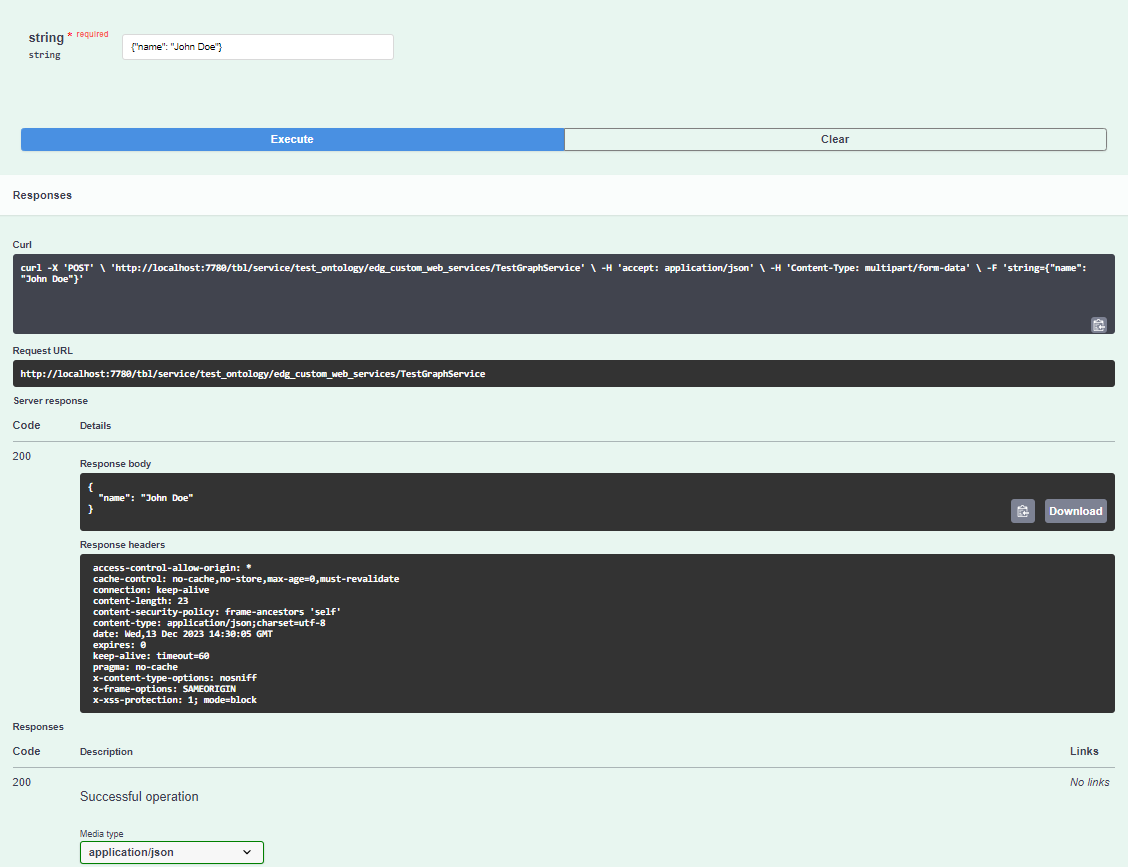
Testing your web service in SWAGGER
Great, you have created your first web service! This was a very simple example of ADS, and really just intended to get you creating a web service. In the next tutorials we will begin to work on importing data into EDG using this same approach, and in the last tutorial we will cover other details, like basic error handling, e.g. if your input string is not the correct format.
2. Creating a web service that imports OWL into an ontology and converts to SHACL
Now lets create a web service which will allow us to import a TTL file into an existing ontology asset collection, and run the OWL2SHACL transform. This is a necessary step if we want to make properties defined in OWL but not SHACL visible in EDG, see Transform > Convert OWL Axioms to SHACL Constraints.
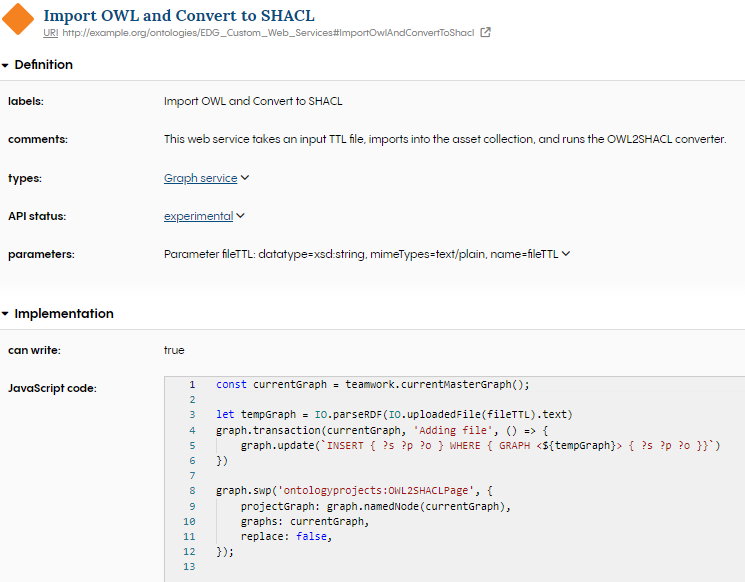
To begin, first create a new web service using the same approach as in the previous example (or clone and edit the previous graph service instance). We will call the web service “Import OWL and Convert to SHACL”.
The web service should be the same as the previous, except now we set “can write” to “true”, and we also change the parameter from a string to file, and make it a plain text file (this will be our input turtle file).
Now let us write some ADS script (the JavaScript code field in EDG). The code takes in the file passed in by the defined parameter, extracts the text, and then uses the built in ADS function IO.parseRDF to convert the file into a temporary graph, stored as tempGraph. This is then passed into an INSERT query inside graph.update which executes the SPARQL query to insert the contents of the TTL.
let tempGraph = IO.parseRDF(IO.uploadedFile(fileTTL).text)
graph.update(`INSERT { ?s ?p ?o } WHERE { GRAPH <${tempGraph}> { ?s ?p ?o }}`)
Finally, let us run the OWL2SHACL converter. This calls some SWP code. SWP stands for SPARQL Web Pages, and its use is slowly being replaced in EDG with ADS. You should consult with TopQuadrant if you are interested in SWP. The SWP runs the OWL2SHACL transformation on the current graph.
graph.swp('ontologyprojects:OWL2SHACLPage', {
    projectGraph: graph.namedNode(currentGraph),
    graphs: currentGraph,
    replace: false,
});
Your final web service should now look like this.
Creating an OWL2SHACL web service
Now, let us go to SWAGGER and test our web service. Use any OWL TTL file as your input file. When you run the web service, you upload the file, execute the web service, and then visit the OWL hierarchy panel to see the results of the import.
Creating a web service that converts a JSON string into a data asset
Now lets create a web service which will allow us to capture metadata about databases and store it in EDG using the data assets collection. The metadata will consist of descriptions of the tables and columns in a database, provided via a JSON object. The JSON object will look like below. In this simplified example, we consider the input string to represent a single database, and we are only interested in one table which can have 0-n columns. We wish to generate a Database instance in EDG, with a Table instance and Column instances, with the correct relationships, e.g. column1 columnOf table1, etc.
{
   "tableId": "table1",
   "columns" : [
      {"columnId": "column1"},
      {"columnId": "column2"}
   ]
}
To do this we must first create a service using the same approach as in the previous example, and we name the web service “Import JSON to generate Data Assets”. Create the web service as previously, except this time let our parameter be called “jsonString” and it will be a Datatype string. We can add a description if we wish, and also be sure to set “API status” to “experimental” and “can write” to “true”.
We must also do one more thing so that the web service is able to create instances of the EDG data assets collection, and that is to first include the “EDG schema - Data Assets” collection type in our ontology.
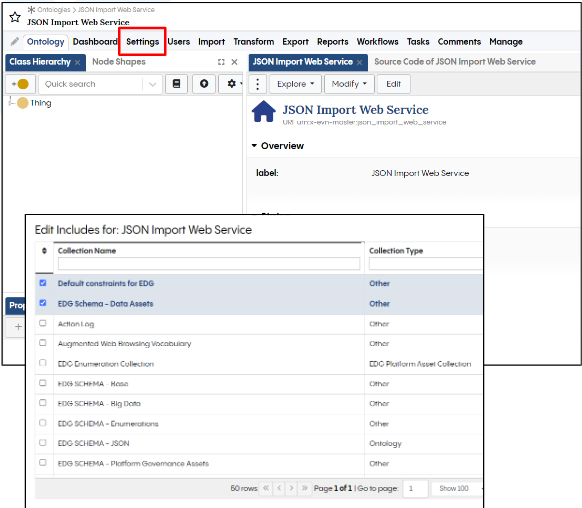
Including data assets collection
Next we must generate ADS APIs in EDG for manipulating Data Assets. This is done by going to the home page of your ontology. The home page is the first page that opens when you access your asset collection. You can also return to it at any time by clicking the icon on the top right which resembles a small outline of a house (a square with a triangle on top).
On the home page click on the drop down on the right of the form, and select “Script API”. Click edit and add “edg” prefix for both the “generate prefix constants” and the “generate prefix classes”.

Adding collection prefix constants and classes to generate APIs
Next you must create a Data Asset collection and include the Custom Web Services Ontology via the settings tab. From here select the “Script Editor” panel, and from the gear icon select “Allow scripts to make changes to the data” and finally click the refresh icon (two circled arrows).
Now things are set up for us to be able to create new instances of the Data Assets collection, let us begin working on the ADS code. This time we are also going to do a small bit of error handling, to deal with potentially incorrect inputs. We begin by creating an array to store our errors as they are encountered. Next we assign a namespace as that of the current asset collection, this will be used to generate URIs for our instances. We create a variable jsonParsed to store the parsed jsonString input. Another variable responseMessage which we use to return a response message indicating if the service ran correctly, or failed and any errors. The code checks to see we have a correctly formed input string. If it is incorrect, we add an error message.
let errors = []
//read the default namespace for the current asset collection
const namespace = tbs.defaultNamespace()

let jsonParsed
let responseMessage

//Check that a JSON string has been correctly passed
try {
   jsonParsed = JSON.parse(jsonString);
} catch (error) {
      errors.push({
            message: `Error parsing the input JSON`
      })
}
Next let us process the json and use it to update the current graph. If a well formed JSON string is not provided, we generate a response code “500” and we set the response message. This response message is what is returned by the web service. If well formed JSON is provided, we then look to process this.
To do this, we need to again make use of the ADS function graph.transaction, used in the previous example. This allows us to ensure that changes to our graph only are committed when it is executed, thus allowing us to also roll back if an error is discovered. The variable graph.dataGraphURI is passed as parameter to graph.transaction indicating the current data graph uri (it is assumed this web service will be run on an existing Data Asset collection). We next specify a message to be logged with the transition “Data Assets Added”. Finally we run a function processDB(jsonParsed). This function will process our JSON and also add errors to the errors array if they occur. After the function is run, if there are any errors, we roll back any changes and add the errors to our response message, and set the response code again to “500”. If there are no errors, the JSON is assumed to have been converted into instances in the target collection, and a success response message is created.
Finally, we return the response message.
if (jsonParsed) {
   graph.transaction(
      graph.dataGraphURI, "Data Assets Added", () =>
      {
            processDB(jsonParsed);

            if (errors.length > 0) {
               graph.changes.rollBack()
               IO.setResponseStatusCode(422);
                                   responseMessage = { "errors": errors };
            } else {
               responseMessage = {
                  success: true,
                  message: "The JSON string was processed."
               }

            }

      }

   )

} else {
   IO.setResponseStatusCode(500);
   responseMessage = { "errors": errors };
}
responseMessage
So, now let us write the function to handle the JSON. We first create a single database for our input file. You can of course re-write this to account for multiple databases, but as an illustrative example, here we hard code for the single database. The code creates an instance of Database using the edg.createDatabase function. Here we add a URI and
a rdfs:label. We also call a function “generateURI”, which is shown below, and combines the namespace with the encoded dbName. Finally we call the processTable function, this takes two parameters, the input json (called table) and the instance of database (called db).
/*
   processes the top level database elements
   for now they are not included so we take a fixed DB
*/
const processDB = (table) => {
   const db = edg.createDatabase({
      uri: generateURI("DB1"),
      rdfs_label: "DB1"
   })

   // process the tables
   processTable(table, db)

   return db
}

     const generateURI = (dbName) => {
 return namespace + encodeURIComponent(dbName)
}
The processTable function assumes there is only one table. Here we now have some metadata in our JSON to process, i.e. tableId. We assume here we are dealing with Tables in our database, and not Views, and would need some additional checks if that were not the case. We first check to make sure the tableId has been provided, and if not, we add an error to our errors array. We then create our edgTable instance. Here we make use of another function “appendToURI” to make use of the existing URI for db, and append our new id to it. Finally, we run through the array of columns in the JSON, and for each column we call our last function “processColumns”.
/** process the table and it's columns */
const processTable = (table, db) => {

   const { tableId } = table

   if(!tableId){
      errors.push({
            message: `Error creating table Asset`
      })
   }

   const edgTable = edg.createDatabaseTable({
      uri: appendToURI(db, tableId),
      rdfs_label: tableId,
      tableOf: db
   })

   // process columns
   table.columns.forEach(col => processColumns(col, edgTable))

   return edgTable
}

const appendToURI = (uri, valueToAppend) => {
 return uri.uri+"-"+encodeURIComponent(valueToAppend)
}
The processColumns function takes two parameters, each column in the array and the Table they belong to. It extracts the Id and generates a column instance with an id as rdfs:label and a columnOf relationship, pointing back to table.
/** process the columns of a table */
const processColumns = (col, table) => {

   const { colId } = col

   if(colId==undefined){
      errors.push({
            message: `Error creating Column Asset: ${JSON.stringify(col)}`
      })
   }

   return edg.createDatabaseColumn({
      uri: appendToURI(table, colId),
      rdfs_label: colId,
      columnOf: table
   })
}
And that is it! Remember to add the functions before they are executed, so processDB function must be declared before it is called. Now let’s test our service using SWAGGER.
To test the code, go back to your Data Asset collection. Go to SWAGGER, and select the new web service from the list. Click “try it out” and enter the sample JSON message above into the jsonString filed. You should get the below message.
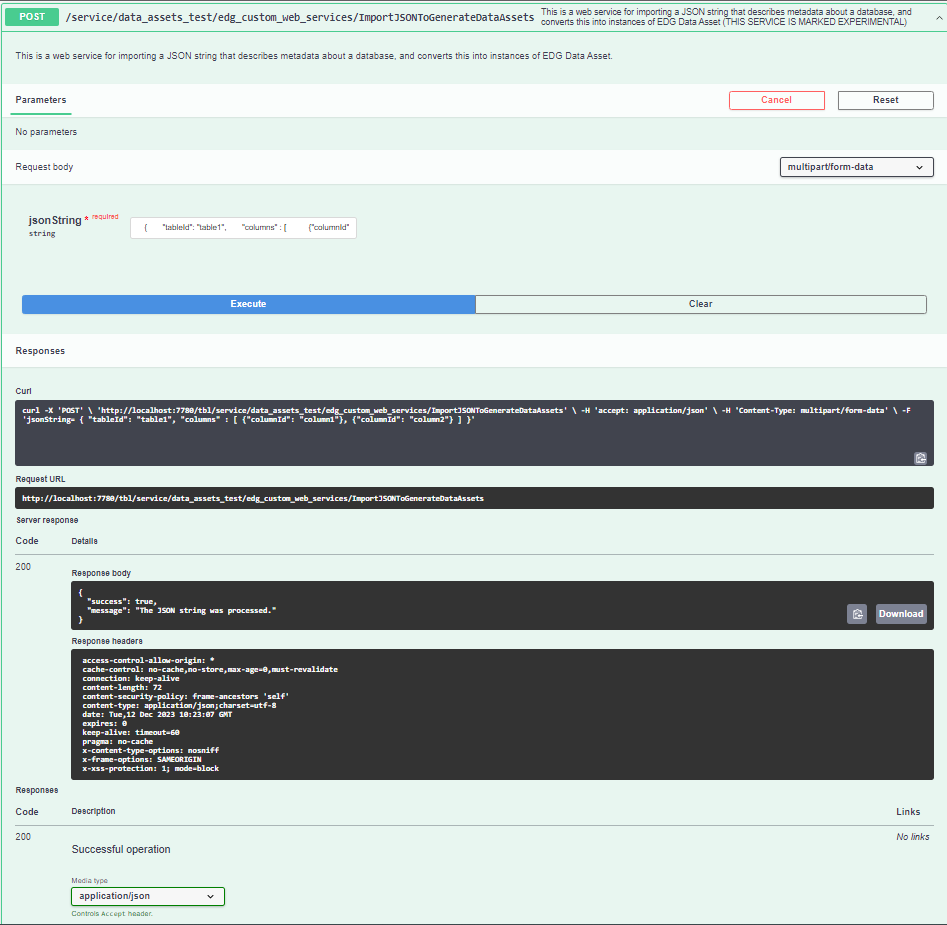
After a successful import of your JSON
You can then check the instances in the EDG UI.
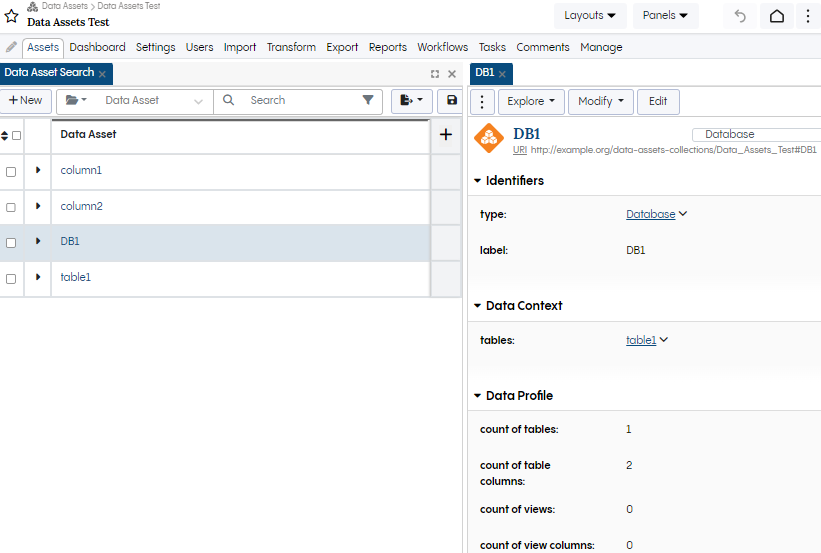
Viewing your imported data assets in a Data asset collection