Understanding and Using Workflows
Workflows
To help teams maintain asset collections, EDG workflows provide special views and functions that coordinate multiple users in defined change-management processes.
Users can start workflows for an entire asset collection or for a specific asset in a collection. Multiple workflows can be active at the same time. Changes made in each workflow are isolated from other workflows and are not part of the asset collection until authorized users review, approve, and commit the workflow’s changes back to the “production copies”. To isolate its changes, each workflow has a “working copy” of changes from the production state.
Note
From version 7.4 onwards, workflows may be used to edit not only the a single asset collection but also its included asset collections. In this case, the committed changes will be applied to multiple asset collections at once.
EDG is shipped with a pre-defined workflow template called the Basic Workflow. Additional workflow templates can be developed for your EDG installation. These templates can implement different process-flows with different scope of applicability. A template determines what users can perform various actions in a workflow:
A template can specify what governance roles should have editor and manager privileges for the associated workflow
A template always specifies who can transition a workflow from one state to another. Authorizations for the workflow transition actions can be defined for permission levels (viewer/editor/manager) or for governance roles. For an example of such workflow transitions, see the main Workflow View tab for the Basic workflow.
If an asset collection you are working with has any workflow in progress you can access them by clicking on Workflows tab for the collection.
Any changes you will make will stay in the workflow associated with this workflow and will not be visible outside it. The tabs (import, reports,…) for a workflow operate the same as for the production copy but in the scope of the workflow only. Until it is committed to production, changes remain here only.
Starting a Workflow
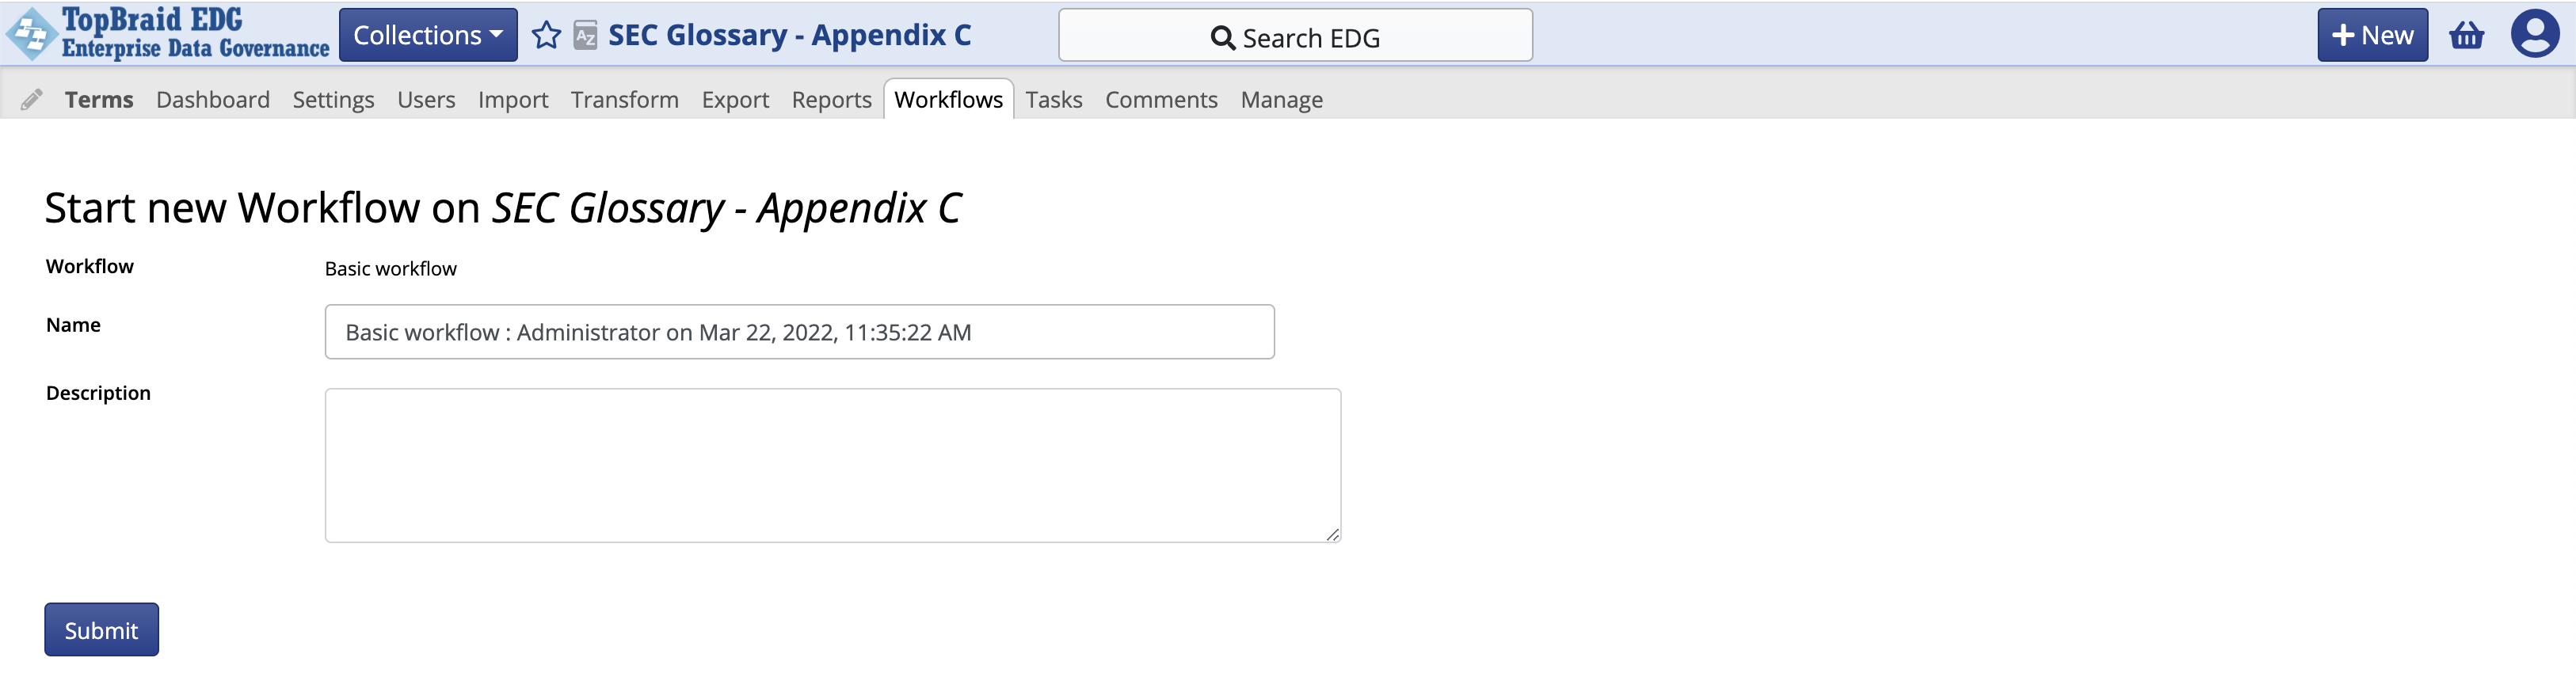
There are two places in EDG where you can start a workflow by selecting Start Workflow:
When viewing a specific asset in the Editor, user can select Start Workflow from the asset menu.
Start Workflow button is also available on the Workflows tab.
Workflow can be started for a specific asset or for an entire collection if you will be creating a new asset(s) or making changes to multiple assets.
TopBraid EDG Starting a New Workflow About Glossary
The start workflow dialog will let you select a workflow template (if more than one template is available) and provide a short description. TopBraid EDG will auto-generate a unique name for a workflow. If desired, you can override the generated name.
If an asset collection includes other asset collections, and you have sufficient permissions to edit those, then the Start Workflow page will show check boxes where you can elect to also allow edits to certain included collections. In the example below, the Currencies Codes asset collection includes the Country Codes collection, and the workflow could be used to edit either currencies or countries.
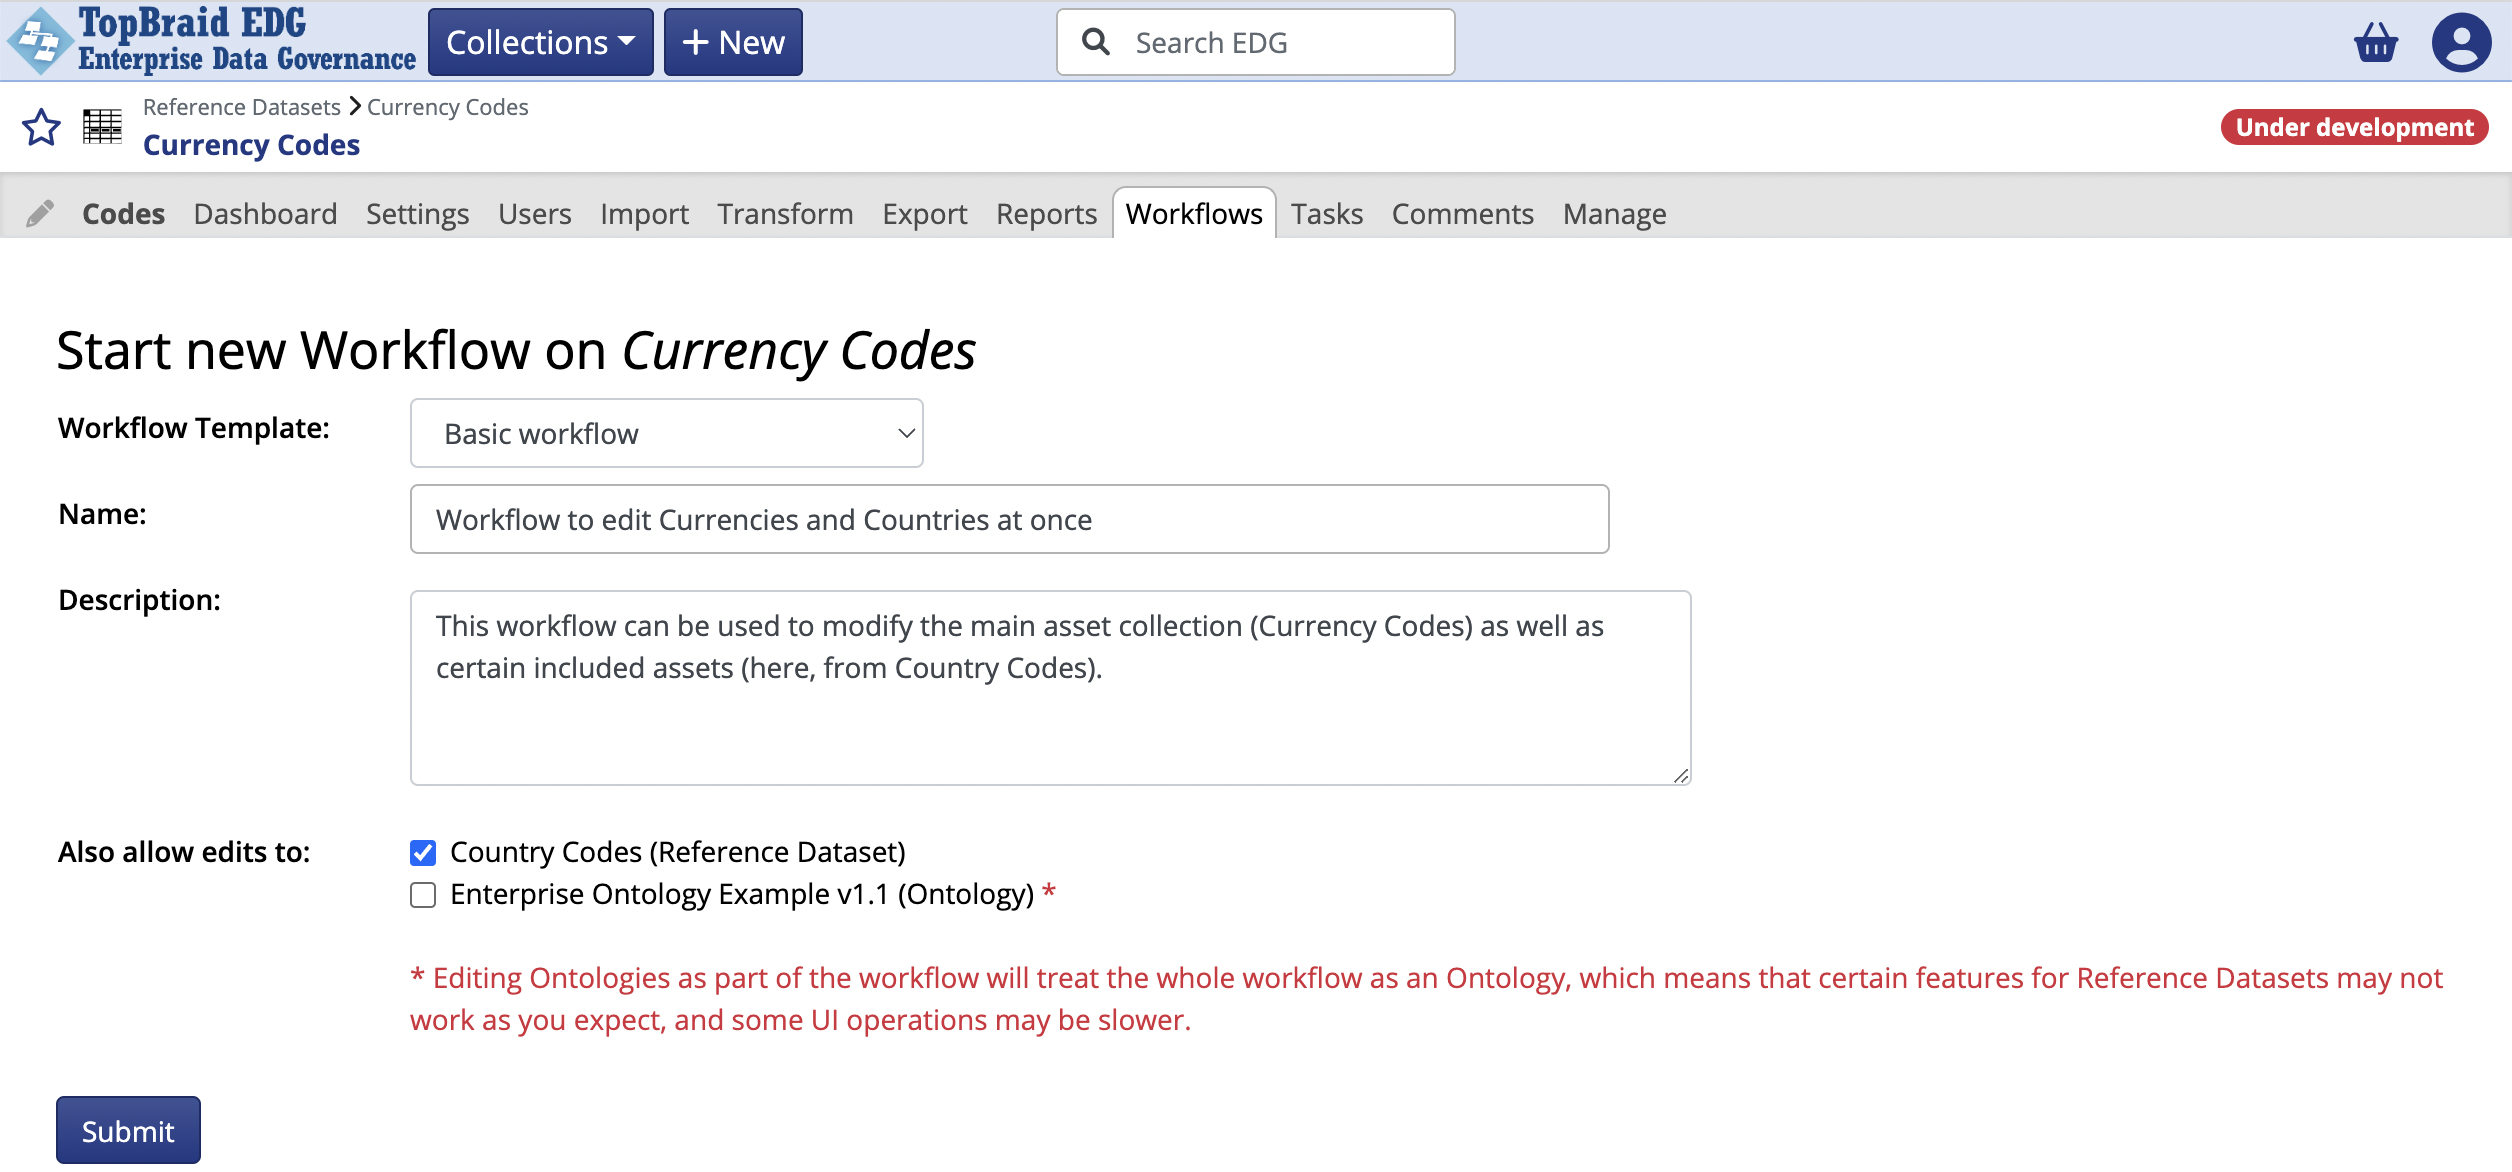
TopBraid EDG Starting a New Workflow that Also Allows Edits to Included Asset Collections
Working in a context of a Workflow
You will always know when you are working in a context of a workflow because the horizontal menu bar on top of asset collection pages will change its color from grey to light yellow.
In a context of a workflow you will see the same tabs as in the context of the asset collection it is performing updates to, although some tabs will be greyed out. For example, you can not start a workflow within a workflow which is why the Workflows tab is not available.
To make edits, use the same features as those normally available to you for an asset collection.
You will also see a new tab called Workflow – shown in the screenshot below. This tab lets you see information about the current state of workflow and lets authorized users move it to the next state.
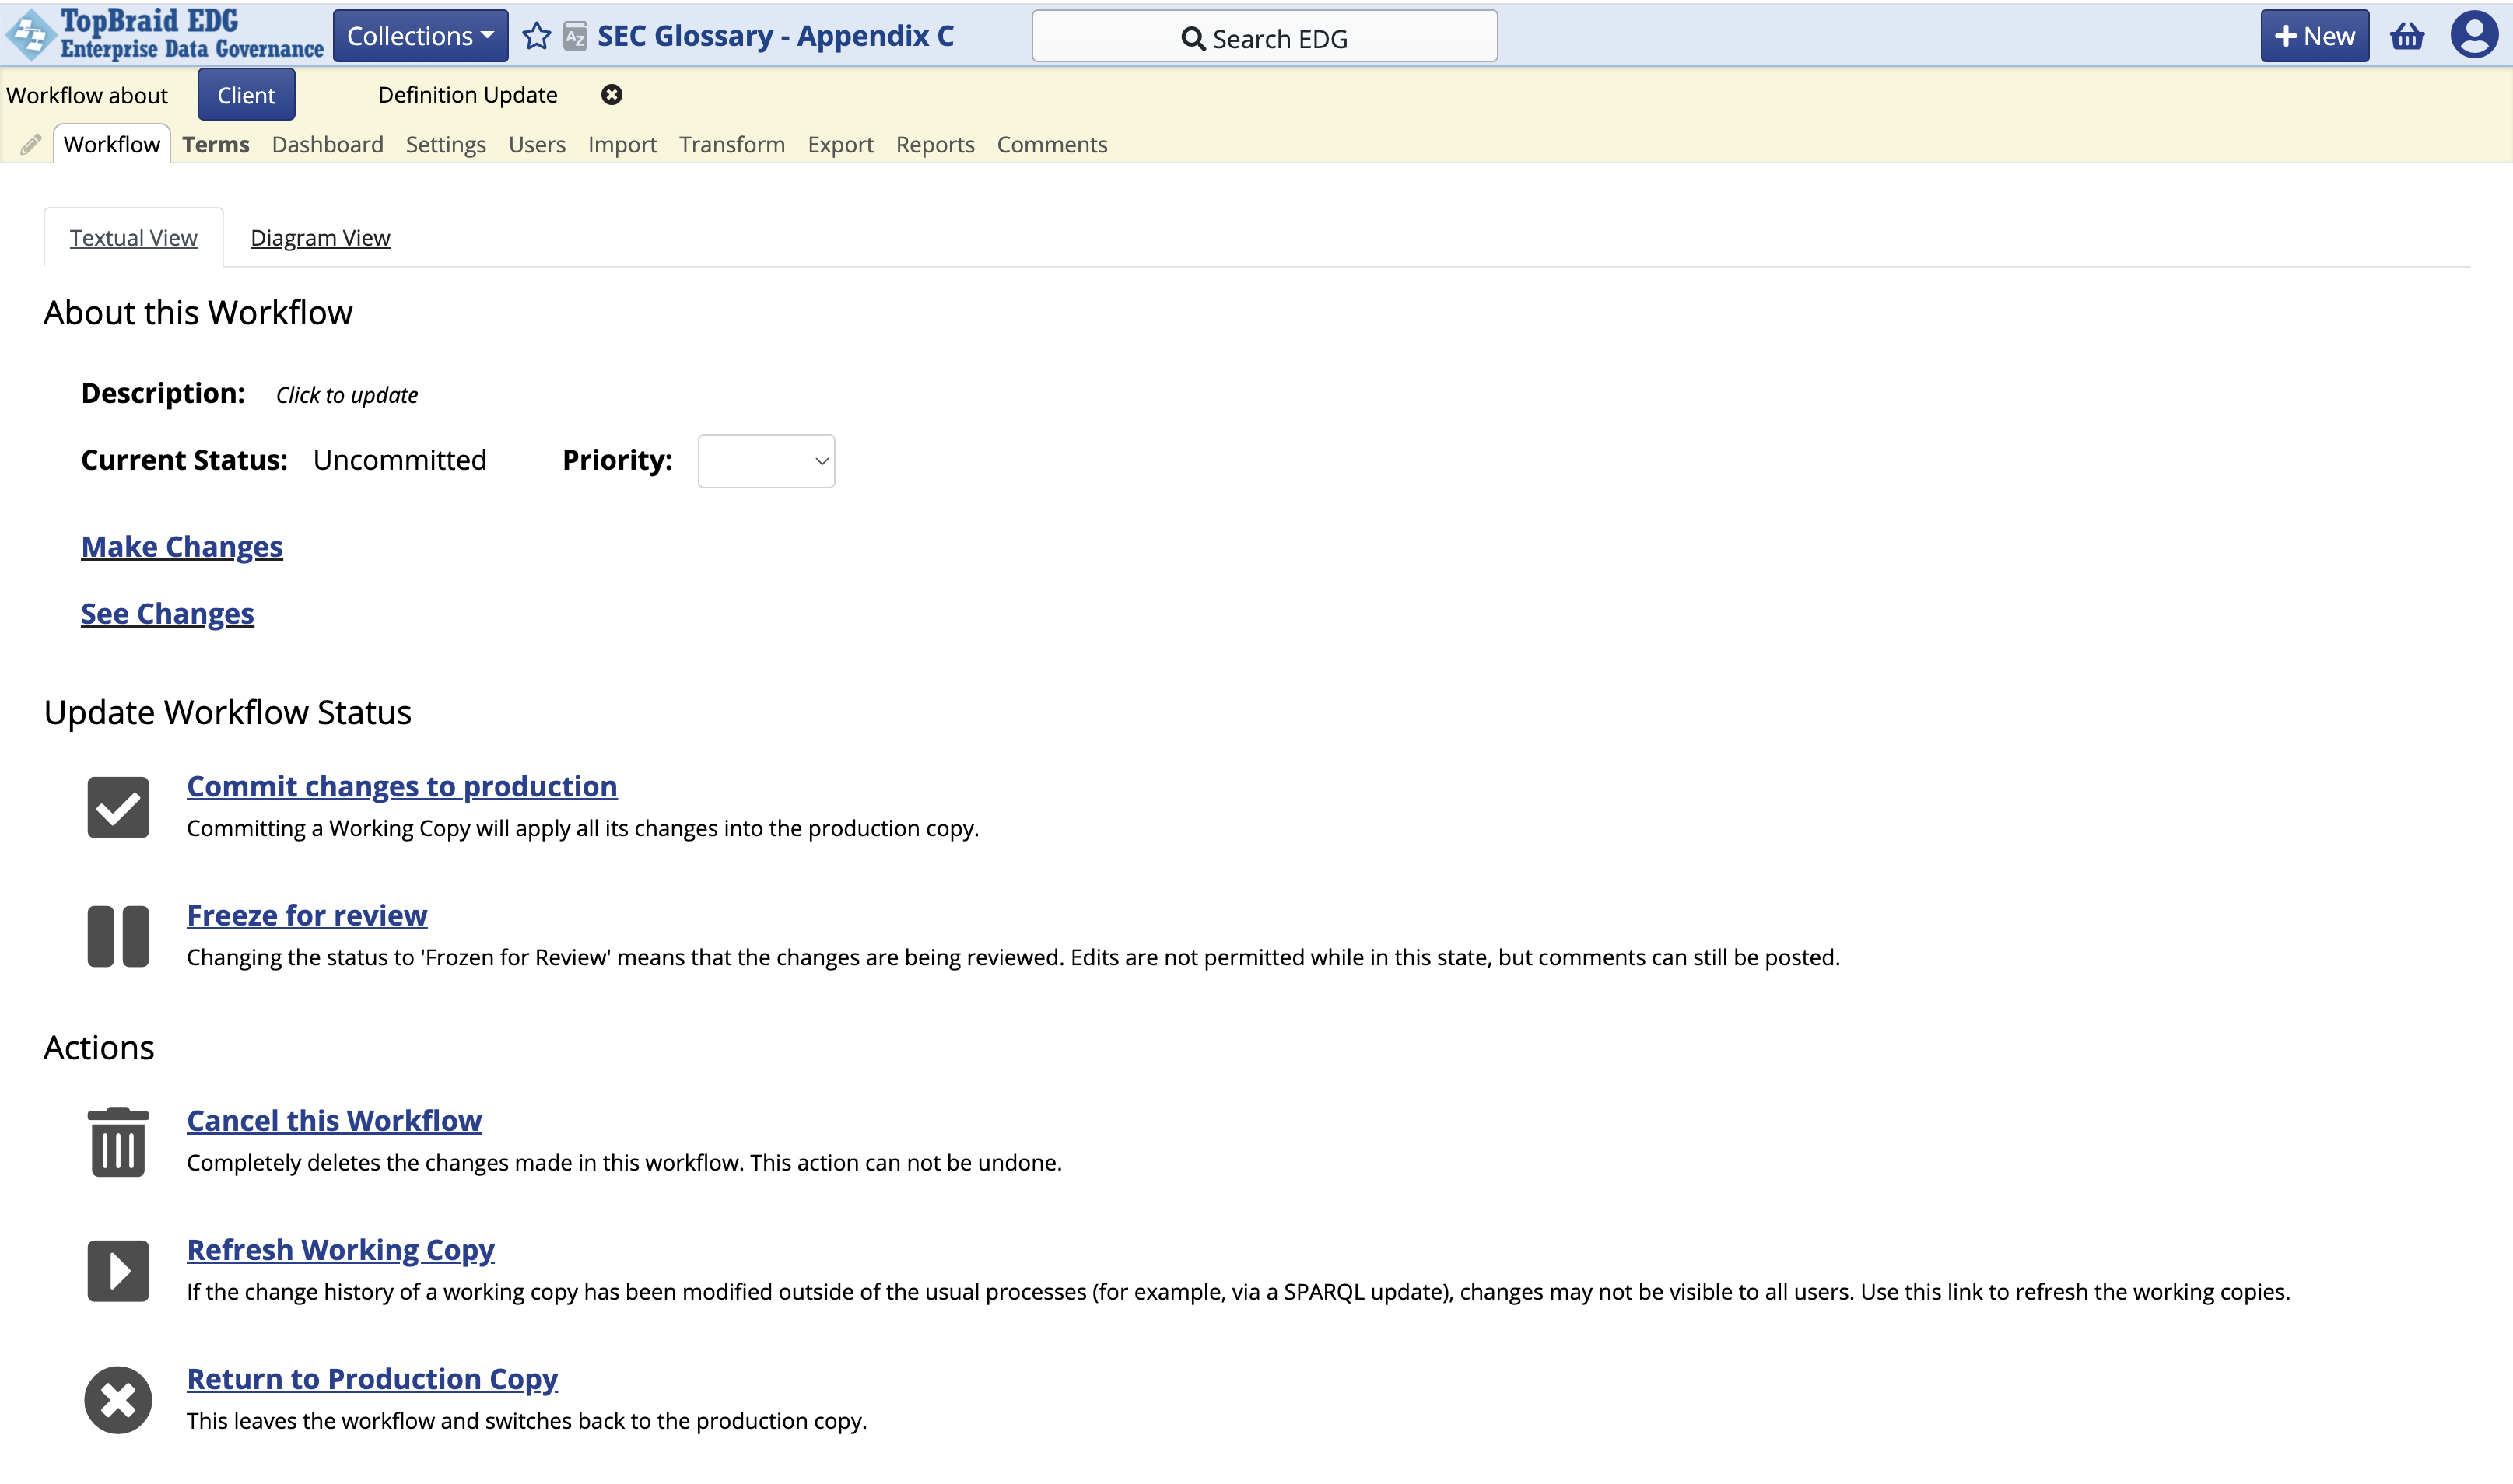
A Workflow’s status tab
When you click on the Diagram View link, the page switches to a view that visually depicts the workflow state and transitions. For example, if we, after making changes, click on the Freeze for review link and then switch to the Diagram View, the diagram will look as follows:
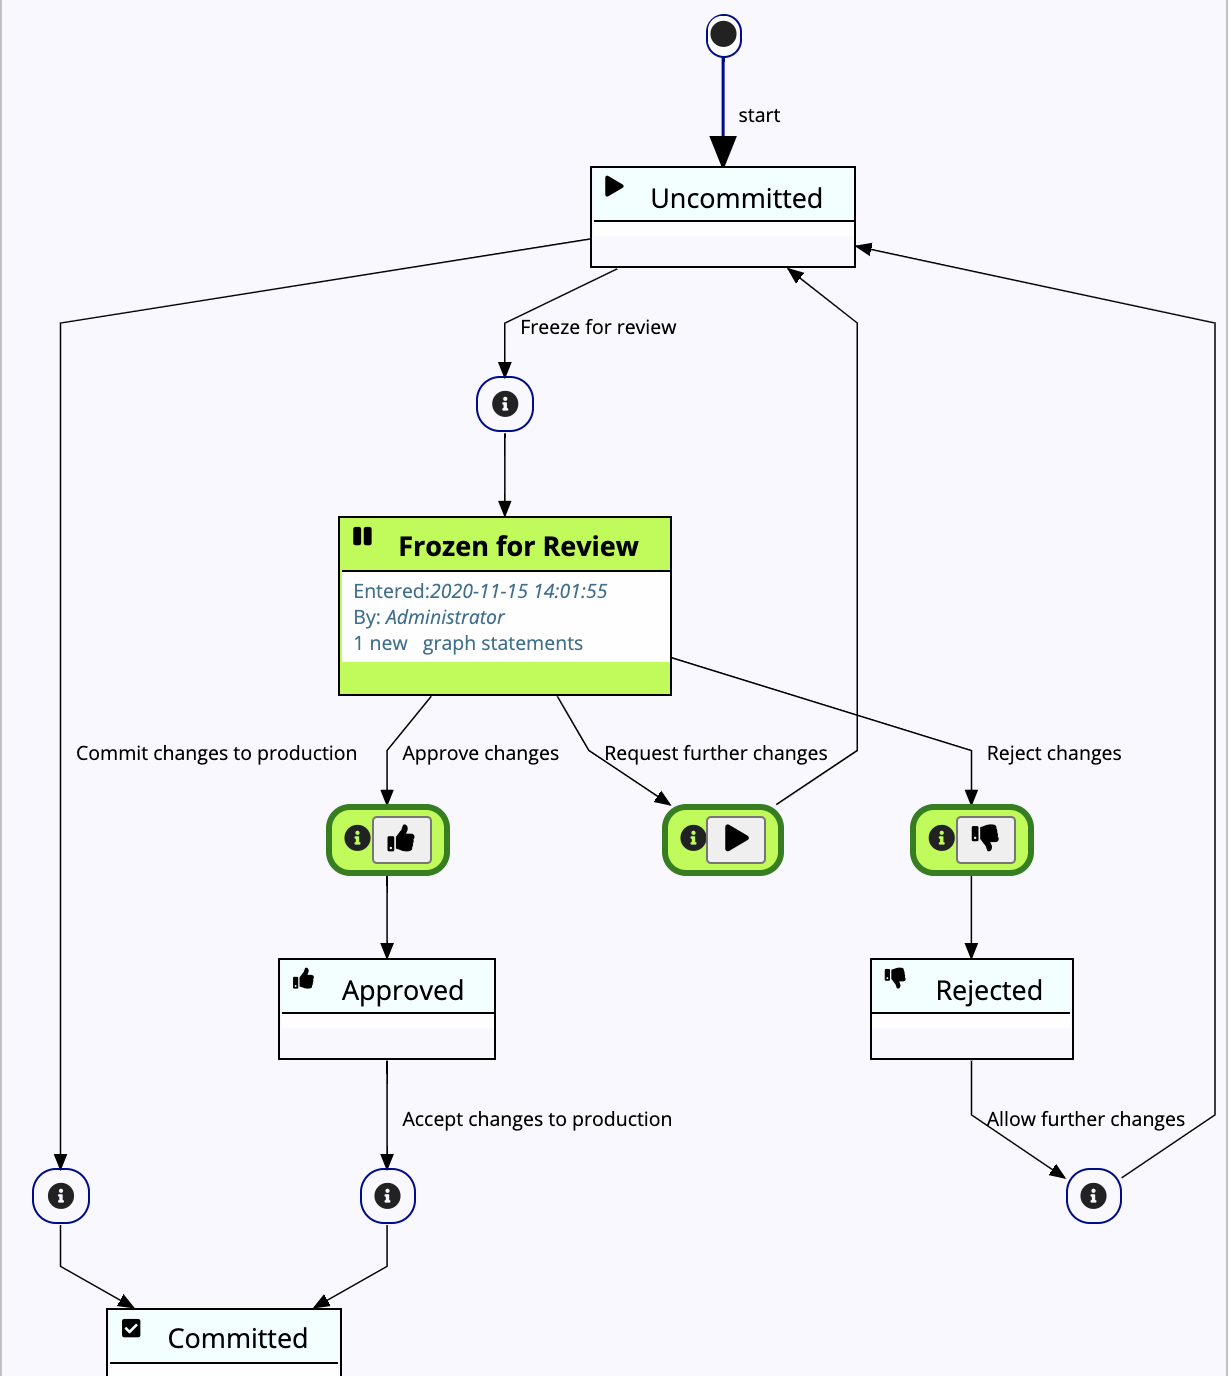
TopBraid EDG EDG Diagram View Example
The state that a workflow is currently in is shown in the diagram as a green colored box. If you could move a workflow into a next state, the diagram will depict transition actions as green clickable buttons. On the diagram above, you see three possible actions – to approve, to reject and to request further changes by reverting the workflow back to the Uncommitted state.
Workflows that Edit Multiple Asset Collections
When you have created a workflow with Also Allow Edits to some other, included asset collection, most of the user experience is identical to normal workflows. However, there are important differences in where the changes will be applied to when the workflow gets committed. By default, when add new statements to an asset (e.g. on the Form Panel) the new statements will be committed into the “home asset collection” of that asset. This is defined to be the collection where the type statement of the asset resides.
At any point in time, you can consult the Workflow Preview panel to check which statement will go into which asset collection:
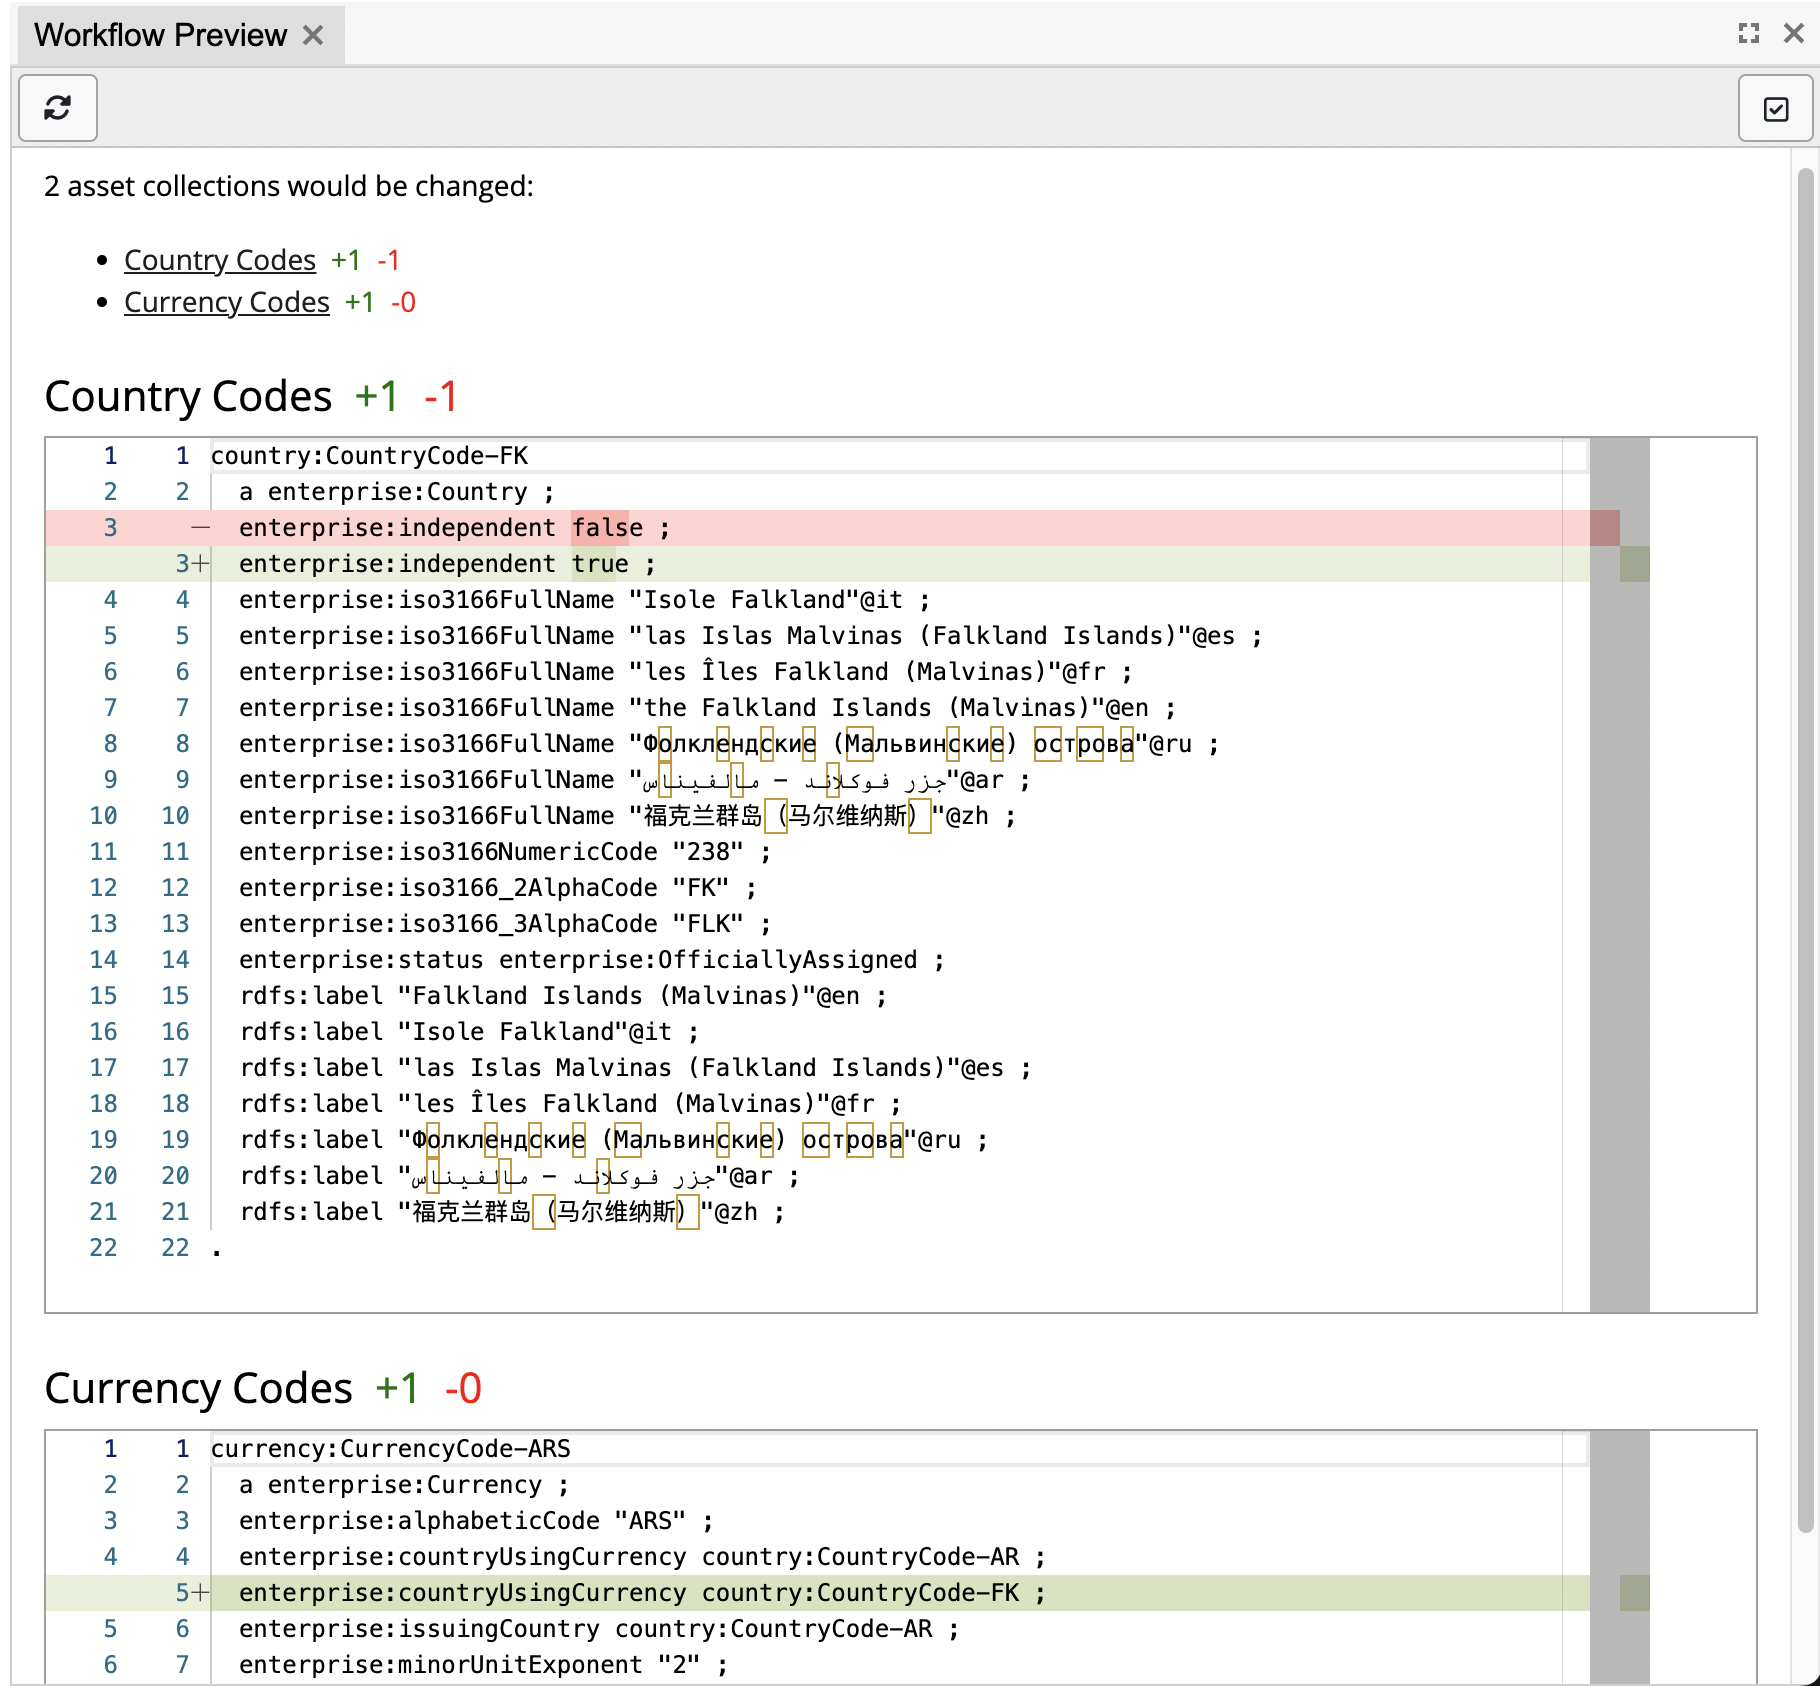
The Workflow Preview panel can be used to check which changes will be applied to each asset collection on commit
When you are creating a new asset, and the asset may potentially be placed in multiple asset collections, the Create dialogs will show an additional selection box allowing you to pick the target asset collection. For such assets, the header section of the form will show a drop down box that will allow you to “move” an asset from one target collection to another.
Note
Technically, this information is captured as triples using the property teamwork:definedIn which is visible on the Source Code panel.
These triples will be discarded once the workflow has been committed.
During the life time of a workflow you may modify those triples, for example to perform batch move operations.
To determine the target asset collection, the system will also look at the namespace of an asset’s identifier (URI) to determine its placement. If an asset is from the same namespace as the default namespace as one of the asset collections, then it will be placed in that collection.
It is possible to select the target asset collection for individual statements, using the twisties next to each row on the form:

Setting the target asset collection of individual statements
Rights Entailed by Permission Profiles
Whoever starts a workflow becomes the manager of its workflow, even if that user only had viewer privileges of the asset collection itself. Such user can then make changes in the context of a workflow but cannot commit them to Production because only users with editor privileges for an asset collection can make changes to them.
The same permission profiles of manager, editor and viewer are applicable to production copies and workflows, but the rights they entail are slightly different – as described below:
For an asset collection (production copy)
A viewer of an asset collection can:
view and browse it,
view a history of its changes,
display various reports,
export it in a variety of formats,
enter its usage information,
create tasks, change the status of a task assigned to them and comment on tasks, and
create a workflow copy of it to make changes, which will not be applied back to the production one until the changes are reviewed and committed by an editor or manager of that production asset collection.
An editor has all viewer permissions and can also make changes.
A manager has all editor permissions and can also:
perform operations on the Manage tab (for details, see the Manage View section in the $ModelTypes Utilities),
assign permission profiles and governance roles to others,
save searches and hierarchy views as “default” for a collection.
For a workflow
A viewer of a workflow can:
view and browse it,
view reports of changes contained in it,
view reports of what other workflows will be affected by changes made as part of this particular workflow,
run a report comparing a workflow to the production asset collection,
export data to a variety of formats.
An editor has all viewer permissions and can also make changes.
A manager has all editor permissions and can also:
control permission privileges to a workflow (i.e., grant viewer/editor/manager roles to users) and
if a workflow is based on the Basic template, WF managers can freeze/unfreeze it to prevent/allow changes, e.g., for reviewing, and they can change the status to Approved or Rejected. This is defined in the Basic Workflow template.
Workflow Transitions and Governance Roles
In the Basic Workflow, the state-action transitions (e.g., freezing/resuming, accepting/rejecting, etc.) are defined
in terms of the permission profiles: viewer, editor, and manager.
Workflow templates also allow workflow transitions to be defined in terms of governance roles
(e.g., data steward, subject matter expert, etc.).
Depending on the workflow design, state transitions can also happen automatically e.g., on a timer or as a result of some other event.
Workflow Scope
When you start a workflow, you may be able to select a workflow type from a dropdown if multiple workflow templates
are installed in your EDG system.
Only workflow types applicable to the workflow context will be available for selection.
Otherwise, Basic Workflow is automatically selected.
Workflow templates in EDG can be scoped to be applicable only to a given type of collection or to a given asset type or to a given governance area. This lets users develop different workflows for change management. For example, Review and Approval process for Glossaries can be different from Data Assets.
If no scope is set for a workflow template, it is applicable EDG-wise. The Basic Template has no scope which is why it can be used in all contexts.
Workflow Status and Transition Tab
This is the first tab in the horizontal navigation menu. It has a gear icon and contains a name of the workflow and its description. If you have manager privileges you will be able to edit either one by clicking on the text, editing, and confirming by clicking on the edit-box’s check-mark.
The page shows shows the current state of the workflow and a diagram depicting its state transitions. This page also lets a user transition the workflow to the next state. Depending on the current state and the role you play in the workflow process, you may see action buttons for moving the workflow to the next state.
Email notifications can be enabled for all workflow transition states by setting the Server Configuration parameter, see EDG Administration and Configuration.
The Basic Workflow
The standard EDG workflow template includes the Basic workflow, which supports optional review cycles and staging before committing changes to production.
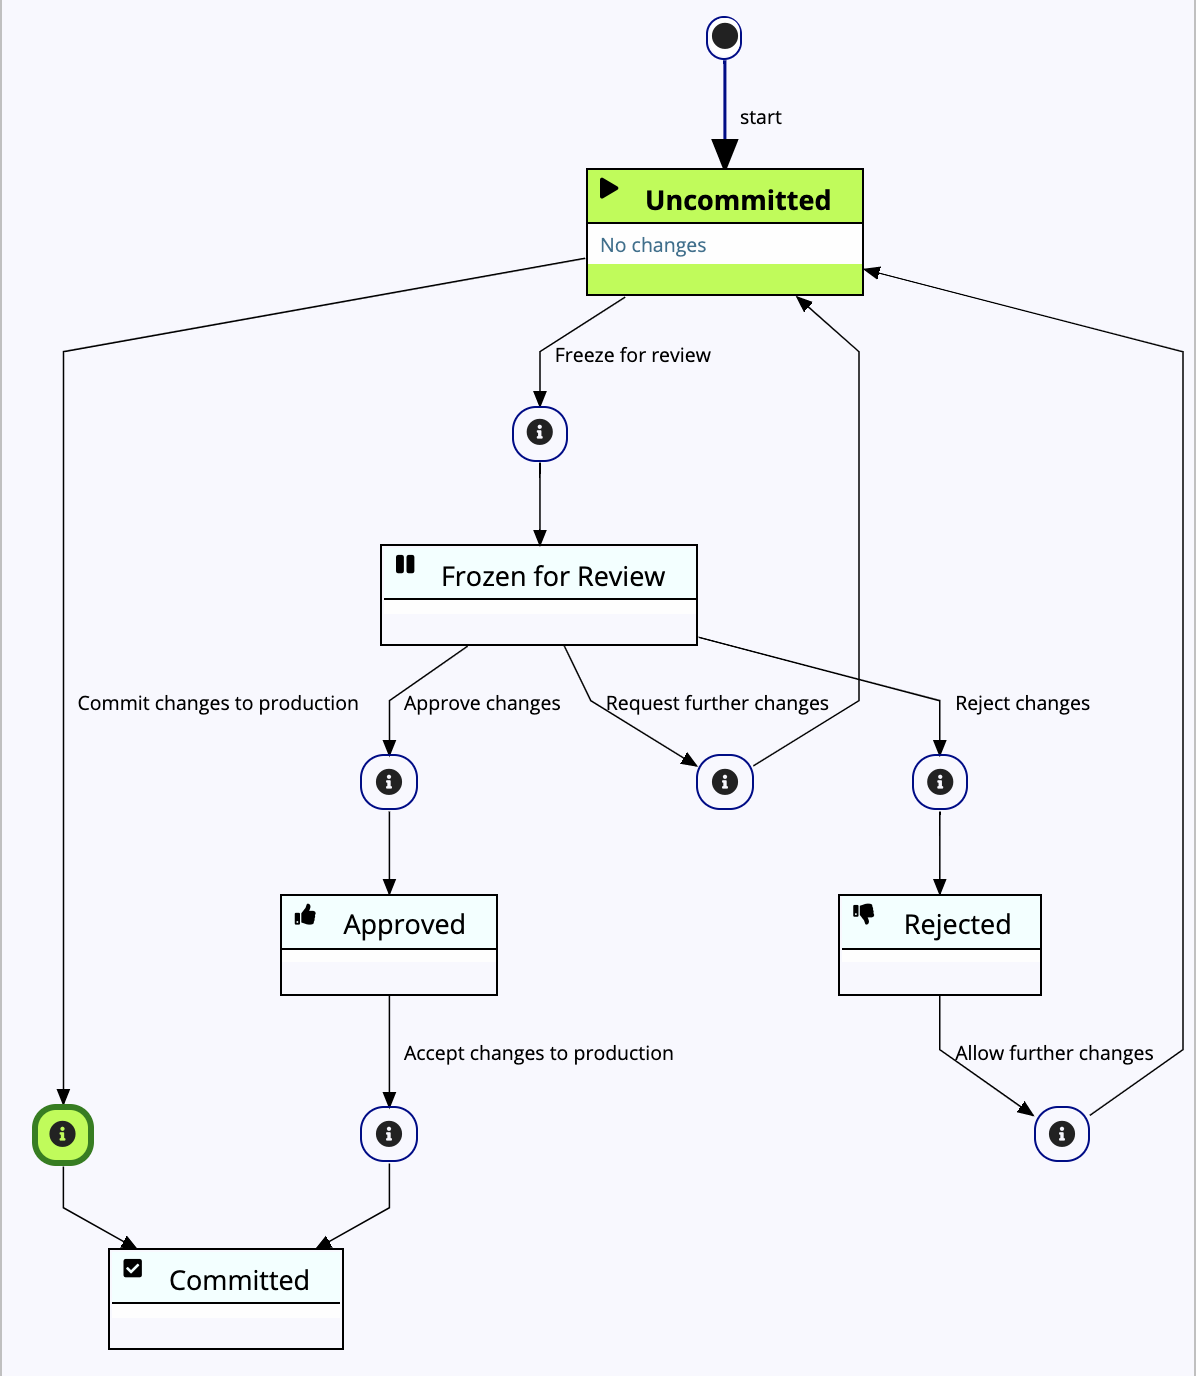
TopBraid EDG Basic Workflow
The Basic workflow’s states and actions (transitions)
Basic WF Status |
Action |
Role(s): Graph(s) * |
Description |
Resulting Status |
|---|---|---|---|---|
Cancel this workflow |
Manager: either |
Irrevocably deletes the entire WF |
N/A |
|
Uncommitted (editable) |
Commit changes to production |
Editor: Production |
Applies all WF changes into production |
Complete |
Freeze for review |
Manager: WF |
Pauses WF editability |
Frozen for Review |
|
Frozen for Review |
Request further changes |
Editor: WF |
Resumes WF editability |
Uncommitted |
Reject changes |
Editor: WF |
Blocks applying any WF changes into production |
Rejected |
|
Approve changes |
Editor: Production |
Ends WF editability (staged for production) |
Approved |
|
Rejected |
Allow further changes |
Editor: Prod. & Manager : WF |
Resumes WF editability |
Uncommitted |
Approved |
Accept changes to production |
Editor: Production |
Applies all WF changes into production |
Complete |
Complete |
Complete |
|||
|
||||
Workflow Templates
The stages that a workflow goes through, and the transitions between them, are defined by in a so-called workflow template. Workflow templates are selected whenever a new workflow is started, and remain with that workflow for the rest of its life cycle.
The Workflow Templates page, available from the User menu in the top right corner, shows the templates that define the available workflow types, e.g., the Basic Workflow. Users with administration permission can customize these workflow types.
The workflow templates are defined in TopBraid in a dedicated RDF graph.
To access the workflow templates graph from SPARQL or ADS scripts, use the function teamwork:workflowsGraph().
Warning
Editing workflow templates is a low-level operation that should be handled with care. It is technically possible to modify workflow templates that are already in use and, as a result of this, an existing workflow may be in a state that gets disconnected from the other states in the template, or its whole workflow template may get deleted. We therefore strongly recommend that the development and editing of workflow templates is performed by expert users only, and tested in a sandbox environment (such as a TopBraid EDG Studio) before deployment to a production server. Alternatively, consider having TopQuadrant services develop custom workflows for you.
EDG comes with a default workflow called Basic workflow.
Hint
If you delete the basic workflow by accident you can bring it back via Install Default Workflow Templates.
The editing of workflow templates is currently best performed through source code editing. You may elect to use TopBraid EDG Studio but any other 3rd party source code editor is also suitable. For administrators, the basic mechanism is:
Go to the Workflow Templates on the production server
Click Download as Turtle File to a local file
Edit this file using an editor of your choice
In a test environment such as TopBraid EDG Studio, use Upload Turtle File to replace the current definitions and try them out
If any syntactic or semantic errors are detected, the Upload feature present a report of all the errors found in the file. These errors must be addressed in order for the file to be successfully uploaded.
Carefully test the workflows in your test environment.
When satisfied, use Upload Turtle File to replace the definitions on the production server.
Defining a Workflow Template
Workflow templates must be instances of one of the following classes:
teamwork:TagWorkflowTemplatefor general asset workflowsteamwork:ExistingResourceTagWorkflowTemplatefor workflows that are specific to an existing asset)teamwork:NewResourceTagWorkflowTemplatefor workflows that create a new asset
Each workflow template defines a start status (e.g. Uncommitted) and a set of transitions that specify which steps are possible and by whom, until the workflow is ended (e.g. by committing). The properties are typically used at workflow templates:
rdfs:label: a human-readable label that is used to name the workflow template in the user interfaceteamwork:initialStatus: specifies the initial status of a Workflow. Example values includeteamwork:Uncommittedorteamwork:New.teamwork:defaultTagWorkflowTemplateForProjectType: enumerates the asset collection types for which the workflow template is the default. Asset collection types that don’t have any default workflow template fall back to the system-wide default workflow template. For example, useedg:GlossaryProjectTypeas a value to make the workflow template the default for EDG Glossaries.teamwork:suitableWorkflowForProjectType: enumerates the asset collection types for which the workflow template is suitable for use. If left empty, it applies to all types. For example, useedg:GlossaryProjectTypeas the value to make the workflow template only applicable to EDG Glossaries.teamwork:suitableWorkflowForSubjectArea: the subject areas that asset collection must have so that the workflow template is suitable for them. If left empty, then it applies to all subject areas. Details about defining subject areas can be found at EDG Governance Model: Governance Areas.teamwork:editorWorkflowParticipantProperty: lists the workflow participant properties (e.g.edg:responsible) whose users are automatically granted editing permission. By default, workflow participants only get viewer permission.teamwork:managerWorkflowParticipantProperty: lists the workflow participant properties (e.g.edg:responsible) whose users are automatically granted manager permission. By default, workflow participants only get viewer permission.teamwork:tagShape: (advanced feature) SHACL shapes that the workflow needs to conform to before it can be committed. See Using SHACL Shapes to control Workflow Transitions.
An additional property for templates that have the type teamwork:ExistingResourceTagWorkflowTemplate:
teamwork:editedResourceShape: the shape that edited resources need to have. Used to filter applicable workflows for a given resource. If multiple values are present then they are interpreted as a union, i.e. a candidate resource must conform to any one of them. An example of this isteamwork:editedResourceShape [ sh:class ex:Person ]to limit a workflow for instances ofex:Person.
Defining Workflow Statuses
All individual statuses of a workflow are represented by instances of the class teamwork:TagStatus.
Often you would simply reuse existing instances in your workflow templates.
Hint
Copy and paste from existing workflow templates to get started with your own templates.
Defining Workflow Template Transitions
A workflow is started in the status specified by teamwork:initialStatus in the template.
From there, the possible transitions are defined by the values of teamwork:transition.
These values must be URI or blank nodes of type teamwork:TagStatusTransition, and can have the following properties:
teamwork:fromStatus: the status that the workflow must be in for the transition to be applied.teamwork:toStatus: the status that the workflow will be in after the transition is applied.teamwork:transitionLabel: the display label of the transition, e.g. “Accept changes to production”.teamwork:blockOnValidationSeverity sh:Violation: prevent workflow transitions if there are SHACL validation errors.teamwork:requiredGovernanceRoleOnCreate:This ensures that only users with the specified role can view and start workflows with the template.teamwork:editableInWorkflowScript: Allows only form edits for the selected resource for exampleteamwork:editableInWorkflowScript "focusNode.instanceOf(skos.Concept)"sh:order: an optional number that is used to order the transitions in the Workflow tab. Transitions with smaller numbers show up higher, with 0 being the default.teamwork:requiredGovernanceRole: the minimum governance role (e.g. informed) that a user must have on an asset collection to perform the transition. For example, the required governance role can be an instance ofedg:JobRole, which means that any user who hasedg:assignedJobRole edg:JobRoleis allowed to execute the transition. The user will in this case see a corresponding button in the UI, and under My Workflows.teamwork:requiredProjectPermissionRole: the minimum permission role (e.g. editor) that a user must have on an asset collection (master graph) to perform the transition. These are the roles defined on the User Roles tab of an asset collection.teamwork:requiredTagPermissionRole: the minimum permission role (e.g. editor) that a user must have on a workflow to perform the transition. These are the roles defined on the User Roles tab of a workflow.teamwork:minVoteCount: the minimum number of votes required before the transition can be performed.teamwork:voteAutoTransitions: if true then the transition will be performed automatically, as soon as sufficient votes have been registered. This property can only be used ifteamwork:minVoteCountis present.teamwork:autoTransitionHours: the number of hours after which a workflow will automatically transition to another state. For example this can be used to give users a chance to comment without explicitly waiting on such feedback.
Sample Workflow Templates
Example workflow templates can be downloaded from this page.
There is also a detailed training guide for workflow templates, custom governance roles and event condition actions. All of this content is also in the page above but without detailed screenshots. The screenshots may not be exact representations of the version you are on but should still be helpful in showing the process. This is meant to supplement what you have learned in the above sections of this guide.
Download the guide for details:
* Teamworks-and-Workflow-Templates.pptx
Custom Governance Roles
Teamworks and Technical Underpinnings of workflows
Workflow Templates
Notifications
ECA Framework
Using SHACL Shapes to control Workflow Transitions
SHACL can be used to define constraints that must be satisfied before a workflow transition can be applied.
The SHACL constraints are validated using the union of the workflow and the TCH graph as data graph, and the workflows definitions graph as shapes graph.
The focus node is the teamwork:Tag instance.
The following example illustrates the use of teamwork:tagShape to specify that a workflow can only be committed if it contains exactly one new instance of edg:GlossaryTerm and no other subject.
If teamwork:tagShape statements are present for a workflow template, then the Commit button will force the user to first go through a dedicated page that checks whether the workflow conforms to the specified shapes.
If violations are detected, the user may still proceed, yet he or she has been warned about the consequences.
 1edg:SimpleGlossaryTermWorkflowTemplate
 2    rdf:type teamwork:NewResourceTagWorkflowTemplate ;
 3    teamwork:initialStatus teamwork:Uncommitted ;
 4    teamwork:tagShape glossary-term-workflow:TagHasExactlyOneGlossaryTermShape ;
 5    # ...
 6    .
 7
 8glossary-term-workflow:TagHasExactlyOneGlossaryTermShape
 9    rdf:type sh:NodeShape ;
10    sh:sparql [
11        sh:message "Working copy contains changes about {?other} while it should only be about {?newTerm}" ;
12        sh:prefixes <http://edg.topbraidlive.org/1.0/samples/workflows/glossary-term-workflow> ;
13        sh:select """
14            SELECT DISTINCT $this ?other ?newTerm
15            WHERE {
16                ?change teamwork:tag $this .
17                ?change a teamwork:Change .
18                ?change teamwork:added ?added .
19                ?added teamwork:subject ?newTerm .
20                ?added teamwork:predicate rdf:type .
21                ?added teamwork:object edg:GlossaryTerm .
22                ?otherChange teamwork:tag $this .
23                ?otherChange a teamwork:Change .
24                ?otherChange teamwork:added|teamwork:deleted ?aod .
25                ?aod teamwork:subject ?other .
26                FILTER (?other != ?newTerm) .
27            }""" ;
28    ] ;
29    sh:sparql [
30        sh:message "Working copy does not create a new instance of edg:GlossaryTerm." ;
31        sh:prefixes <http://edg.topbraidlive.org/1.0/samples/workflows/glossary-term-workflow> ;
32        sh:select """
33            SELECT $this
34            WHERE {
35                FILTER NOT EXISTS {
36                    ?change teamwork:tag $this .
37                    ?change a teamwork:Change .
38                    ?change teamwork:added ?added .
39                    ?added teamwork:subject ?gt .
40                    ?added teamwork:predicate rdf:type .
41                    ?added teamwork:object edg:GlossaryTerm .
42                }
43            }""" ;
44    ] .
State Entry Actions
Each workflow status may have a teamwork:stateEntryAction pointing at a script that shall be executed whenever the status is reached.
This can be used to implement side effects, such as sending a notification to 3rd party systems when a certain state has been entered.
Although earlier examples may use SWP for this, we recommend using JavaScript/ADS to implement the business logic of those state entry actions. See Scripting with JavaScript and ADS if you are not yet familiar with ADS.
To get started, create an instance of teamwork:WorkflowActionScript and add a triple from a workflow status to the script using teamwork:stateEntryAction.
The script that is the value of dash:js will be executed against the master graph (with imports) and can access the following JavaScript variables:
newStatus(NamedNode): theteamwork:TagStatusthat was just enteredoldStatus(NamedNode): the previousteamwork:TagStatustag(NamedNode): theteamwork:Taginstance representing the workflow
Instances of this class should be declared in the workflow templates graph.
During development, you may want to use the Script Editor panel (with the master graph as active graph) to try your code and later assign it to dash:js.
Simulate the values of the variables above through let statements which you place before your actual code.
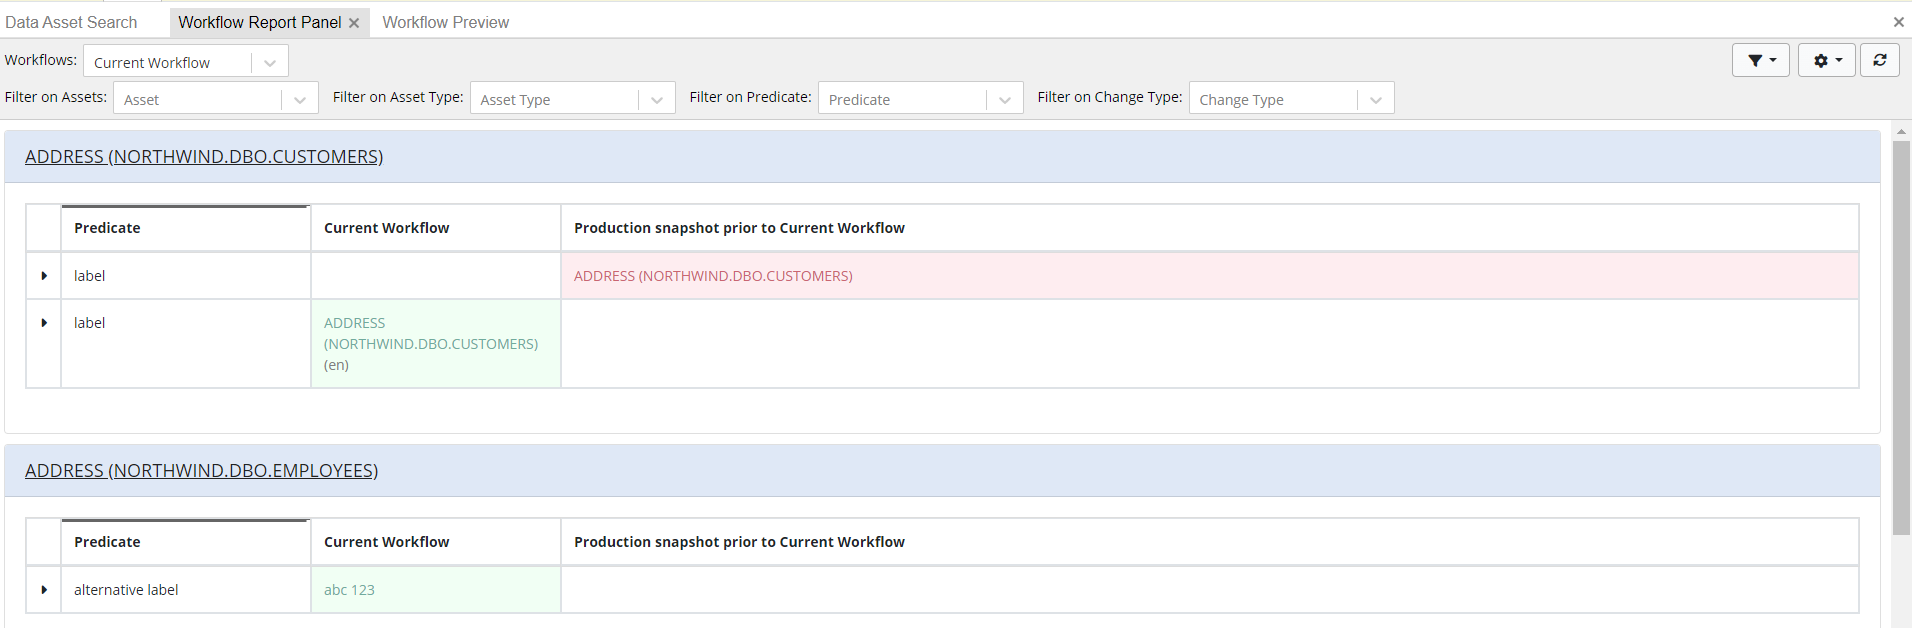
Workflow Report
The workflow report panel allows the users to see the before and after state changes for every selected workflow.
The panel will report all information found within the change history graph for a selected workflow, will calculate what was the change, and will be displayed in a user-friendly table.
Whenever the workflow is still in progress and changes are introduced, the panel would update automatically to show the latest changes. Upon loading of the workflow report panel, the user can filter out this data through different filters. By default, the below filters are available, but workflow report panel offers great extensibility for other filters to be included.
Filter on Predicate
Filter on Assets
Filter on Asset Type
Filter on Change Type
All data retrieved is held within the browser’s local cache, this would enable faster loading of data whenever a workflow is committed. There might be some edge cases where the cache data needs to be refreshed. For this purpose, a refresh cache mechanism has been put in place.
You may find 2 options on how you can refresh the cache:
Option one: Access each and every workflow within the workflow report panel and clicking the refresh button, automatically this would retrieve the data again and saves it back within the cache of the browser.

TopBraid EDG Workflow report refresh cache
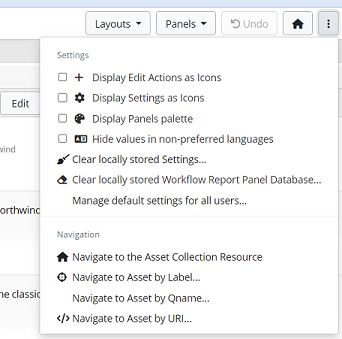
Option two: Click the overall settings menu and clicking ‘Clear locally stored Workflow Report Panel Database’. This option would delete all data found in the browser’s cache related to the workflow report.
TopBraid EDG Workflow report clear all workflow report data
Note
When retrieving data for panel population, it may take some time depending on the amount of data there is to be retrieved.
TopBraid EDG Workflow report panel
Workflows Page (tab) in an Asset Collection
The workflows tab allows users to start workflows for a particular asset collection, and it lists both the active and completed workflows, if any in this collection.
Start new Workflow button
This button opens a form for starting a workflow for this collection. If multiple workflow templates (types) are available, select the appropriate one. The new workflow requires a name and allows you to enter an optional description, both of which remain editable by managers.
Users can also create a workflow pertaining to a selected asset (see View or Edit > Actions > Additional asset actions). Such workflows record the identity of the selected asset but are otherwise ordinary.
If you are responsible for transitioning a workflow to the next state, you will also see it listed in the My Workflows page that you can access directly from the User menu in the top right corner of every page.
Workflows in Progress
This section lists any active (uncommitted) workflows of the collection. To access a particular workflow, select its row and click Go to Workflow. You will see a page showing you the status of the workflow and, depending on the workflow’s status and your role, allowing you to move the workflow to the next state.
Also depending on workflow’s status and your role, you can view or edit the workflow and view or execute various utility actions on it. A workflow can be used to process changes to multiple assets or changes to one specific asset. Each workflow isolates its changes to its own workflow copy, which does not affect other workflows or the production version, until and unless the workflow is committed back into production.
If the workflow was created for a specific asset, its name will appear in the row. Selecting the row and clicking Go to Asset will open the asset’s details view, which workflow editors can also modify.
Completed Workflows
This table works similarly to Workflows in Progress except that it lists the workflows that reached the terminal state. Typically, this means that changes have been finalized and committed to the asset collection. Users can view the history of workflow transitions. Each completed workflow shows its number of changed statements (triples), giving users information about the volume of changes made as part of the workflow.
For completed workflows with extensive changes, preserving such history of changed triples might occupy considerable space. Therefore, asset collection managers can select a completed workflow and use the Archive action to remove the audit trail from the change history. The change records are copied into a file in a new project that an administrator can access if the change history details are ever needed again. The only information retained in the audit trail is the transition history of the workflow itself, without any detail of the data changes.
To browse archived files, use the Base URI Management page in the Server Administration area. The files will be located in a project (or folder) called “Archive”. If these are no longer needed you can move them off the server.
Archive Workflows on Commit
If true, then workflows will be archived automatically when a workflow is committed.
Note
The archive will always contain the full history, regardless of the Record Triple Counts only setting.
Changes made in the archived workflows will not show up in the Change History after commit. Archived workflows will continue to be listed in the Completed Workflows table on the Workflow tab.
A special “archive” folder is created where this data is stored. System Administrators can move or permanently delete the archived data so that it isn’t using up storage space when not needed.