EDG Vocabulary Management
About This Guide
This guide provides a hands-on tutorial for working with the TopBraid EDG Vocabulary Management package. It walks you through a series of day to day tasks you may perform using TopBraid EDG. Throughout this journey, the guide offers background information and instructions on each topic.
In addition to following this guide, you may also want to watch a set of complimentary videos. You can watch some of these videos before doing the hands-on exercises described in the tutorial and/or come back to them at any point.
We have assembled the following list of short videos for you, organizing them into topics. The duration of the videos varies depending on a topic, but, on average, it takes between 5 and 20 minutes to watch a video.
Working with Taxonomies
Working with Modular Taxonomies
Working with Ontologies
Workflows, Collaboration and Audit Trail
Search
Data Import
Setting up Information Governance Framework
Crosswalks
Classifying Documents
About Vocabulary Management with TopBraid EDG
The TopBraid EDG Vocabulary Management package lets you work with the Taxonomies, Ontologies, and Crosswalks asset collection types. The Tagger and AutoClassifier add-on module adds the ability to work with Corpora (document collections that reside in content management systems) and content tag sets (data-sets that tag documents using terms defined in your vocabularies). Actual taxonomies, ontologies, crosswalks, corpora and content tag sets are collectively called asset collections in EDG terms.
A taxonomy in EDG is an asset collection based on SKOS, the W3C standard ontology designed for managing taxonomies, thesauruses, and subject headings. This guide shows you how to edit a taxonomy, manage a set of edits, and review the history of changes. It also provides some information on how to work with ontologies in order to add custom metadata.
The taxonomy editor in EDG offers a user interface and features designed to work with SKOS. An example feature is displaying a Concept Hierarchy, where concepts are connected with each other by SKOS broader statements, starting with the defined Concept Schemes as hierarchy roots. Every taxonomy must have at least one concept scheme that identifies “top concepts” in a scheme. Although a taxonomy can have multiple concept schemes, a recommended practice is to use a single scheme per taxonomy. Like all asset collections, taxonomies can be included into other collections, which means that a taxonomy with multiple concept schemes can be assembled through the inclusion of several single-scheme taxonomies.
SKOS defines a number of standard attributes and relationships related to a concept. Users can customize taxonomies by adding their own attributes and relationships, defining subclasses of SKOS Concept and even deactivating some of the standard properties. These customizations can apply to a single taxonomy, a subset of taxonomies, or to all new taxonomies created in EDG.
Access the EDG Application
To follow this guide, use a browser to access the EDG running in one of the following environments.
Create an EDG trial evaluation at TopQuadrant, and run EDG from the TopQuadrant servers. Submit an EDG evaluation request or contact TopQuadrant.
Use TopBraid Studio and run its demonstration version of EDG. Submit an EDG evaluation request or contact TopQuadrant.
Install EDG on a server accessible to your network (which could also be a local Tomcat server, via localhost). For a custom install, contact TopQuadrant and see EDG Server Installation and Integration.
The EDG sample data is used in this tutorial, however if you have other collections they could be used instead. If using the EDG sample data, you will need to download and install the EDG samples project from the TopQuadrant Website Downloads page under Asset Collection Samples.
For the TopBraid Studio option, launch TopBraid Studio and EDG will open in your default browser. If you use the Studio startup -B option to not use the default browser then open http://localhost:8083/ Logging in as Administrator requires no password for the demo version. All asset collection types are available in the demo version.
For the other two options, the system administrator or TopQuadrant will provide you with a URL, a username, and a password. Browse to the URL and log in. Server licensing will determine the availability of the various asset collection types.
TopBraid EDG User Interface
See also
For a basic orientation to the user interface, see Using Forms to View and Edit Asset Information and EDG Home Page and Navigation.
You will always see the “Collections” menu drop-down in the header that will help you navigate between asset collections. The Search EDG menu offers various options for search. Some pages of interest also appear under the user button, such as Find Tasks.
Vocabulary Management with Taxonomies
Selecting a Taxonomy
After logging in, the EDG home page will appear.
To see a taxonomy we will work with in this tutorial, click on Taxonomies link in the Collections drop-down in the header. It shows the list of taxonomies available to the logged-in user and some metadata about each one. This page also lets you create new taxonomies.
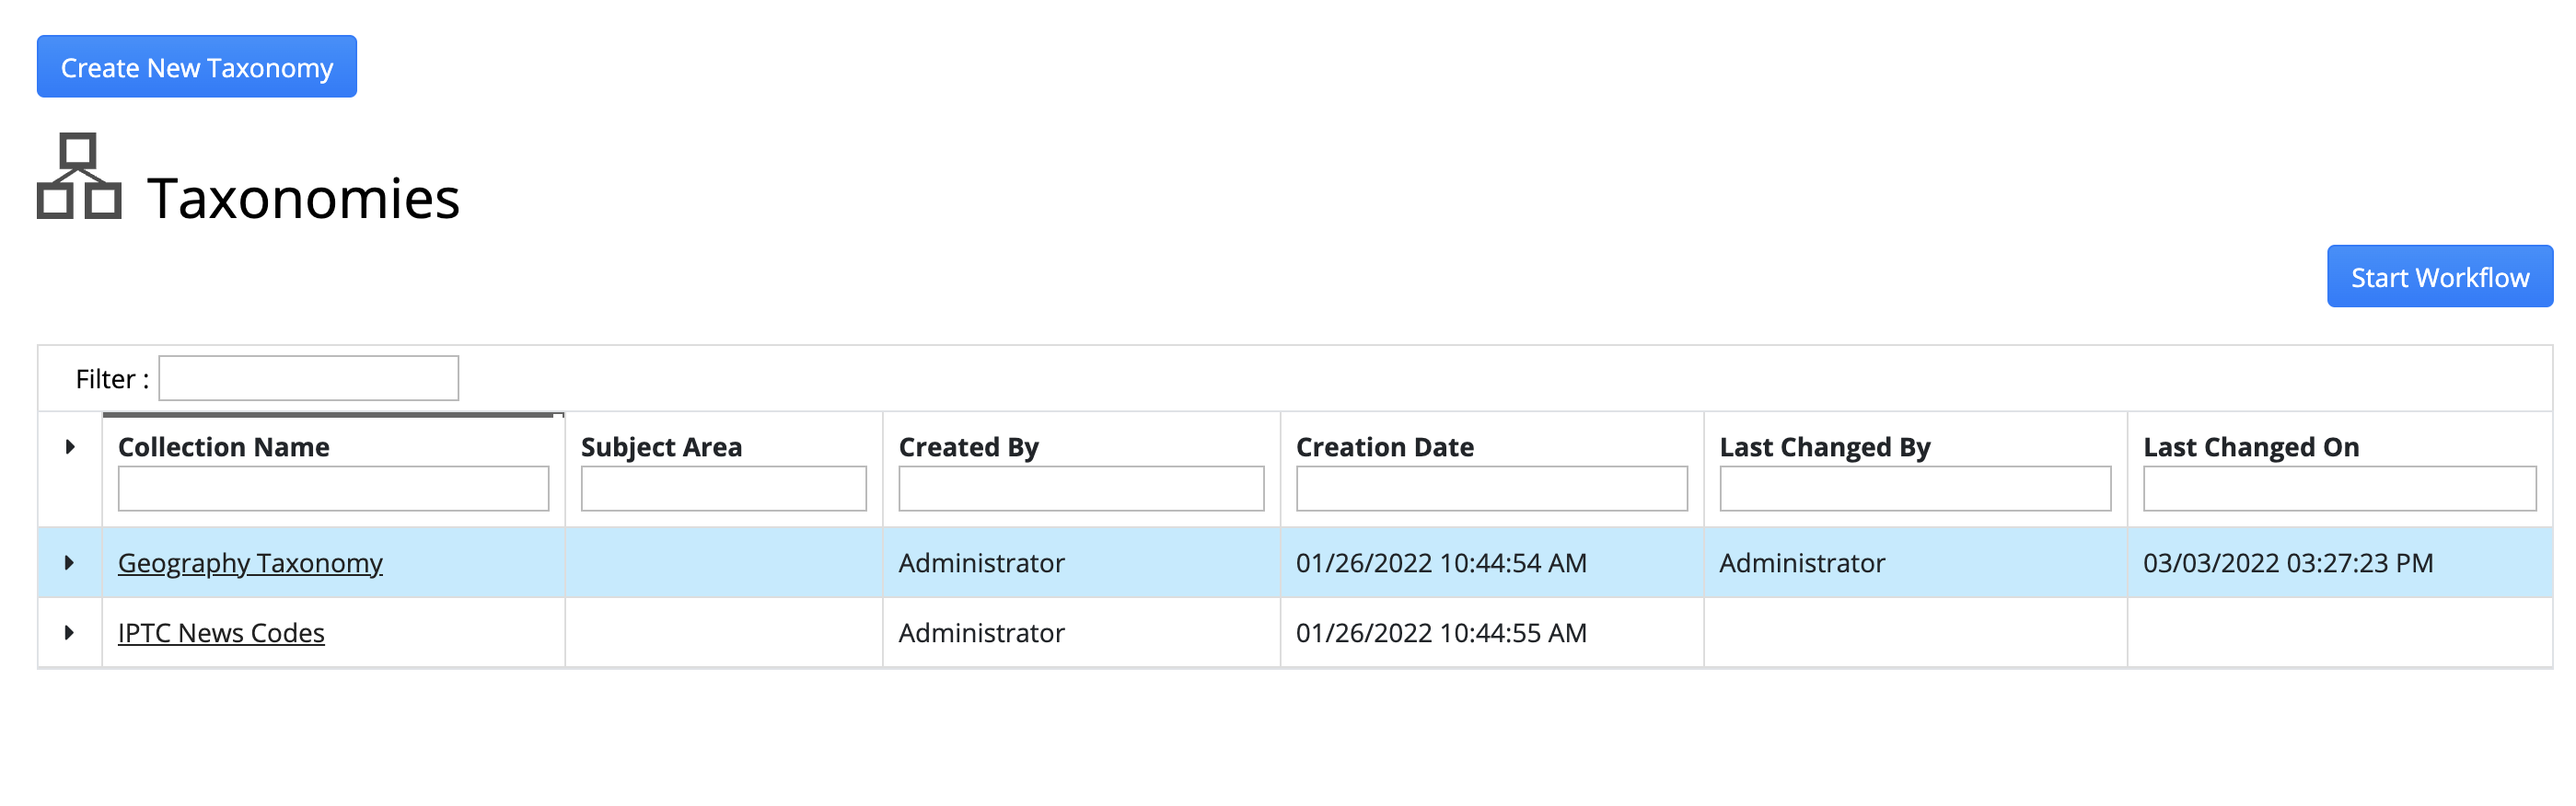
TopBraid EDG Taxonomies
This tutorial uses the Geography Taxonomy sample. If your server does not have it, an EDG administrator can upload it from topquadrant.com. Metadata about each taxonomy (or any asset collection) that is displayed in the list includes the user name of the person who created it, the date and time of its creation, its short descriptions and some information about the workflows in progress for that asset collection. Taxonomy titles are displayed as a hypertext link. Click on this link to go to the Geography Taxonomy.
If you do not see an asset collection that is known to exist in your system, you might not have the appropriate viewing or editing privileges for it. To gain access, a manager for that vocabulary must assign you viewer or higher permission. Alternatively, if your organization uses governance roles you can be give a governance role for a business area or data subject area. You will the automatically get viewer permission to all collections in the area.
Home Page of an Asset Collection
A home or landing page of a taxonomy lets you see and modify taxonomy content (i.e,. concepts in a taxonomy) and perform other operations.
The tabs acrpss the top of the page provide access to various operations such as importing data, exporting data, collaborating with other users through tasks and comments, running certain pre-build reports and more. There is also a configurable dashboard that summarizes the overall status of an asset collection.
When you click on a taxonomy, the first tab (aka Taxonomy Editor) will be automatically displayed. The default editor layout has Taxonomy Concepts Panel (a tree view) on the left and the Form Panel on the right. Concept Search panel is stacked behind the tree view.
Just like the other asset collection editors, the UI for the Taxonomy Editor can be customized and re-arranged. It comes with many panels and layouts.
See also
For more information on using EDG editors please see Using Forms to View and Edit Asset Information.
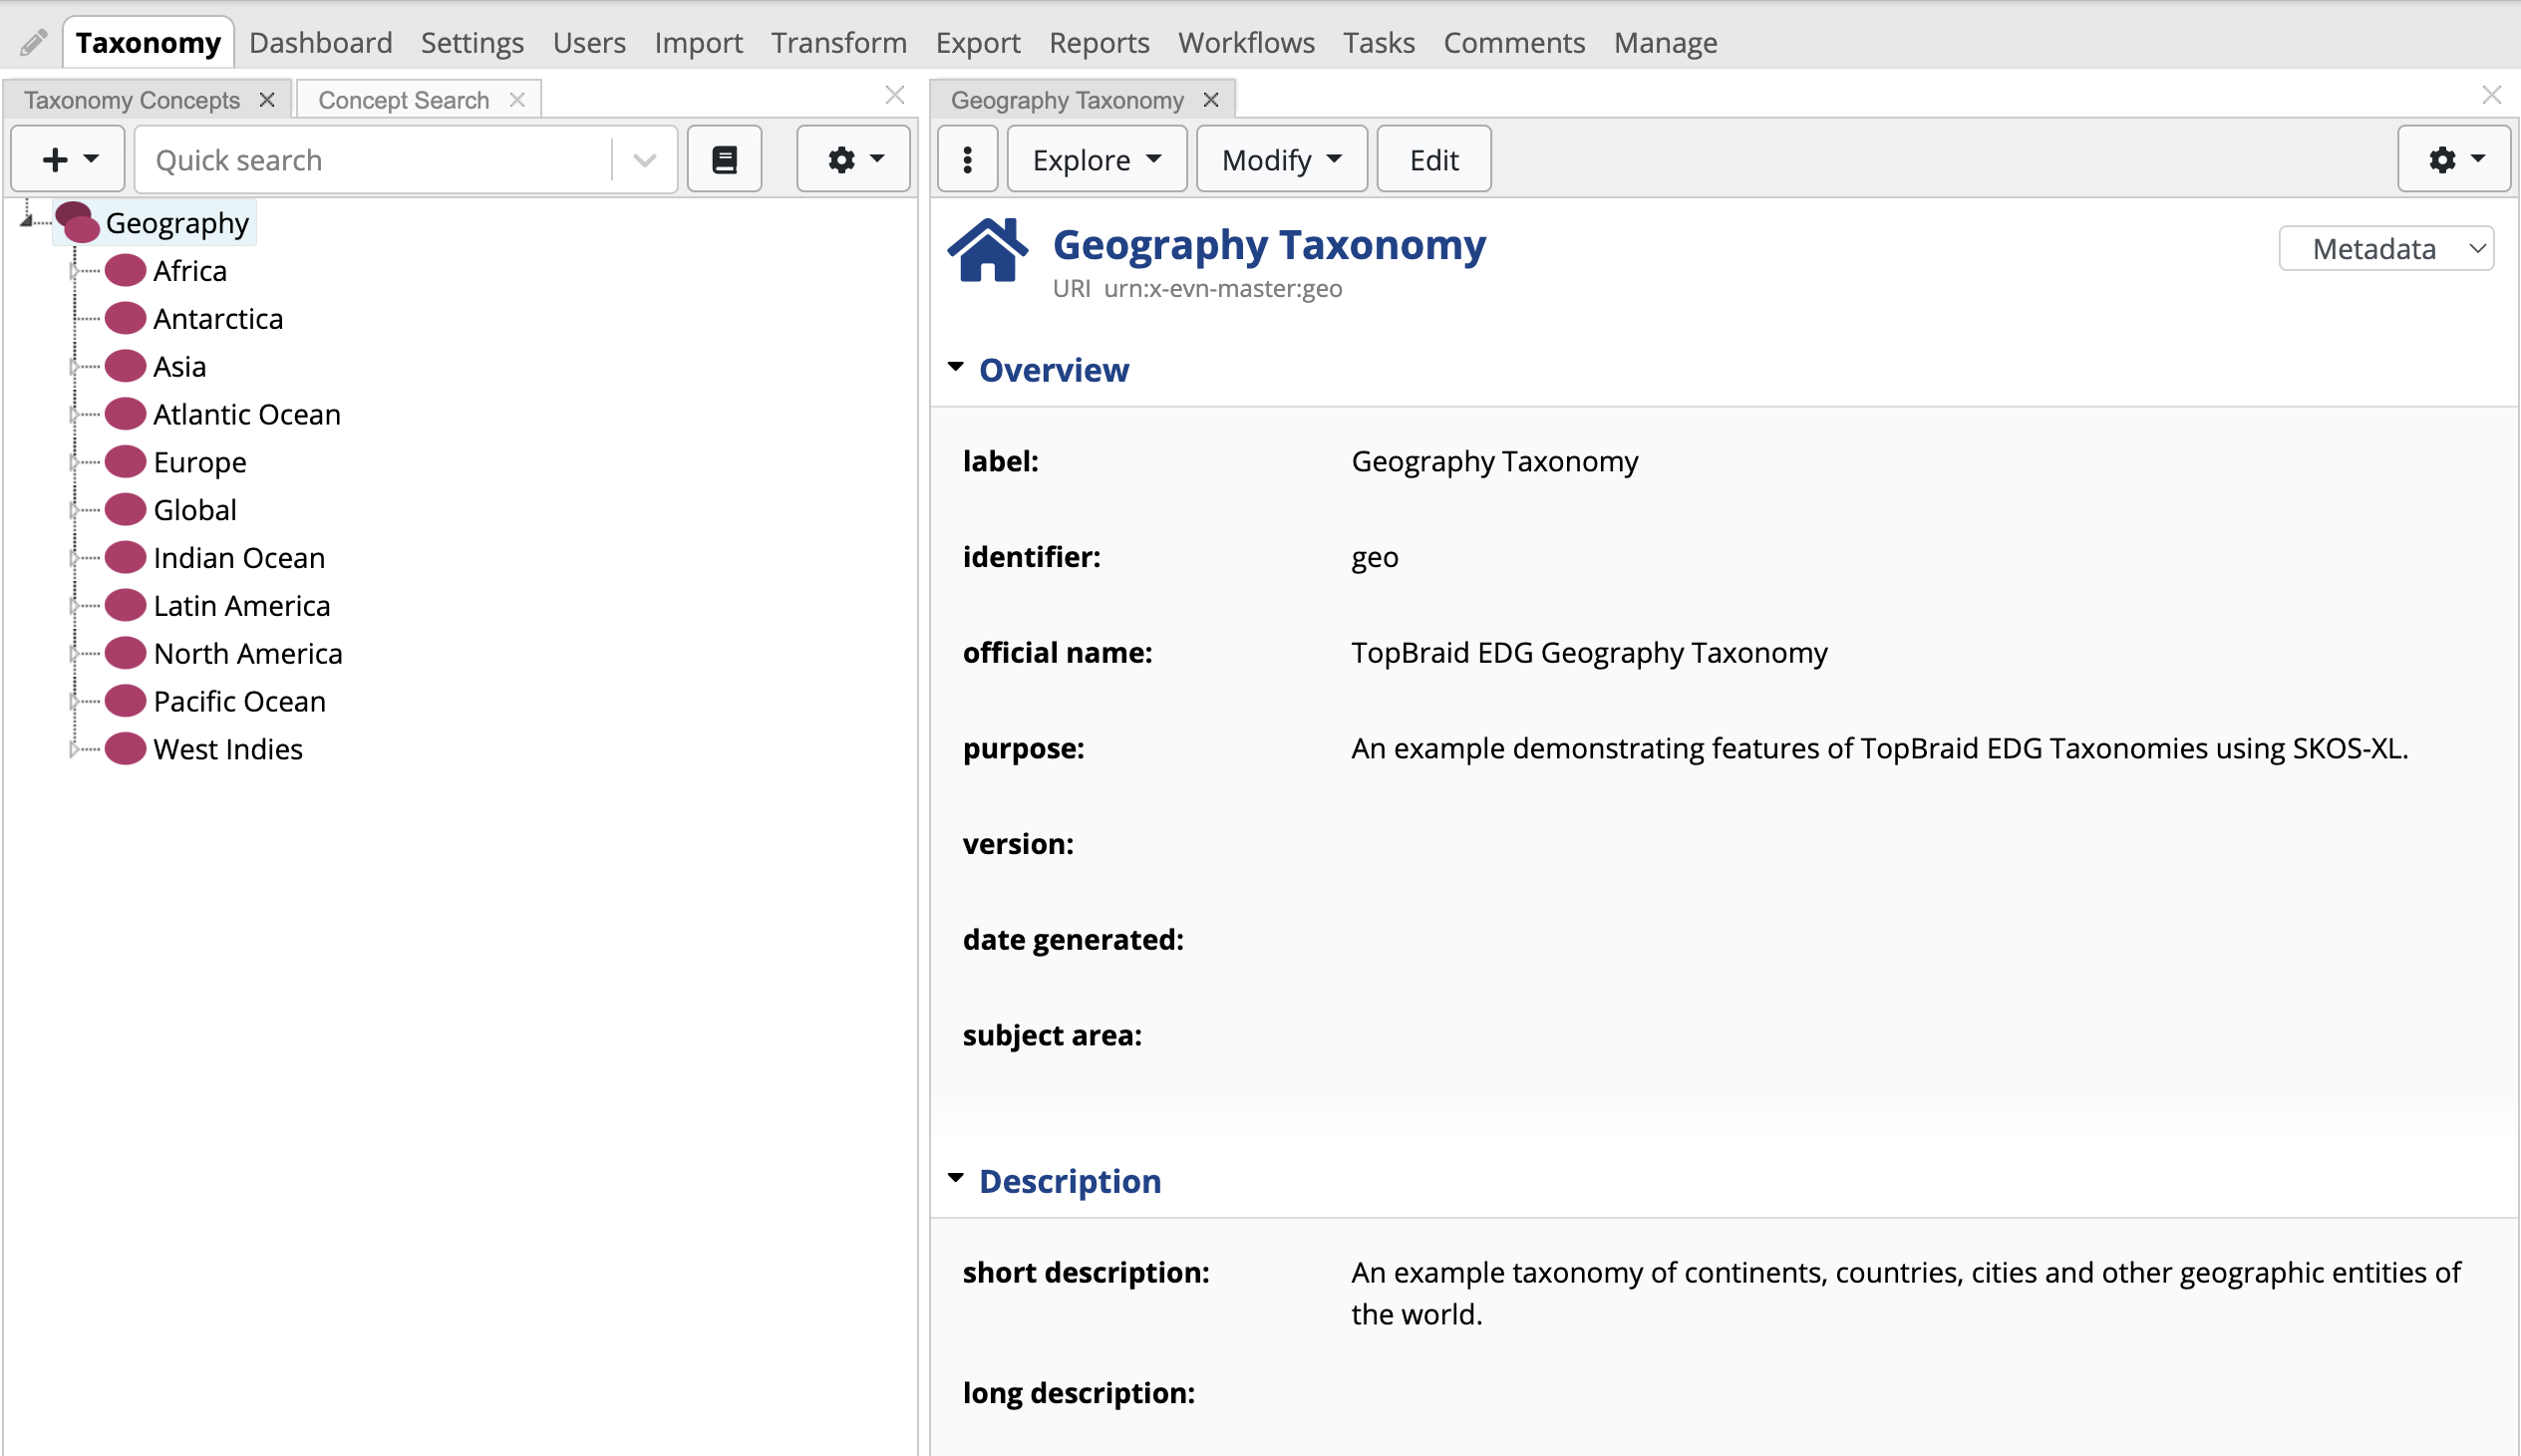
TopBraid EDG Geography Taxonomy Home Page
Given the right permissions, you can edit the taxonomy directly. In this guide, however, instead of editing the taxonomy directly, we will walk you through the steps for changing taxonomy content through a workflow.
A workflow isolates the set of changes we will be making, keeping them in a working copy until the workflow completes and changes are committed to the production copy. While we will be using a workflow, all edit and search user interfaces you will learn how to use in the context of a working copy operate exactly the same way on the production copy.
We will conclude the tutorial by walking you through instructions for customizing the ontology that describes schema (types and properties) of the concepts in the Geography Taxonomy. You will learn how to deactivate pre-built properties and add your own properties.
Workflows and Working Copies
TopBraid EDG defines the production copy of a vocabulary as the version of the vocabulary currently in use. For example, an online store that organizes menus of product categories based on a managed vocabulary would use the production vocabulary when it builds the menus used on their website. In this case, the production copy is a Geography Taxonomy.
EDG supports making changes through Understanding and Using Workflows. When you start a workflow, an associated working copy is created to hold the changes that will go through the workflow process and, eventually, may get committed to the production version at the discretion of the users who have permission to make and execute such decisions. A working copy is a virtual copy of the production vocabulary created for editing purposes.
It is possible that several “in progress” workflows exist at the same time, each with its own set of working copy changes. These workflows are shown in Workflows tab. Workflows are based on templates to support different types of workflows.
Out of the box, EDG has a built-in review and approval workflow called “Basic”. Users can define custom workflow templates to support their specific vocabulary management processes.
See also
More workflow templates are available from the TopQuadrant Website Downloads page under under Workflow Templates.
When you edit a taxonomy production copy, changes will be visible to everyone using it. They will also show up in any working copy created for this taxonomy. When you edit a working copy, changes will only be visible in that working copy. EDG users with the appropriate permissions can choose between making changes directly to an asset collection and using workflows and associated working copies to change, review and publish new versions.
Basic Workflow Template
TopBraid EDG comes with the prebuilt Basic workflow template. Working copies managed by the Basic workflow can be in the following stages aligned with the states of the workflow:
Uncommitted working copies are copies of the production vocabulary that people are currently changing. Changes are not reflected in the production vocabulary until the changes are committed, or published, to the production copy. An uncommitted working copy can be cancelled, frozen for review or directly committed to production without a review step by users with appropriate permissions.
Frozen for Review working copies are working copies that are going through a review during which no one has permission to modify them. This is useful to allow people to review changes while knowing that no further edits can be made during the review period. Users can enter their review comments. Frozen for review working copy can be cancelled, rejected, approved or requested further changes (i.e. unfrozen to status uncommitted).
Rejected working copies are working copies that cannot be edited or published. A rejected working copy can be cancelled or opened for further changes, changing its state back to Uncommitted. When a workflow is cancelled, all changes in a working copy are permanently deleted.
Approved working copies have been approved but have not yet been committed to the production copy. No one has permission to edit them and the only possible next step is to cancel or commit them. This is useful as a final review stage late in the editing workflow to explicitly record that the approval was granted and by whom.
Committed is the final state of a working copy whose changes have been accepted into the production copy. No further actions are possible other than to archive the working copy.
If any workflows were in progress for the Geography Taxonomy, you would see them by clicking on the Workflows tab. You can also start a workflow from this tab. Alternatively, you can start a workflow directly from the page that lists all taxonomies. Finally, you can start a workflow for a specific concept in a taxonomy directly in the editor. We do not have any workflows yet, but we will start one shortly.
Permission Profiles
On the vocabulary’s Users tab you can see a list of users and their permissions. EDG supports permission profiles and governance roles. EDG has the following permission profiles users: viewer, editor, manager and admin (for system support staff, not normal EDG users). EDG also provides a set of governance roles, which is open to customization.
A user can have one of the following permission profiles for a vocabulary (production copy):
Viewer can browse a production copy, viewing the concepts and their metadata as well as any change history associated with that data. A viewer can also generate reports about the vocabulary, export it in other formats, and start workflows.
Editor has all viewer permissions plus can make changes to the content.
Manager has the most capabilities. In addition to the editor permissions, a manager controls access for other users. Manager can also perform actions in the Manage tab – including ability to delete a vocabulary. A user that creates a vocabulary automatically gets manager permissions for it.
A user can have one of the following permission profiles for a working copy of a vocabulary:
viewer can do the same things with a working copy that a production copy viewer can do with a production vocabulary: view its data, view its change history, generate reports, and export the data.
editor has working copy viewer permissions and can also edit a working copy.
manager has working copy editor permissions and controls access to the working copy for other users. A user that starts a workflow automatically gets manager permissions for the associated working copy.
When you are logged in with admin profile, you have manager permissions for all asset collections. Users assigned less powerful permissions for the Geography Taxonomy will not see the complete set of EDG tabs in the header. For example, someone with editor permissions for the Geography Vocabulary would not see the Manage tab at the top and, thus, will not be able to perform any operations available on the Manage page. A user with viewer permissions for the Geography can click on the Taxonomy tab and see contents of the taxonomy, but they will not be able to change it.
Who can do what in a basic workflow is defined in terms of permissions. For example, a basic workflow allows a working copy manager to freeze a working copy for review and revert a frozen copy back to uncommitted status so that those with the appropriate permissions can continue to edit it. A user that only has editor permissions for a working copy will not be able to freeze it for review.
Starting a Workflow
Click on the Workflows tab. Then, click the Start new Workflow link to start your first workflow, automatically creating an associated working copy. If your server environment has multiple applicable workflow templates, you will be asked to select the workflow that corresponds to your change process. For example, changes to existing concepts may follow a different process from the process that proposes new concepts. TopBraid EDG includes one pre-built basic workflow template. Thus, unless others have been installed, you will not be offered a selection.
You can start a workflow for the taxonomy as a whole, when you expect to be making changes to several concepts, or you can start it for a specific concept, if your changes will be only for one concept. In the latter case, you start a workflow from the editor by selecting Start Workflow from the Available actions button.
In our example, we will be changing information about an existing concept (South Korea) as well as creating a new concept, so we will elect to start a workflow at the taxonomy level. Although, arguably, since all these changes will be scoped to South Korea, we could have navigated to South Korea and started the workflow there.
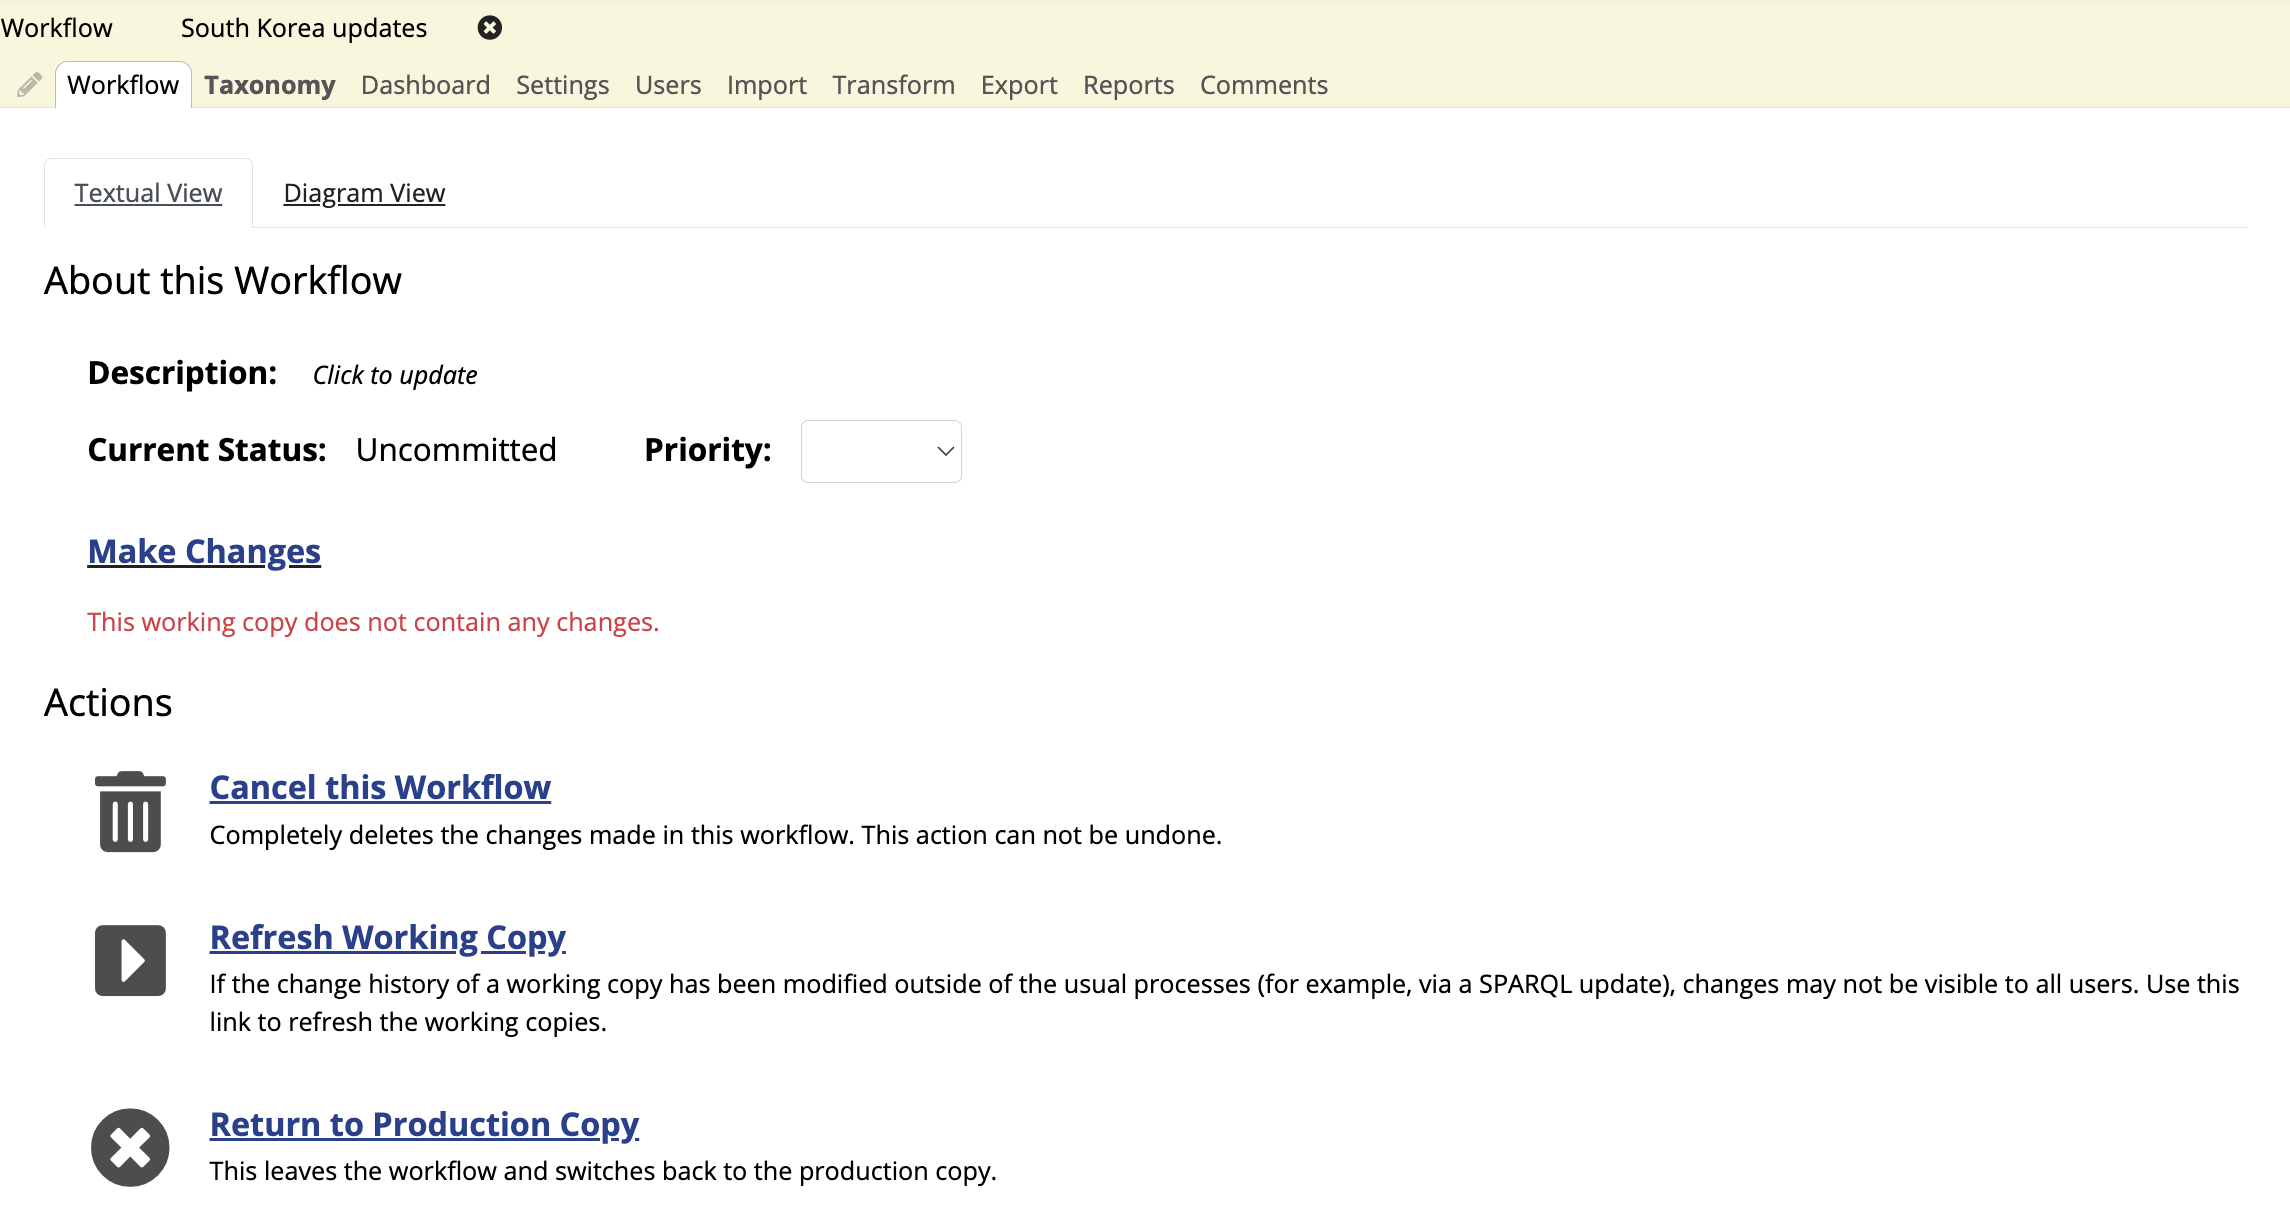
On the Start new Workflow on Geography Taxonomy screen, enter “South Korea Updates” as the workflow’s name. In the Description window enter “Fix country name and add Busan”. Click the Submit button. After creating the new workflow EDG will send you to the newly created workflow’s management screen where you’ll see the current status, Uncommitted, of the workflow and the next steps that can be undertaken. At this point, you can Make Changes, Refresh Working Copy, Return to Production Copy or Cancel this Workflow. The user would select Make Changes or select the Taxonomies tab directly to start work. From the Uncommitted state, possible next steps for the basic workflow are: Freeze for review (of the working copy) or Commit changes to production. However, you will not be able to move the workflow into the next state yet. This is because right now there are no changes to review or commit. You will see this situation change after you make your first edit.
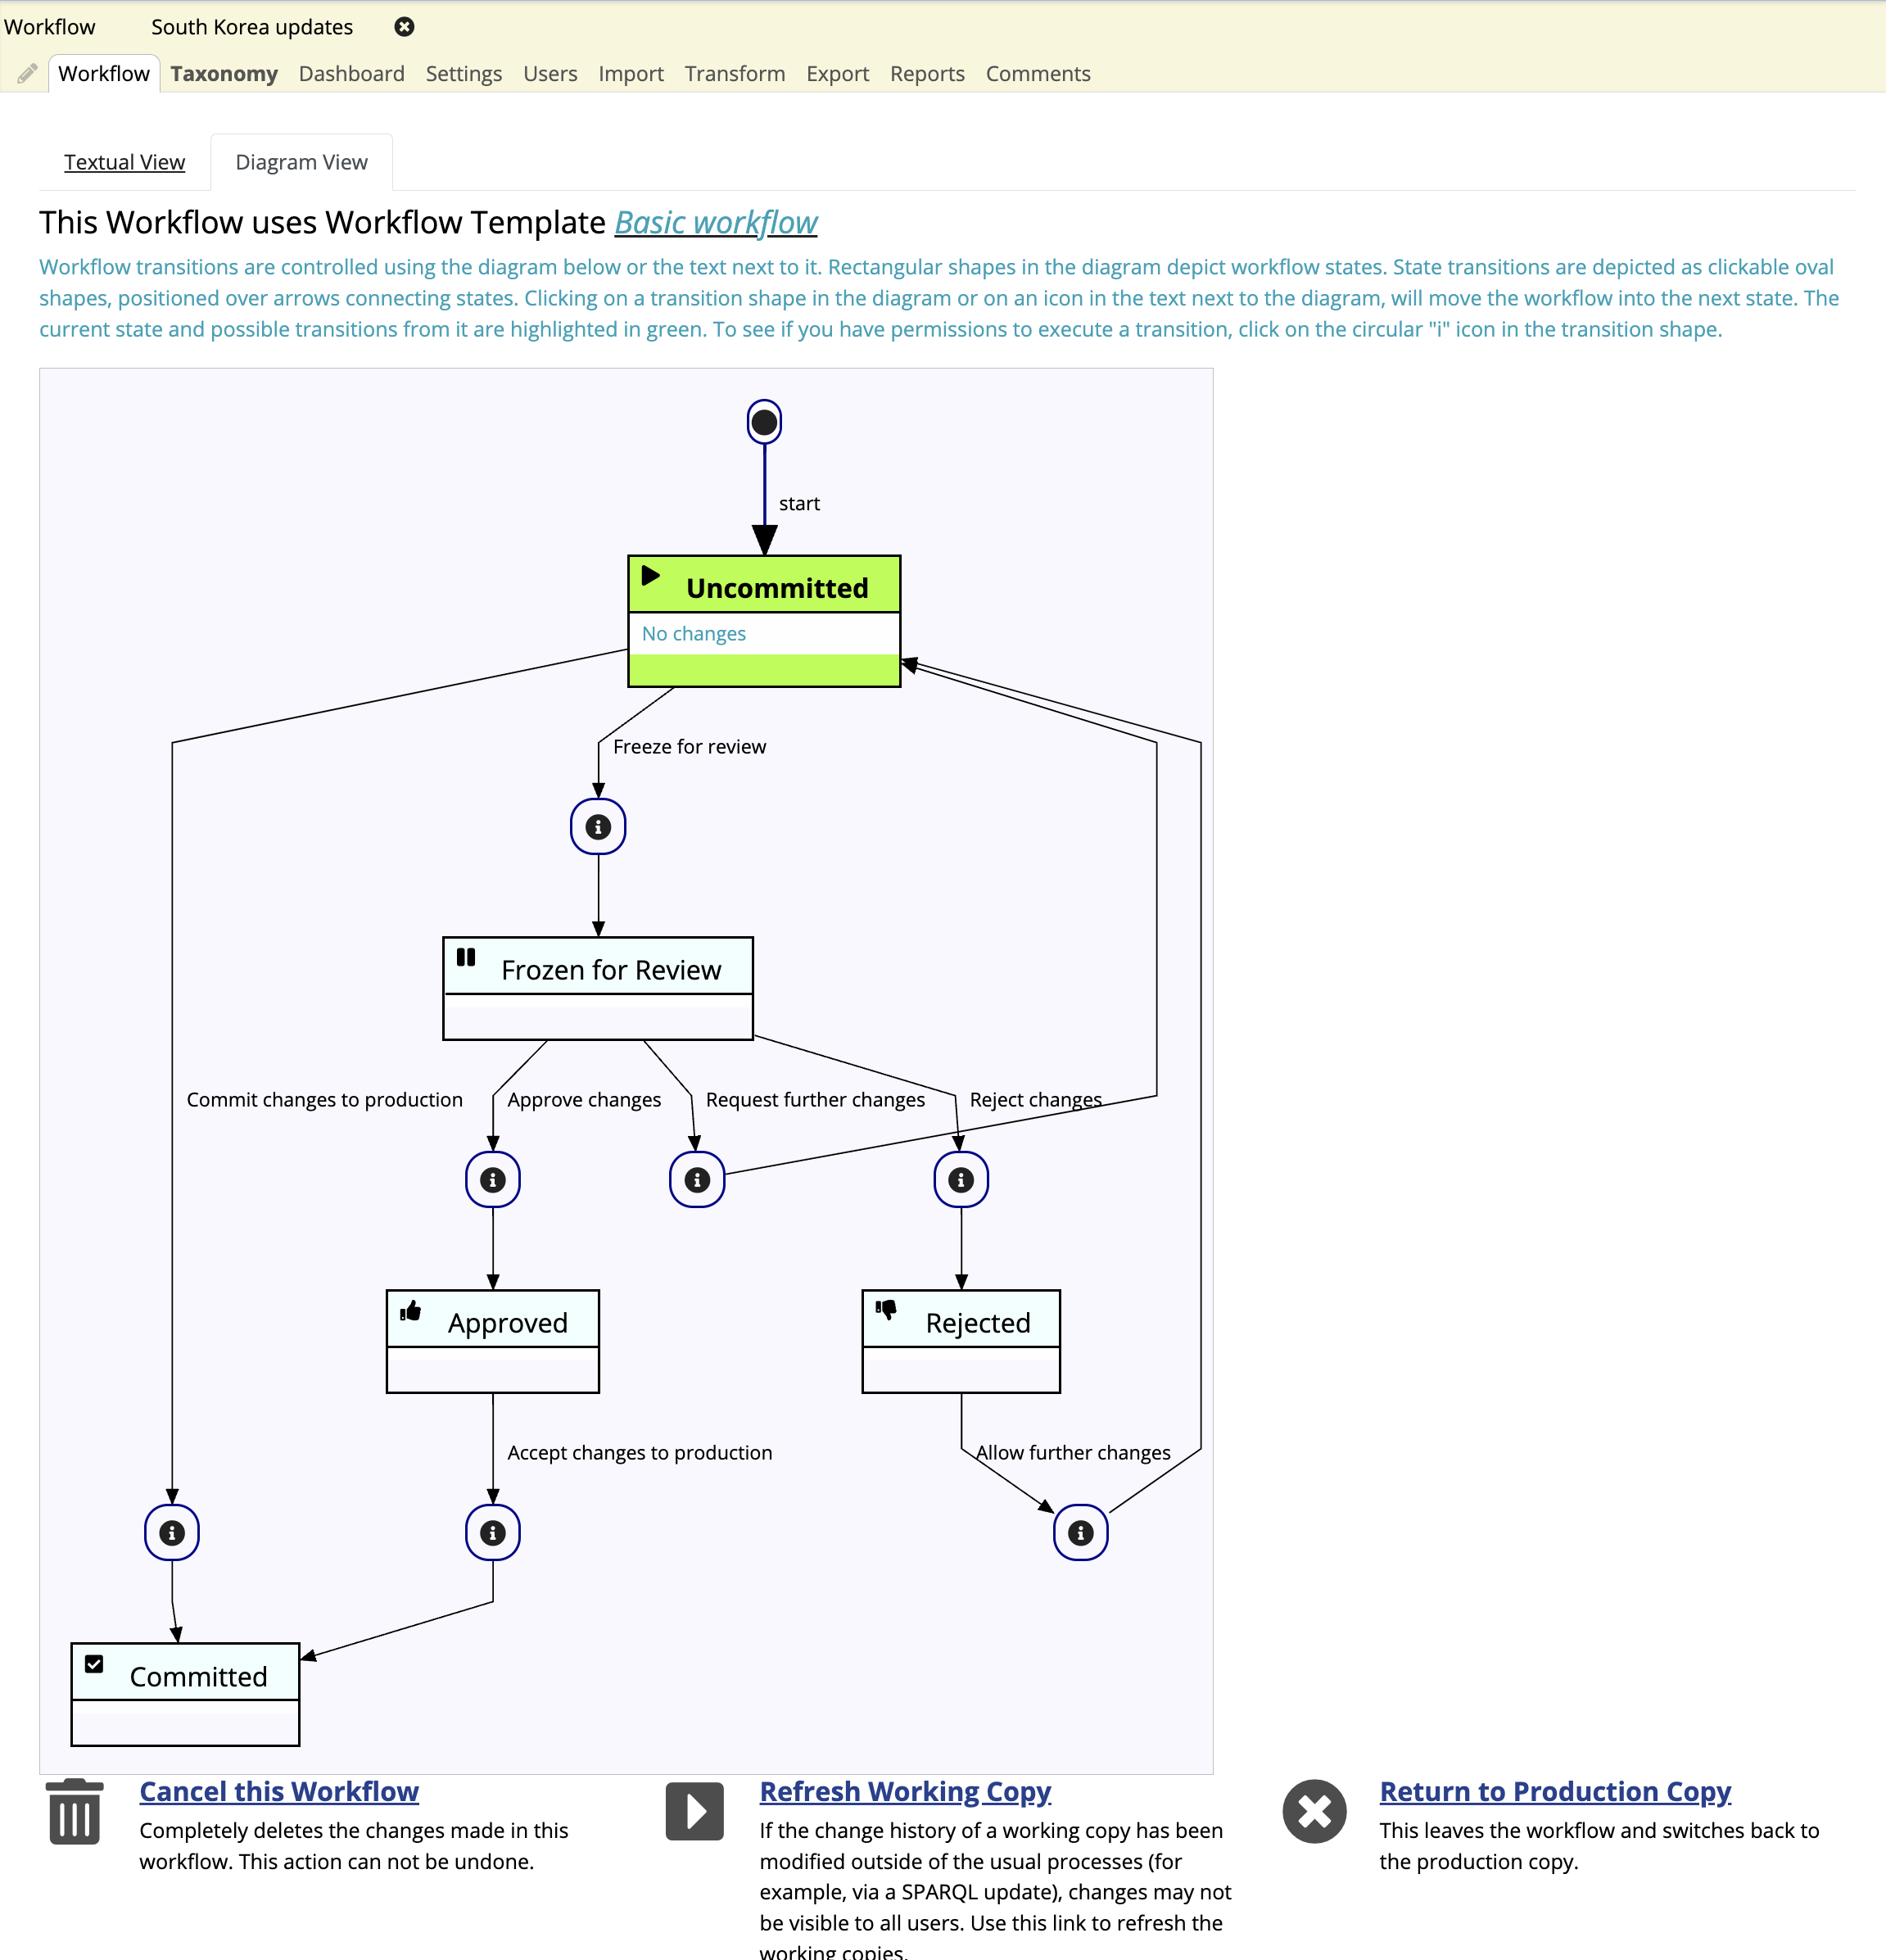
The workflow diagram shows you all workflow actions and the resulting state of the workflow after an action is performed. Users who are authorized to perform the action (transition the workflow) are displayed under the action name. You can switch from textual view or diagram view depending on the users preference, they have the same actions.
TopBraid EDG Textual View and Diagram View Tabs
TopBraid EDG Geography Taxonomy South Korean Updates
Basic workflow combines two possible approaches to promoting changes:
It lets users make changes and directly commit them to production without any review and approval cycle.
It also supports a process where changes are made, then the working copy is “frozen” to allow a review cycle during which changes can be approved, rejected or a working copy can be re-open for changes without recording an explicit approval or rejection.
When changes are approved, then next step is to commit them by explicitly accepting them to production. If they are rejected, manager of the workflow can decide to re-open working copy for re-work or they can cancel the workflow.
Your organization may want to separate these two different way of working into two workflows i.e., with approval cycle and without approval cycle. Users can design custom workflows to support different processes including voting, timed escalations, the use of governance roles instead of permission roles, performing automated steps, etc.
The Basic workflow template is defined in terms of permission roles. For example, only a user with the manager permission role for the workflow can freeze it for review. Workflow templates can also be defined in terms of governance roles. Governance roles are business roles like data steward or taxonomist. They are configurable for your organization. Workflow templates can specify what permission is given to a governance roles. If you use governance roles, you do not need to define permission roles for each instance of a workflow. This can be handled in a template.
Editing a Working Copy
To make changes, from the workflow’s home page, click the Taxonomy tab in the header, and you’ll see the same editing screen that you experienced when you originally clicked on the taxonomy.
Apart from seeing the workflow name and the header being yellow, the editor user interface in the workflow looks the same and has the same functionality as the user interface for making changes directly to the production copy. In either case, you will see the same panels and will have the same options for navigation, editing and searching.
In the Taxonomy Concepts tree, clicking the little arrows will expand and close up sub-trees of concepts.
Note
SKOS organizes concepts into concept schemes. So, the root of the tree will always be a concept scheme. It is differentiated by the blue icon while concepts have manila folder icons.
Click directly on a concept’s name to see data about it in the Form panel on the right. For example, click on the arrow next to “Europe”, and then click on “Belarus”, and you will see information about this term on the right of your screen. This includes information that is part of the W3C SKOS standard for vocabulary management, such as an alternative label for the concept and a history note about it. It also includes custom properties added to extend the SKOS standard for this vocabulary, such as the area figure for the country and its calling code.
Alternative label and history note are both attribute properties. Relationship properties such as Belaurus’s “has broader” and “has related” values describe relationships to other concepts, which may or may not be in the same vocabulary. Relationship properties are hypertext links; double-click Belaurus’ “has related” value of “Soviet Union” and the same panel will display data about that concept. (Use your browser’s Back button to return to the Belarus screen.)
In addition to navigating the concept hierarchy, another way to find specific concepts is to use the quick search.
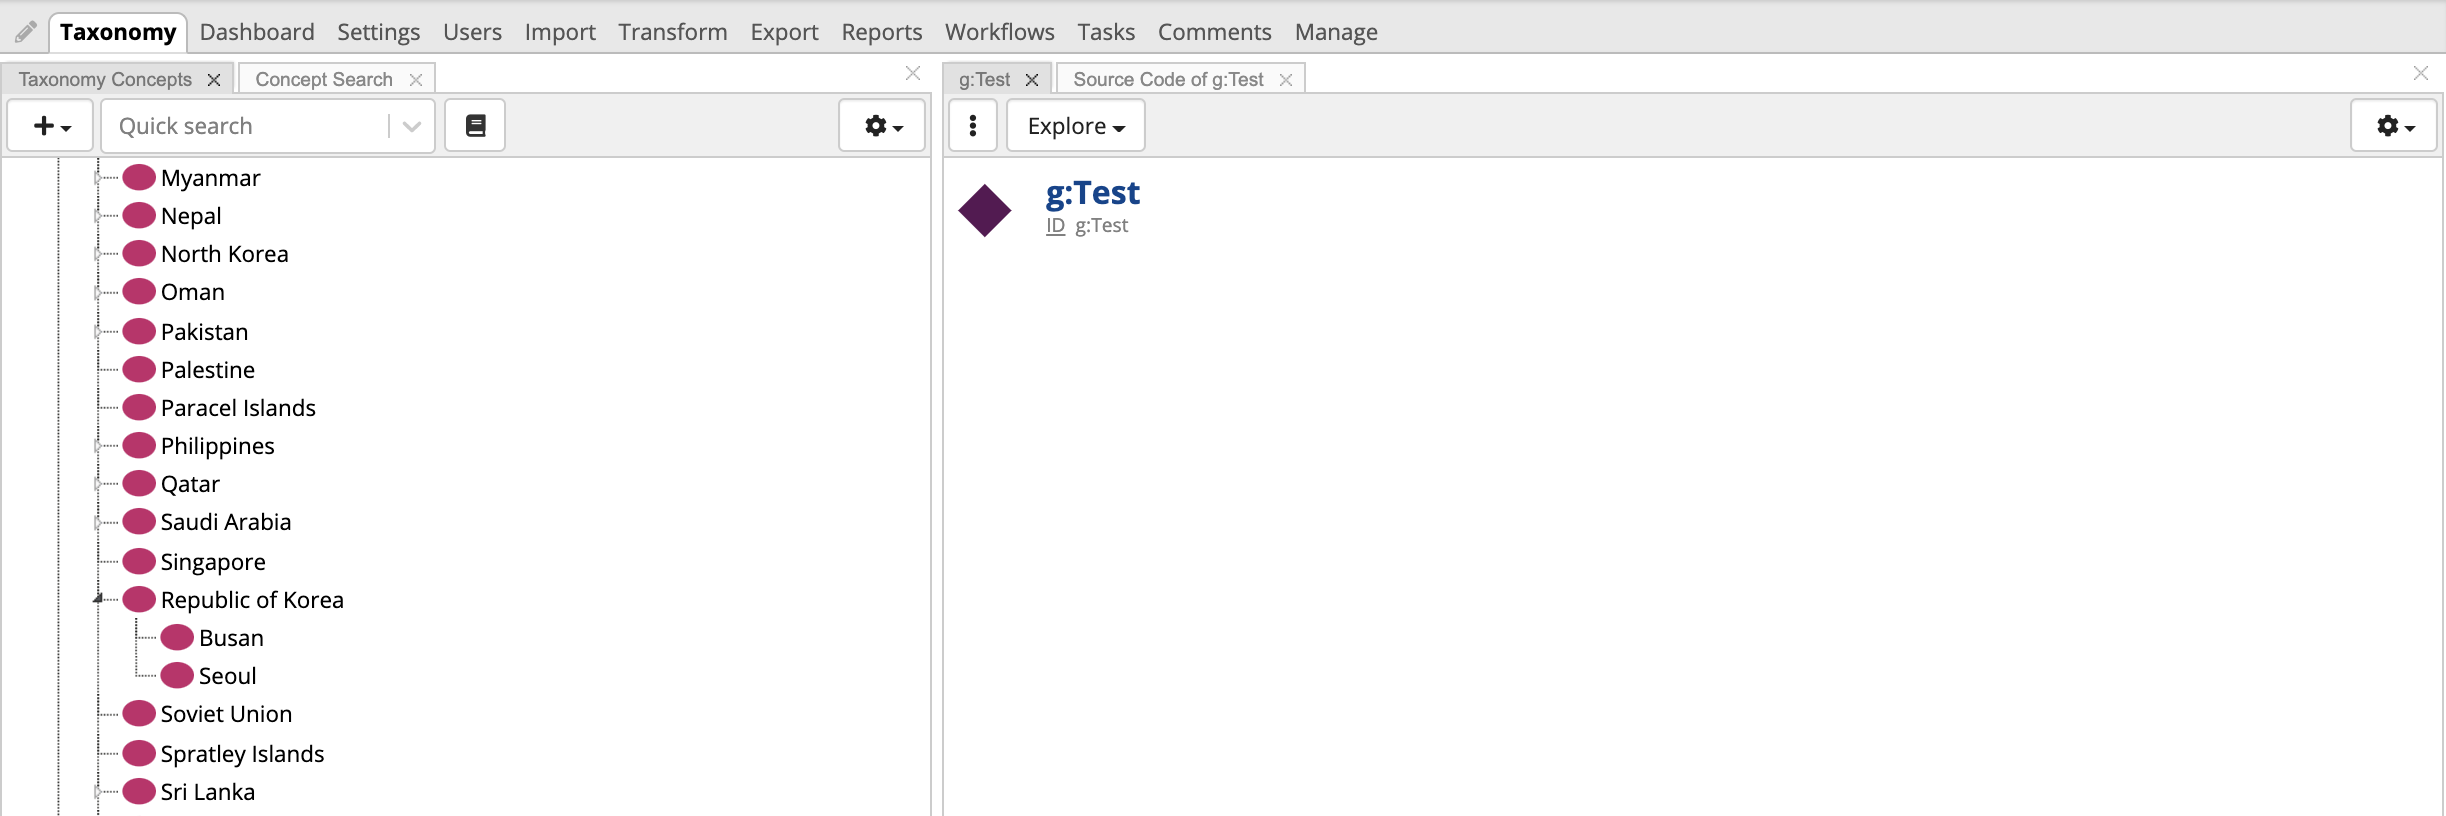
To quickly locate specific concepts in the tree use the lookup field in the upper-left of your screen, under the Taxonomy Concepts heading. Type the word “South” there, and a list will show you the concepts beginning with these letters.
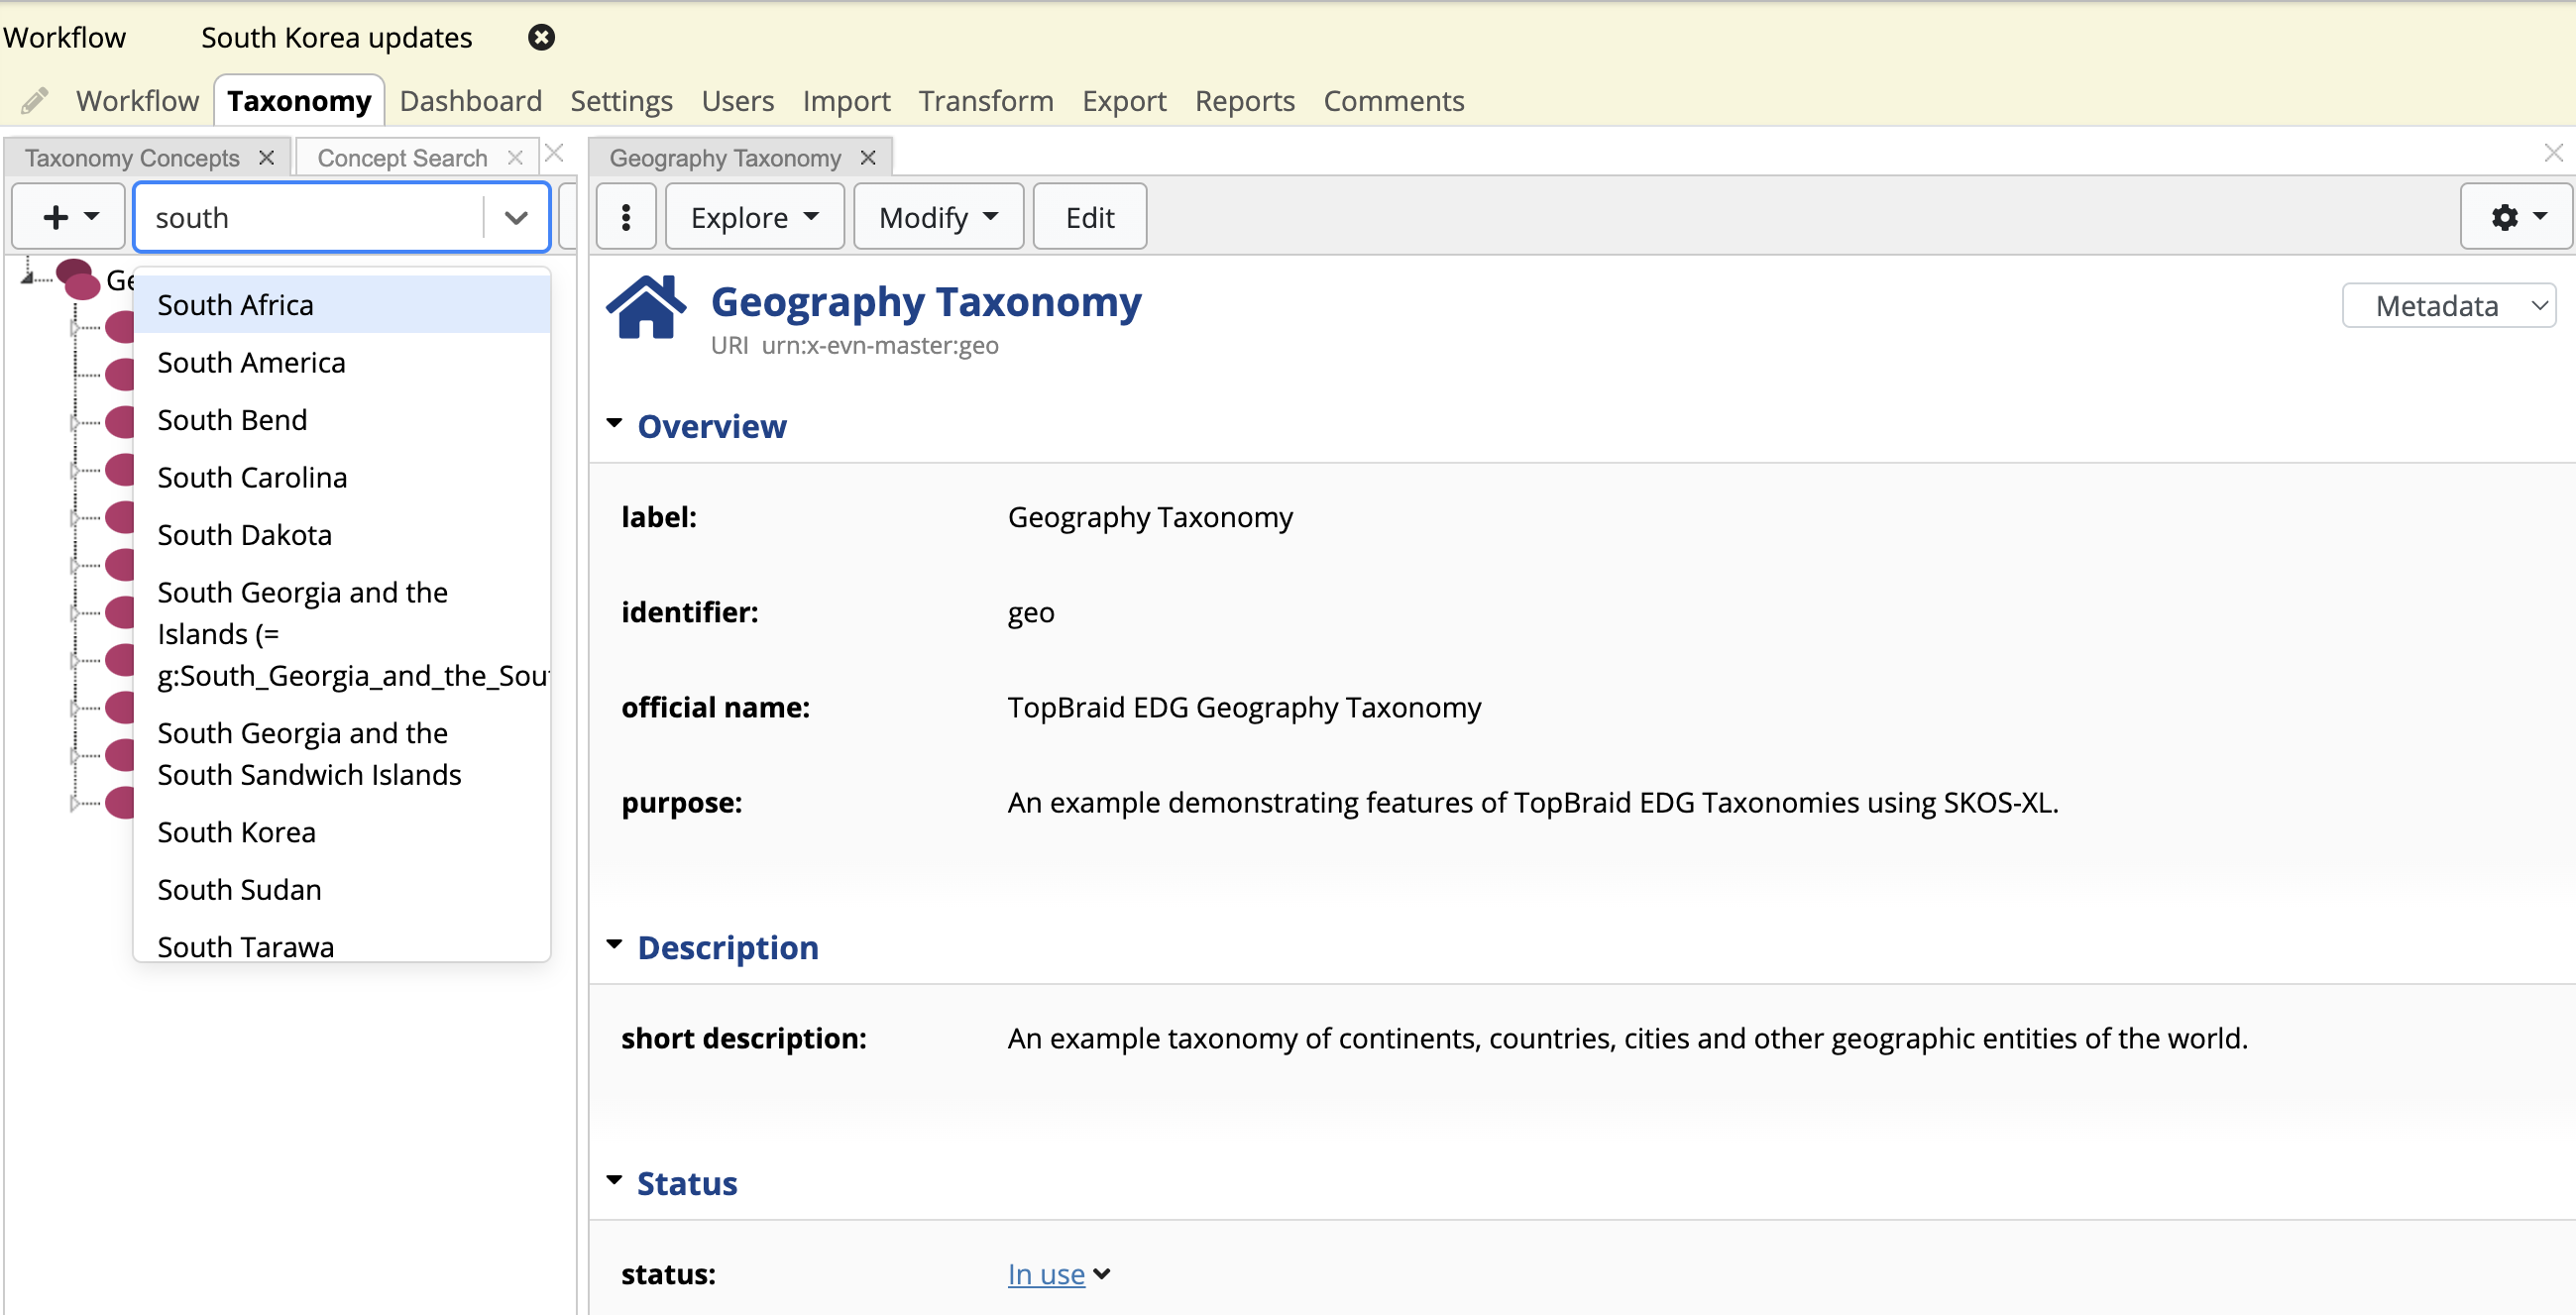
TopBraid EDG Geography Taxonomy Search Options
Select “South Korea” from the list, and EDG will take you to that concept in the Taxonomy tree and will also display it on the form. We’re going to change its preferred label value to the country’s official name of Republic of Korea and make South Korea the alternative label. We will also enter an alternative label in Spanish and we’ll add the city of Busan as a new concept that appears as a child node of Republic of Korea in the Taxonomy tree.
Even if you have the appropriate rights to edit a given vocabulary, if that vocabulary includes data from other sources, you will not be able to edit or delete the included data.
See also
See Advanced Settings in the User Guide for more information.
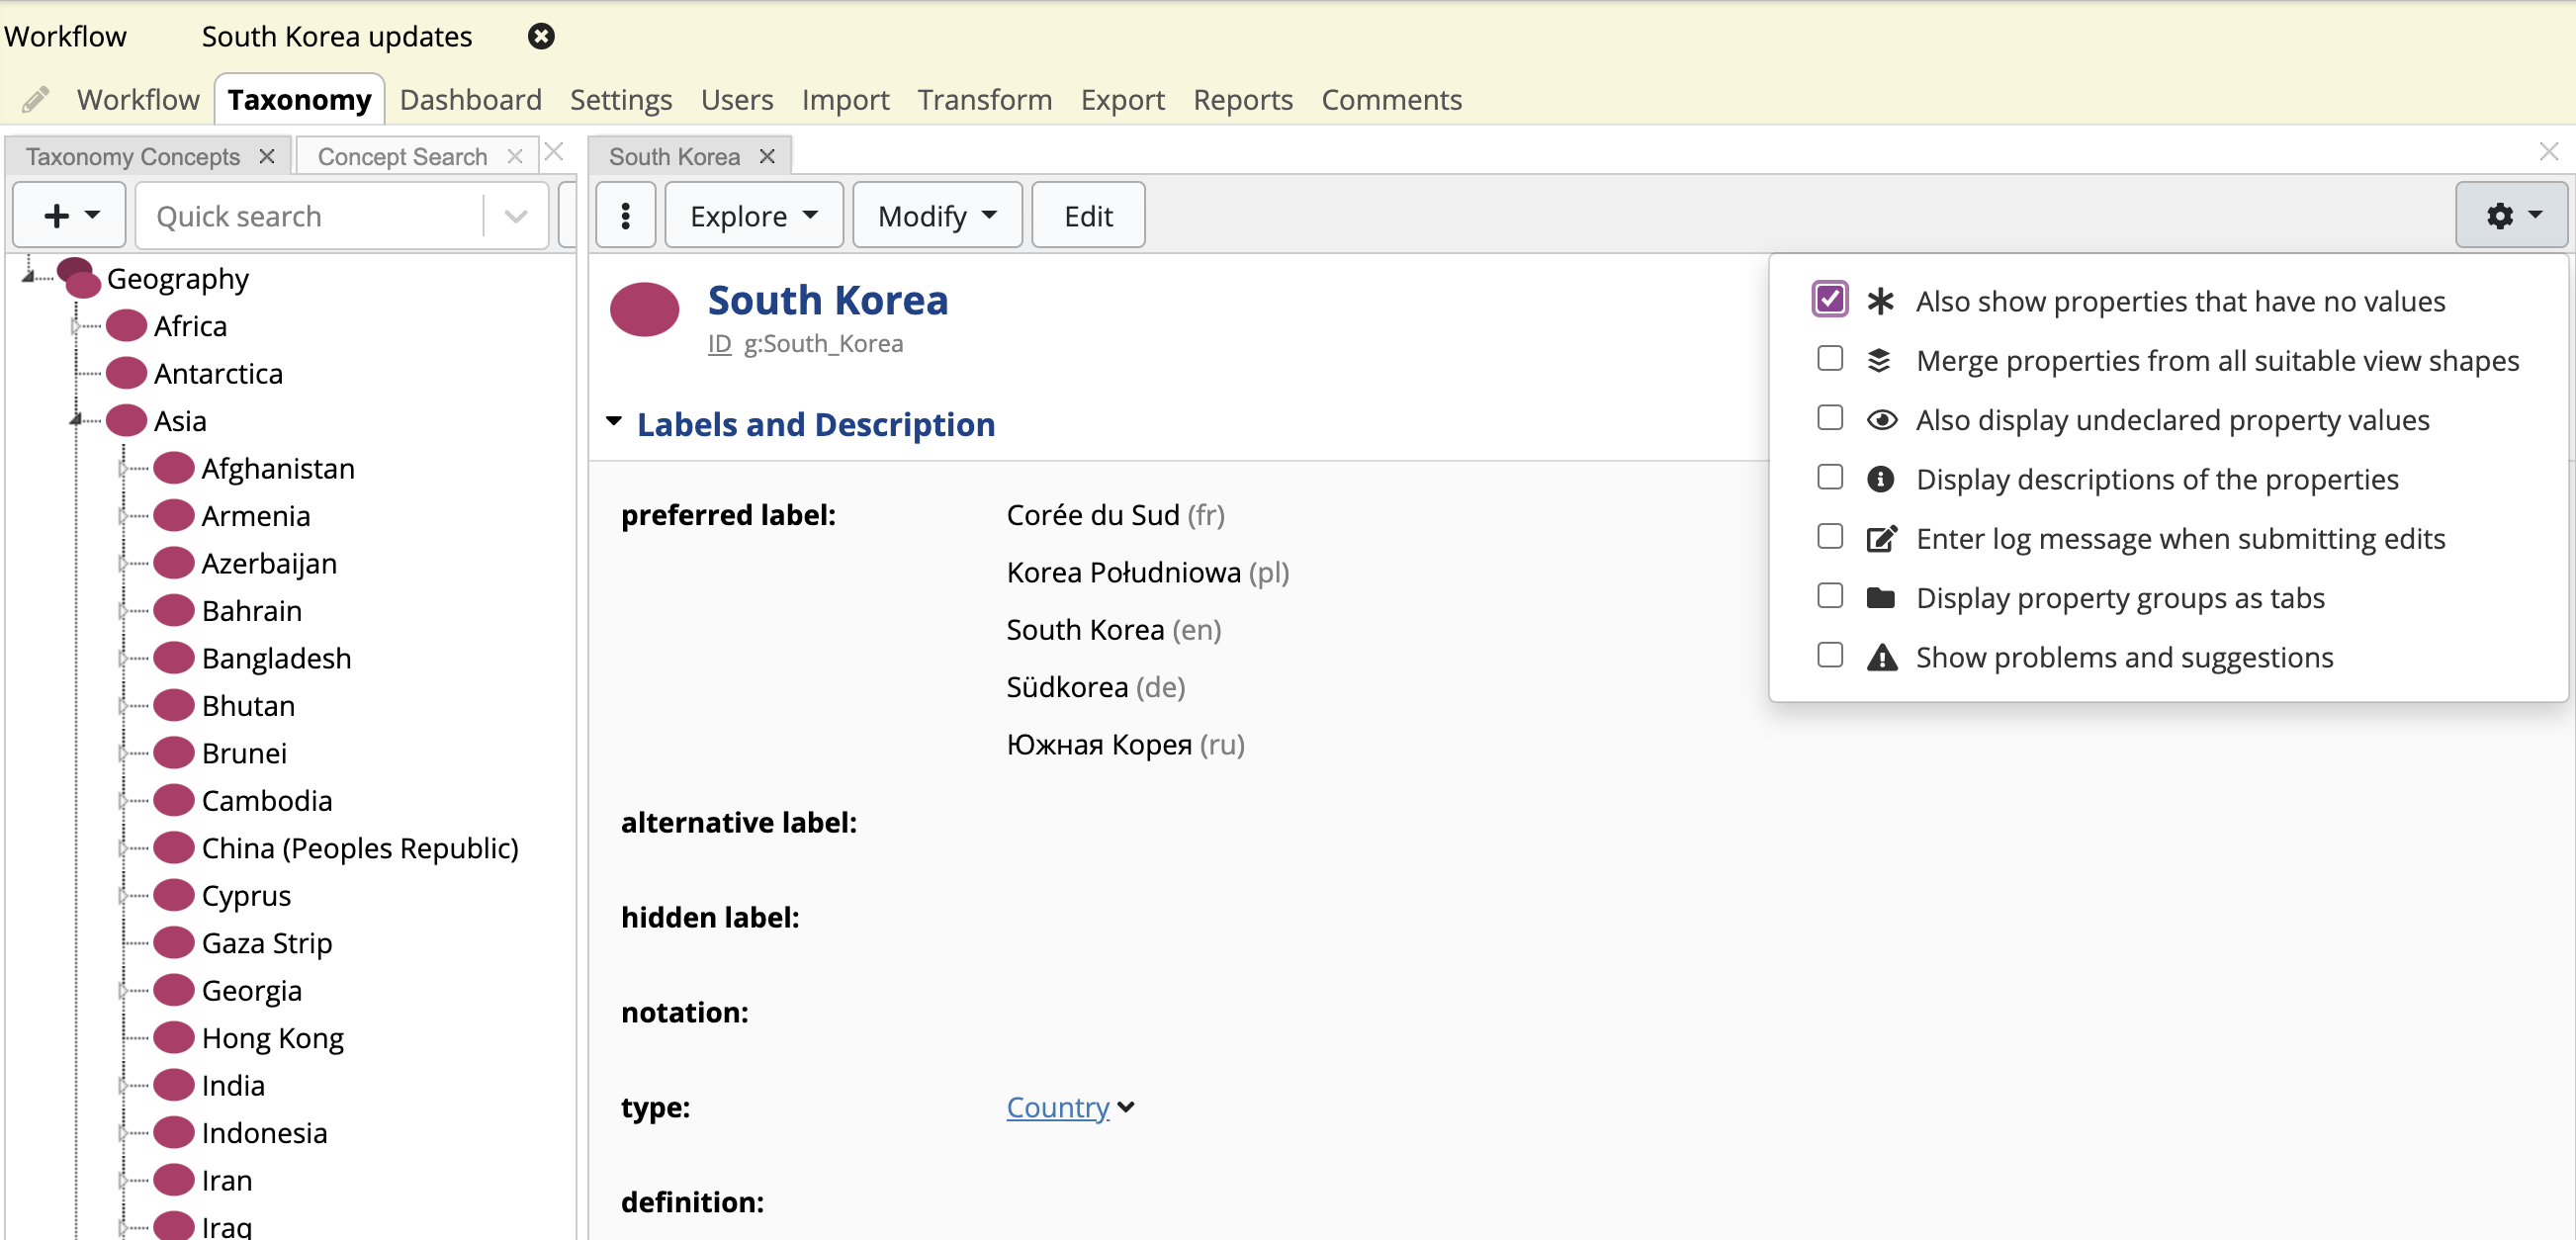
Once you have the South Korea data displayed, you can click on the settings icon and select Also show properties that have no values to see all available fields appear on the form. Before you clicked the Also show properties that have no values button, the form only displayed the concept properties that had values assigned to them. You can then mouse-over the page area where the name of the property is displayed and click on the pencil icon. This will let you in-line edit each field.
Alternatively, click on the Edit button at the top of the screen to open editable form for this concept and edit several properties at once.
TopBraid EDG Edit Geography Taxonomy
Replace the preferred label value of “South Korea” with “Republic of Korea”.
By default, one can add multiple values for a single property unless its underlying ontology explicitly limits the property’s number of values (its cardinality). We’re going to add the Spanish term for “South Korea” to this concept. Click the plus sign next to preferred label and a new blank section appears. Enter “Corea del Sur” there. Choose the Lang setting and pick “es” from the drop-down list that will appear to the right. Your EDG administrator can customize the list of language code choices offered on this list.
TopBraid EDG Taxonomy Labels and Description
Click Save Changes.
You’ll be returned to the concept display screen, where you’ll see your new values; also note that the node of the Concept Hierarchy tree on the left that had been labeled “South Korea” is now called “Republic of Korea”.
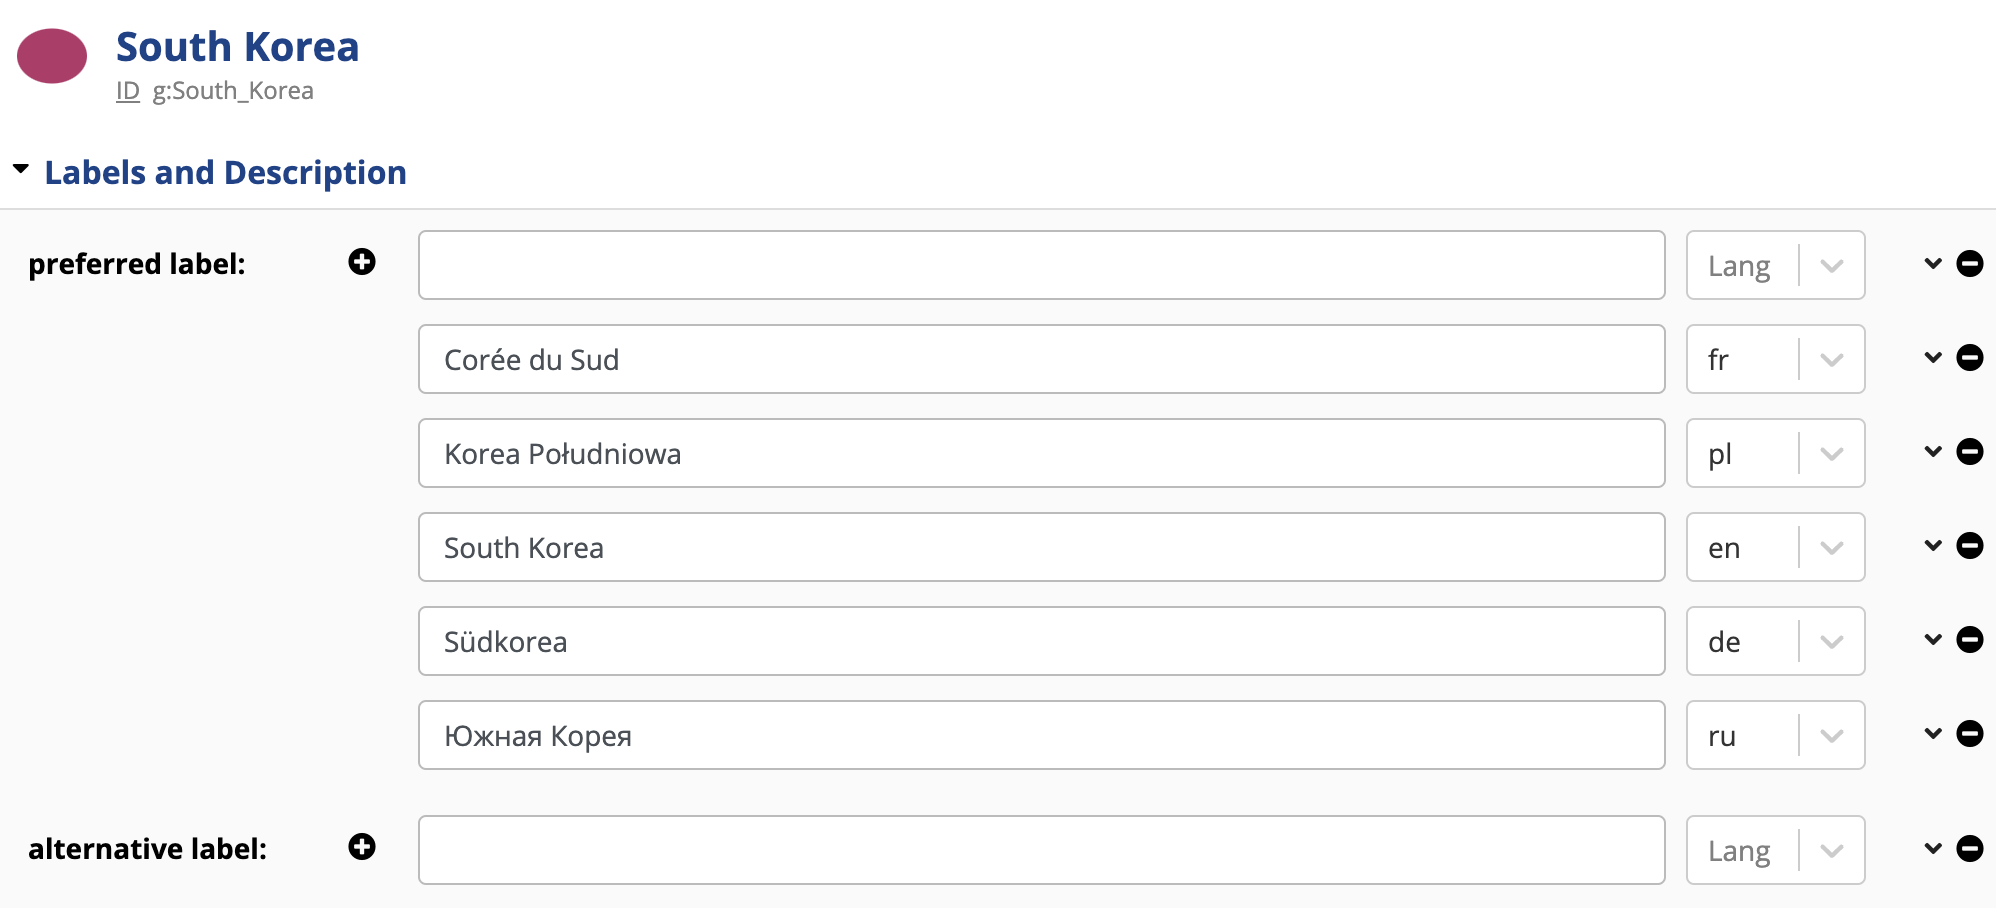
EDG has a built-in set of rules to implement constraints defined as part of the SKOS standard, such as the rule that says that you shouldn’t have two different preferred labels for the same concept in the same language. (Your EDG administrator can customize these rules for each vocabulary and add new ones depending on your vocabulary management requirements).
Another SKOS rule says that you can’t have an alternative label that is the same as the preferred label in a given language. Let’s break this rule and see what happens. Enter “Republic of Korea” as the alternative label for this concept, with a language code of “en”, and click Save Changes. A message box will tell you about the problem, and the label for the property with the problem is displayed in red behind the message box:
TopBraid EDG Taxonomy Preferred Labels
Click this message box’s Cancel button, set the alternative label to “South Korea” with a language code of “en”, and click the Save Changes button again.
Next, we’re going to add a new concept. First, click the arrow next to your “Republic of Korea” node in the Taxonomy Panel to see its children. It only has one: the city of Seoul.
To add a new child node, right click on the “Republic of Korea” in the tree and select “Create narrower concept of Republic of Korea”.
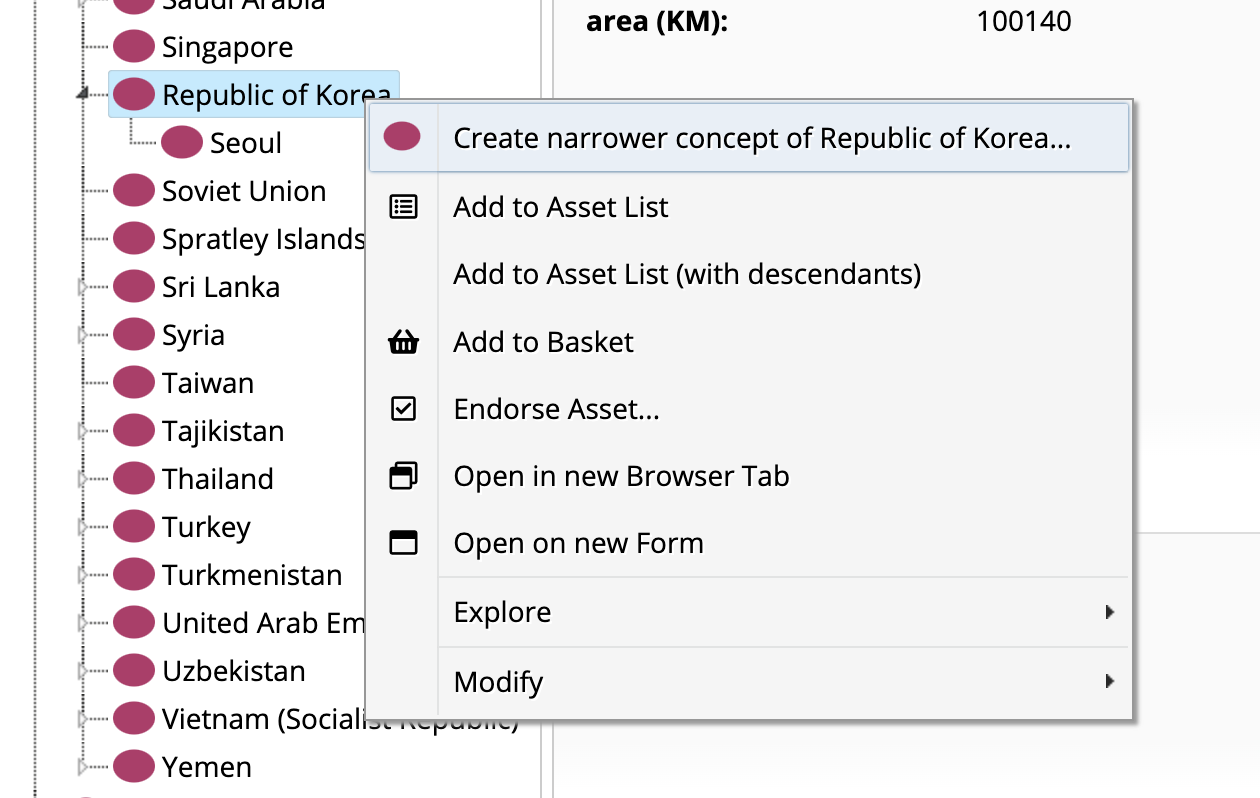
TopBraid EDG Create Narrower Concept Menu
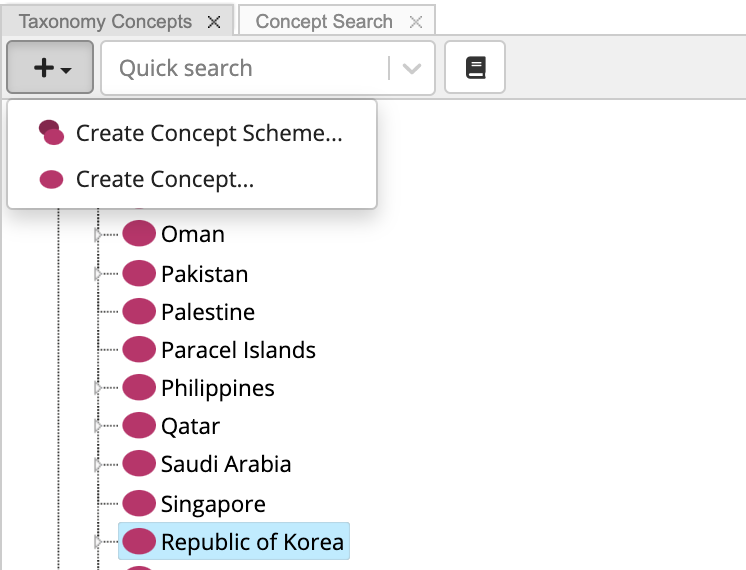
You can also select the “Republic of Korea” node and click on the + button at the top of the panel to create a new concept.
TopBraid EDG Create Concept Menu
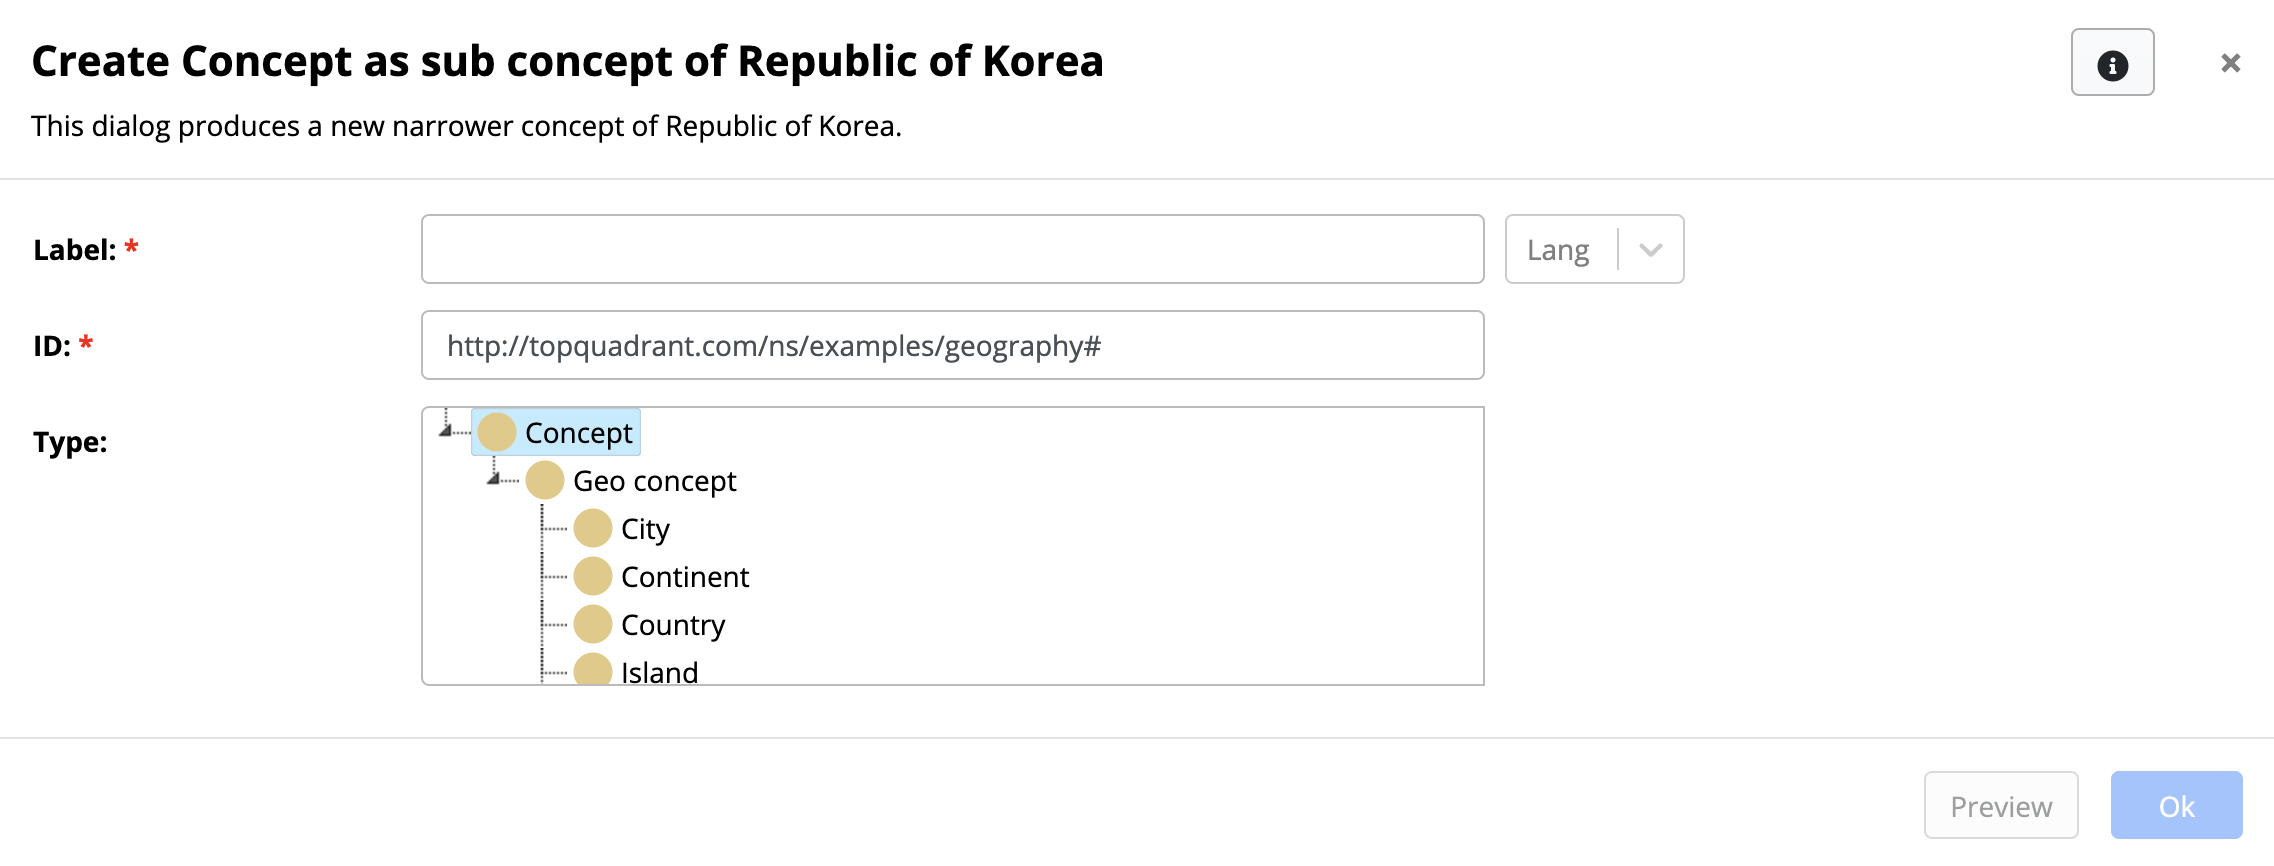
EDG will display a Create Concept dialog to ask you for some information about the new concept.
TopBraid EDG Create Subconcept Menu
The Label is the preferred label for the new concept. Enter “Busan” here. As we saw when we edited the “South Korea” preferred label, we can always change a label later.
The Type identifies whether the new Concept is a regular concept or a specialized sub-class of the Concept. EDG lets you create such classes in an ontology that your taxonomy is based on so that specialized properties can be stored for some concepts but not others—for example, so that forms for editing or searching countries include the calling code, but forms for editing and searching continents do not. By default, every taxonomy is based on the SKOS ontology. However, as described later, you can extend SKOS and include your specialized ontology after you create a taxonomy.
Our Geography taxonomy includes Geo Ontology which defines additional classes and properties useful in describing geopolitical concepts. If you are working with a taxonomy where no special classes were defined, you would leave the default value for type as “Concept”. In our example, there are specialized subclasses of Concept. Click on the Geo Concept in the type tree to expand it and see additional types (classes) available to you. These classes have been defined in the Geo Ontology used by this taxonomy, because you’re adding a city, pick City from the type tree.
The ID is the internal identifier used by EDG to track the concept. Because SKOS is based on the W3C RDF standard, this ID is a URI. Advanced users sometimes have reasons to customize this, but you can’t go wrong by just leaving the default value that appears. Click the OK button to create the new concept.
EDG will add Busan as a new child of Republic of Korea on the Taxonomy Concepts Panel.
For more descriptive properties, EDG includes rich text formatting controls.
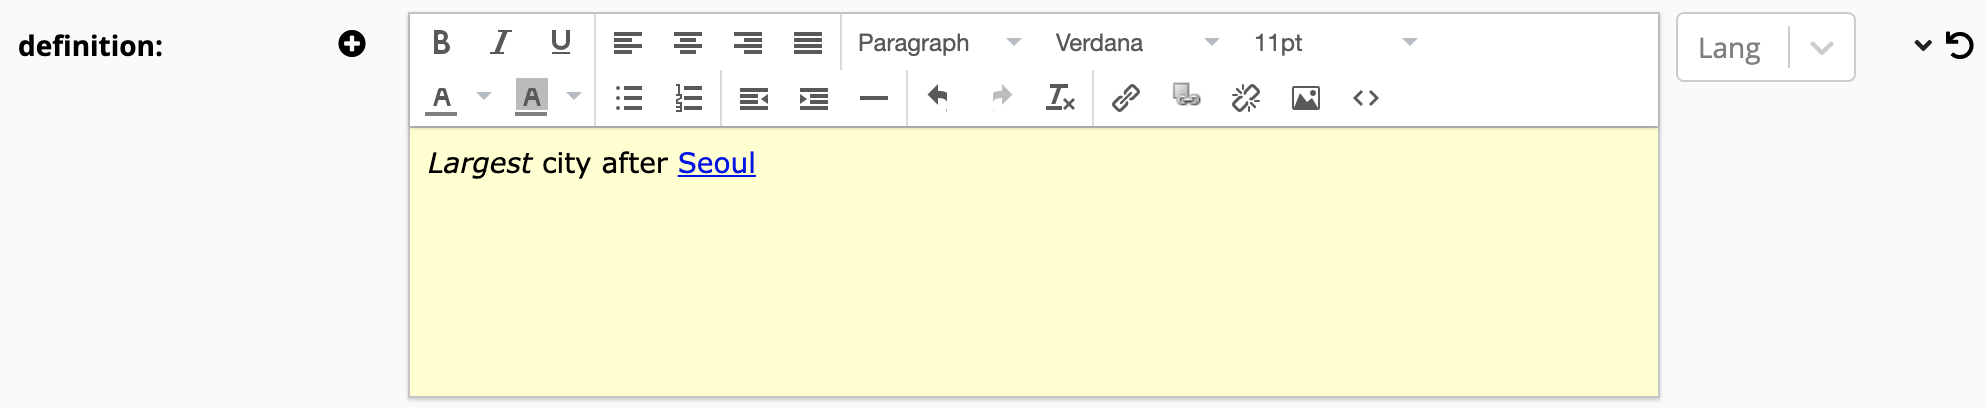
Give Busan a definition of “Largest city after Seoul”, then select the word “Largest” with your cursor and click the I button to set it in italics.
You can also create a link to the concept representing Seoul.
Just select the text you want to become a hyperlink and click on  icon and start typing “Seoul”, then pick the concept from the drop down.
This will insert a link to Seoul.
icon and start typing “Seoul”, then pick the concept from the drop down.
This will insert a link to Seoul.
TopBraid EDG Definition - Insert Link
Click the Save Changes button at the top of your screen, and you’ll see the note you added on the display screen for your new Busan concept.
To insert hyperlinks to web pages outside of TopBraid EDG, use  icon and type or paste the URL.
You can also use this method to link to resources in EDG.
You just need to navigate to their display in EDG and copy the URL shown in the upper right corner of the form.
This approach will let you hyperlink to EDG managed assets that are not necessarily members of the Concept class.
icon and type or paste the URL.
You can also use this method to link to resources in EDG.
You just need to navigate to their display in EDG and copy the URL shown in the upper right corner of the form.
This approach will let you hyperlink to EDG managed assets that are not necessarily members of the Concept class.
Try following similar steps to create a new concept as a child of Busan. Give it a label of “Test”, and leave the Type value at Concept. On the editing form for this new concept, just click the Save Changes button without adding any new data.
We don’t really want this test node, so we’re going to delete it. At the top of the form, to the left of the Edit button, there is Modify menu. Click on it to select Delete. A message box will ask you whether you’re sure that you want to delete the selected node and its associated information. Click OK to complete the operation. Since Test was selected in the form, the form will still display its ID, but no other information. This means that the concept was deleted.
TopBraid EDG Delete Concept Example
You can also delete a concept without selecting it. Simply right click on it in the Taxonomy tree and select Modify>Delete.
History of Edits
Select “Republic of Korea” on the Taxonomy Concepts panel and add the Change History panel (displayed in the Panel menu under Reports) to your layout by dragging it onto your page from the panels menu at the top of the screen. Click the refresh icon in the Change History panel. This shows who made what changes when for this resource:
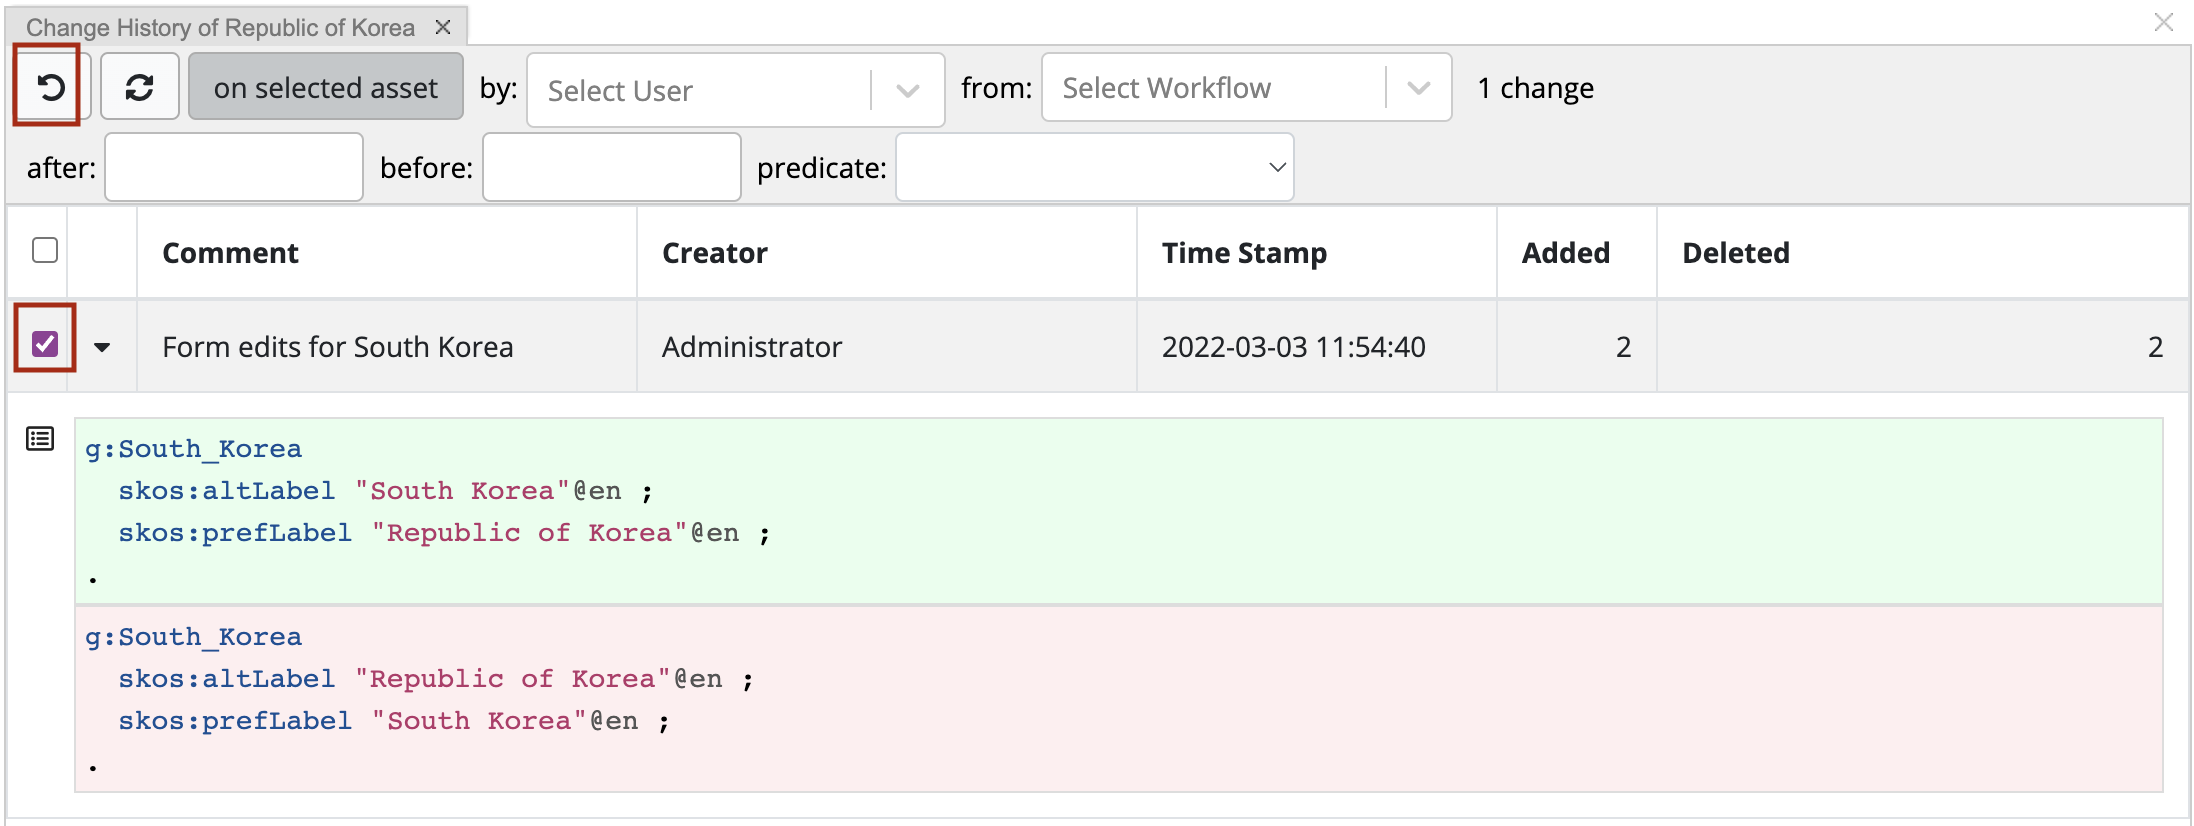
TopBraid EDG Change History Panel
To revert the change, use the check box and the revert button as shown above.
Using the Search Panel
The default layout for Taxonomies includes the Concept Search panel. It is stacked behind the Taxonomy Concepts panel. If you don’t have it anymore, select Search from the panels meny and drag it into place. Here you can use free text searching across all properties or add filters for more specific searches. These panel has a lot of rich features to explore.
TopBraid EDG Concept Search Panel
Use free text search for “land”. The Search Results table shows the first 100 results of this query. In order to see more results use Next button in the bottom-right corner of the results table. You can also change how many results are shown in each table page. For this query we don’t have 100 results so no paging is shown.
Let’s change the search to only search for the “land” string in the preferred label. Click on the Filters button and select “preferred label” in the drop down. Clear the Free Text field. In order to see the column corresponding to the filter, you can select the column icon and choose it or change the settings to display the column with every chosen filter.
You will get a smaller set of results. For example, the first search returns Micronesia and the second does not. Micronesia is returned in the first search because its history note includes “land” string. It says: “Formerly part of the Trust Territory of the Pacific Islands.”.
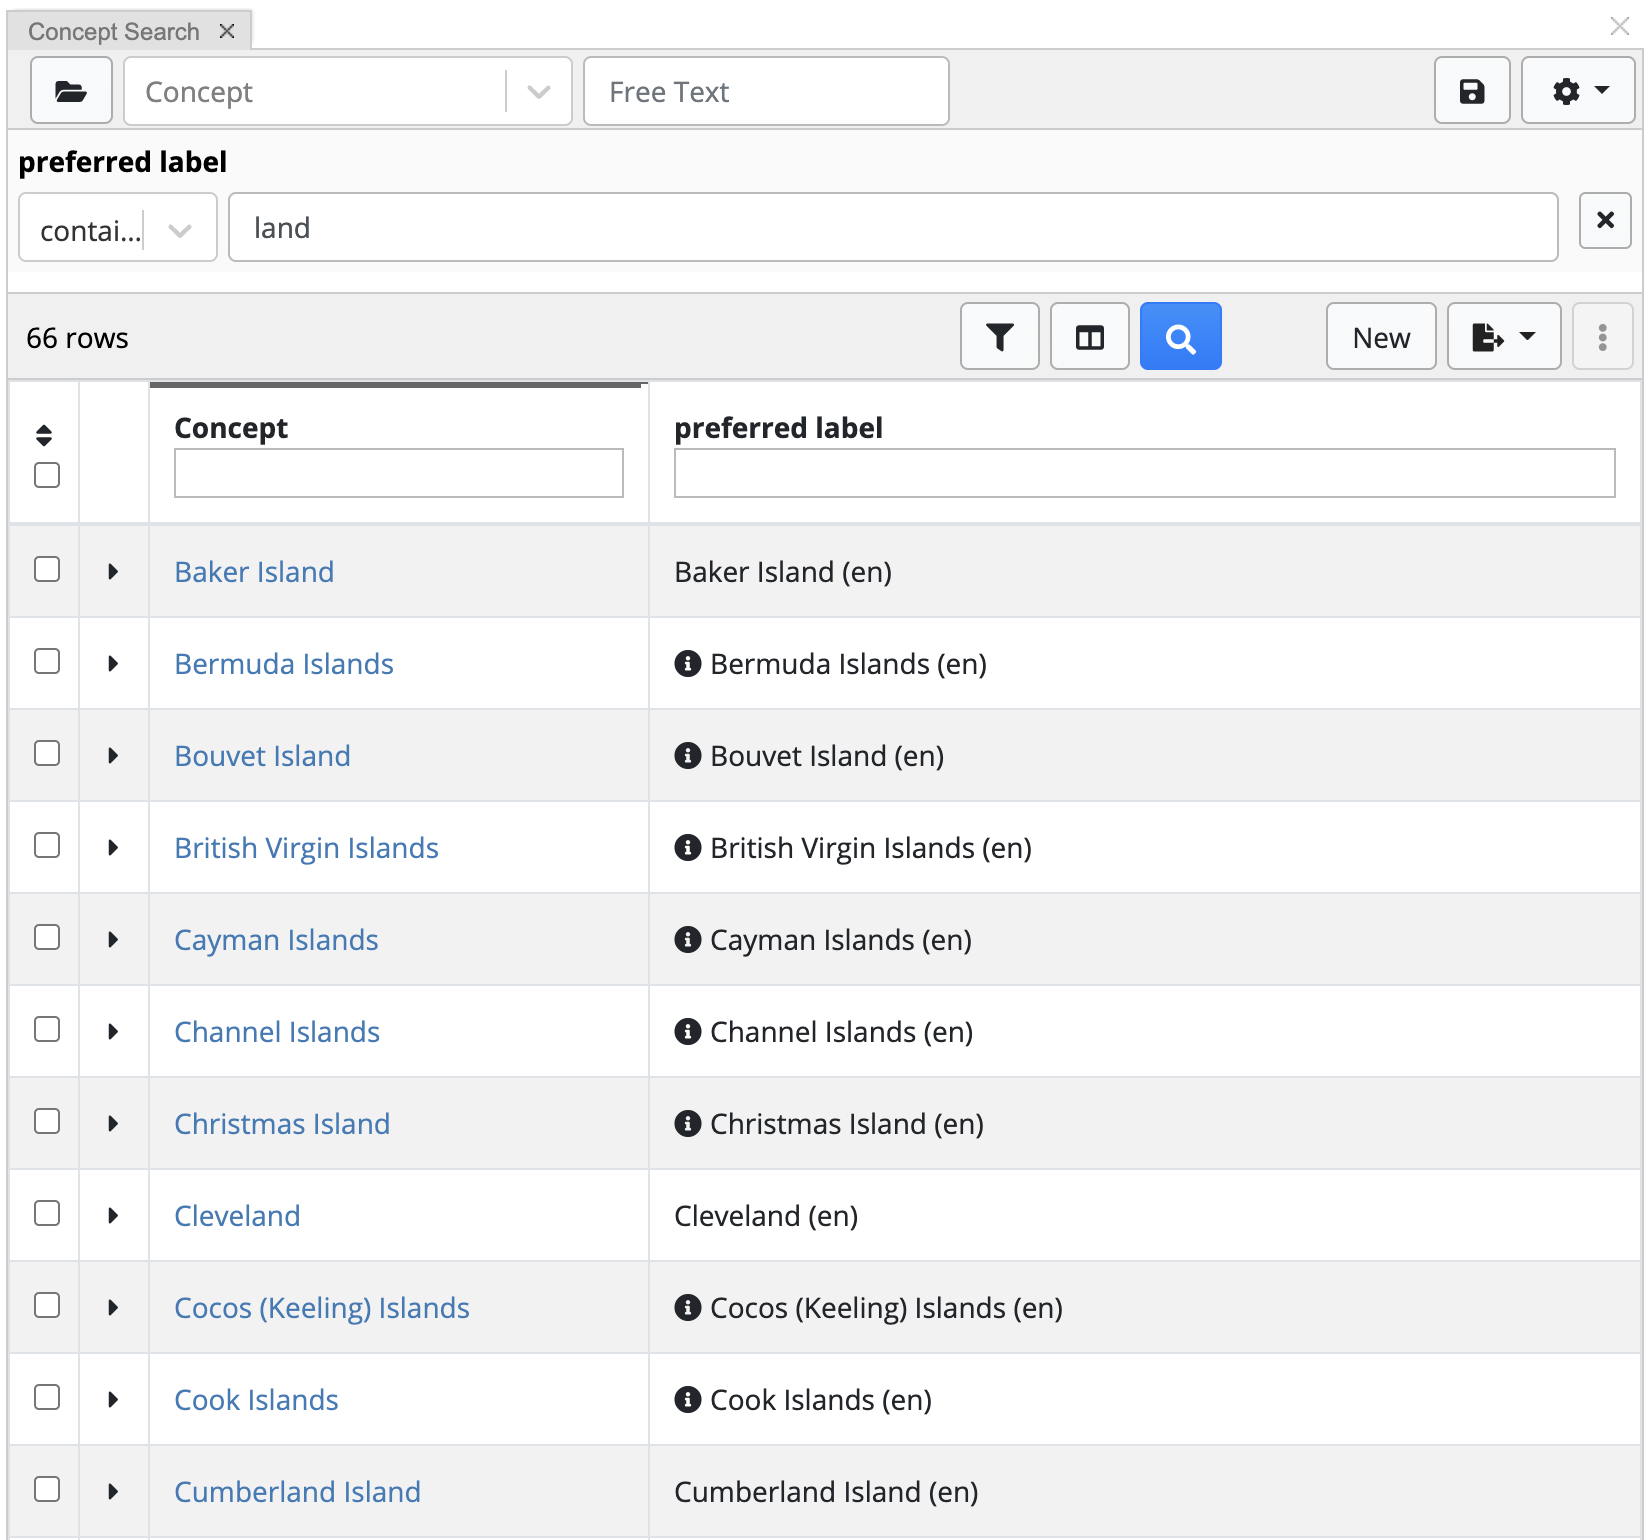
TopBraid EDG Concept Search Results
You can add any column to the table at any time. Let’s modify search results to show “broader concept” value. Click on Columns button, add “broader concept” to selections.
Each filter field also has menu, accessible by clicking the drop-down on its right, that gives you additional ways to specify the search criteria.
The Asset Type drop-down and Asset Type Selector at the top of the search panel let you restrict search to specialized classes and lets you select any custom properties for those types. For example, if you search among the Geography Taxonomy’s Country concepts, you will see the calling code, capital, and language properties available for selection in Filters and Columns drop downs along with the standard SKOS ones such as preferred label and has broader.
In search results table, concept’s preferred labels will be included by default as the resource name, so there is no need to select “preferred label” in the Columns.
Next to the Filters and Columns buttons you also have batch actions and export options. Export the search results to JSON or to a comma or tab-separated value files suitable for importing into a spreadsheet program like Excel.
See also
See Working with Taxonomies for more details on these possibilities.
Navigating Back to Production Copy
You can exit the working copy and return to the production copy of the Geography Taxonomy by clicking on the  button next to the workflow name.
You will see that the preferred label of South Korea is still there, with that name and no Busan child. You’ve been editing a working copy, so the official production version has remained unchanged. We’ll see shortly see how to complete your workflow and update the taxonomy with your working copy’s edits.
Reviewing and Committing Workflow Changes
First, imagine that you’re part of a taxonomy management staff and that it’s time to review the changes you’ve made before accepting them into your taxonomy. Click the Workflows tab at the top of the screen to go to the workflow. Select your workflow from the table. Currently, there is only one workflow in progress, but there can be multiple workflows. Click on the Go To Workflow button at the top of the table.
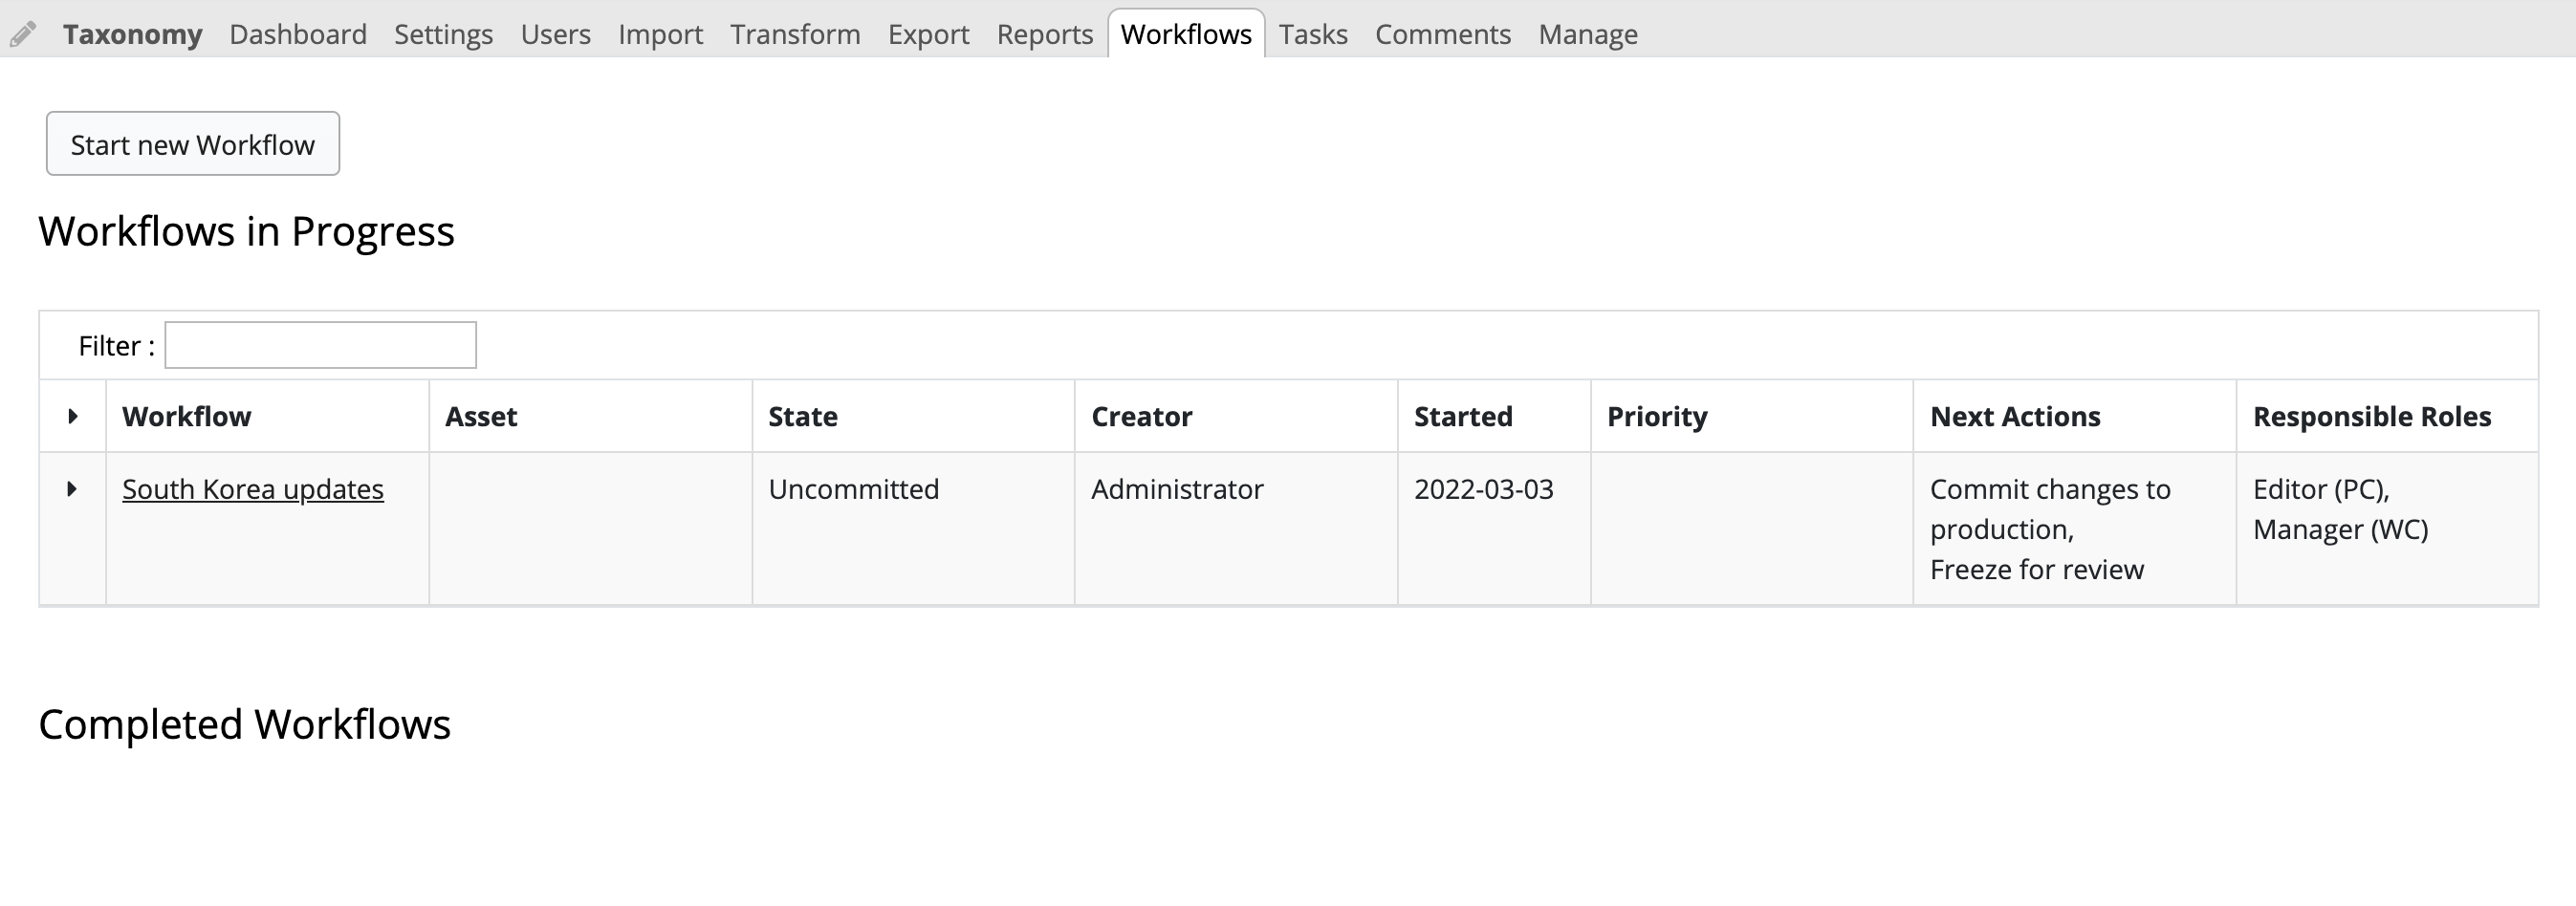
TopBraid EDG Workflows in Progress View
You will see the page that shows workflow status and possible next actions.
There is another way to navigate to a workflow and associated working copy. Under the user button in to top right of the user interface use the My Workflows link. If you click on this link, you will see all workflows for which you have actions – meaning workflows that you can move to the next state. This page will show all workflows you have actions for across all asset collections.
The Workflows tab for a specific asset collection shows only its workflows. And you will see all asset collection’s workflows – whether or not you have an action. You will also see completed workflows.
Click Freeze for Review. Now, everyone—including yourself, the Administrator—only has read access to the the changes in the working copy. Three new links —Approve changes, Reject changes and Request further changes which replace the Commit changes to production and Freeze for review links. Now, no one can edit the working copy associated with the workflow, regardless of their roles, until an administrator like yourself clicks Request further changes which opens working copy for additional changes.
When you click on Taxonomy tab at the top of the screen and you’ll see that the interface for working with the data is pretty much the same as before except that, when you have a resource selected on the concept hierarchy, there is no Edit button at the top of the screen so that you can’t edit the data. (This is the same interface that users who only have Viewer privileges see.)
Note
In a typical production cycle, you would let anyone interested in updates to the vocabulary know that you were finished creating your South Korea Updates working copy and that they should review the changes before you published the changes to the production version of the vocabulary.
In a large metadata management environment, you might have one person creating the working copy, several others editing it, additional people reviewing the changes, and another person publishing the changes to the production copy, but for this tutorial, you’re doing all of these yourself.
Click the Reports tab at the top of the screen, and then click the Comparison Report link. This displays a report that shows where this working copy differs from the production copy—a handy report to run during the final review cycle for a working copy:
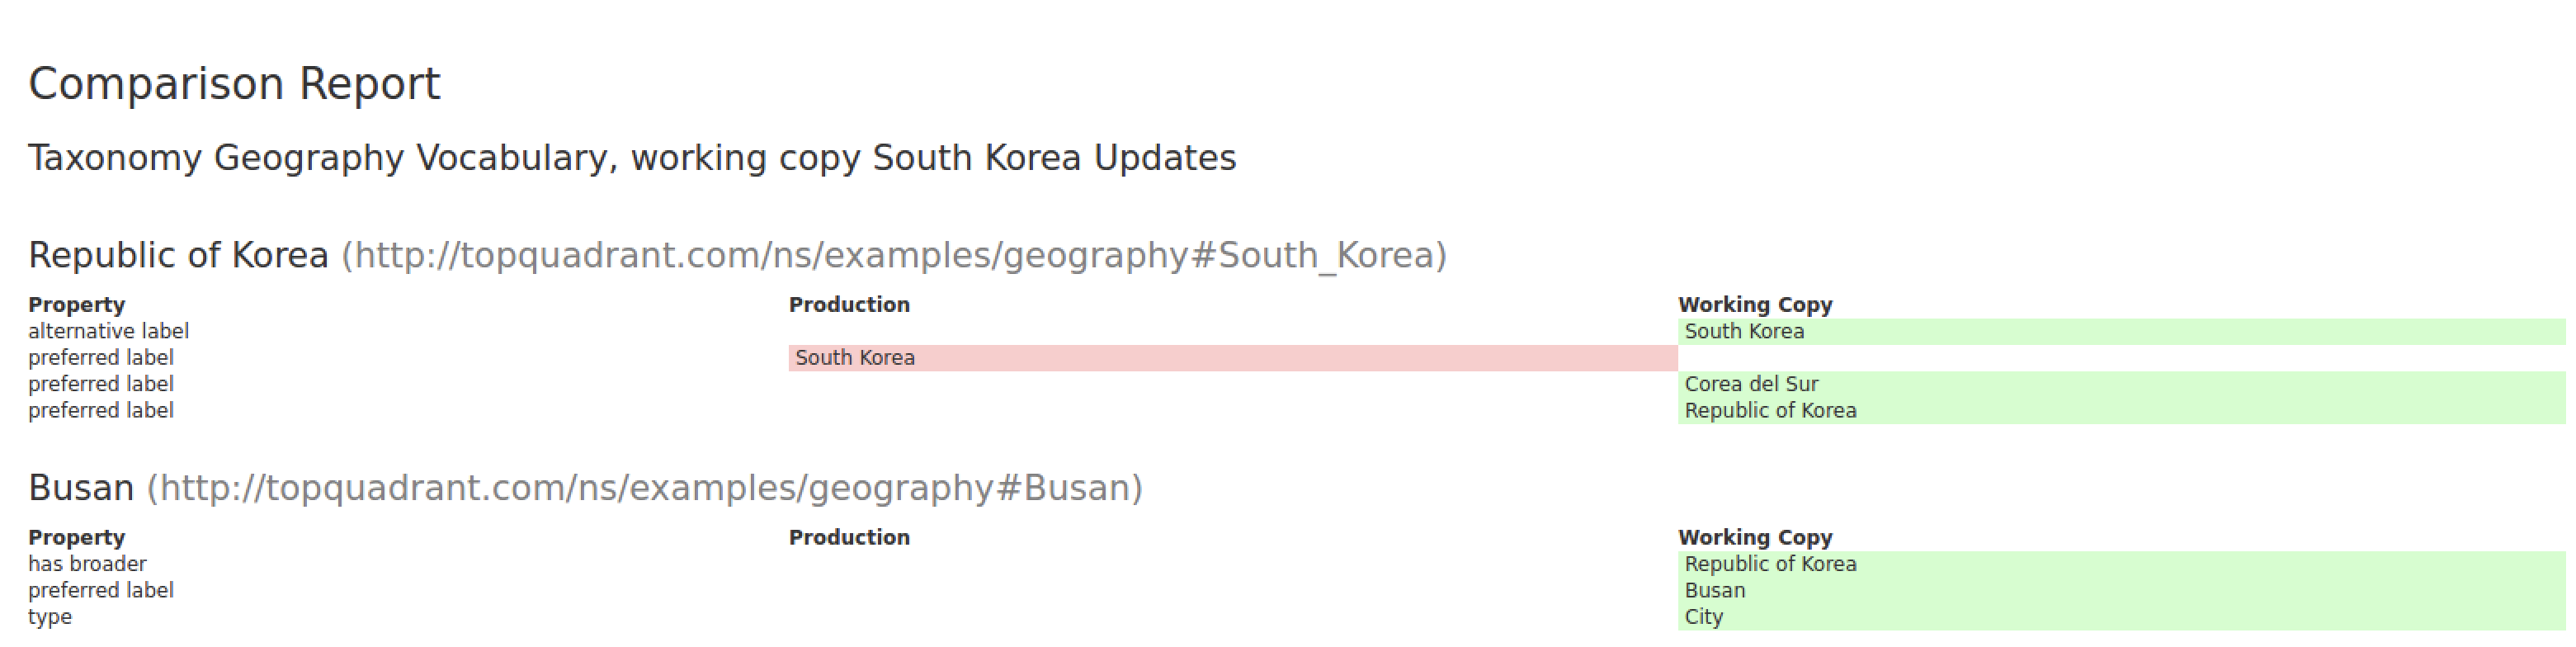
TopBraid EDG Comparison Report View
Note that the See Changes selection on the main workflow page shows the same report.
Let’s say that everyone who needed to review these changes has done so, everyone approves, and you’re ready to make the changes official. On the Textual View in the Update Workflow Status heading, select Approve changes and then Accept changes to production. To perform these steps using the Diagram View, select the icon at the end of the Approve changes arrow and then the icon at the end of the Accept changes to production arrow. After a message box requests you confirm that you want to commit, you’ll see a message that this working copy has been committed. You will be forwarded to the Workflows tab for the Geography Taxonomy where you will see your workflow listed under Completed Workflows.
Click the Taxonomy tab and check Asia’s child concepts again. You will see that the Republic of Korea is there instead of South Korea, and it will have Busan as its child along with Seoul.
Working with Ontologies
When you create a new taxonomy in EDG, it will automatically include the SKOS ontology. SKOS (Simple Knowledge Organization System) is W3C standard for expressing taxonomies and thesauri.
SKOS defines a class (entity type) Concept together with a number of properties (attributes and relationships) that describe concepts. You already seen them when you worked with Geography Taxonomy. For example, preferred and alternative labels and broader relationship between concepts.
Every taxonomy you create in EDG will be based on SKOS. If SKOS does not support all your needs, it is also possible to extend SKOS using a custom ontology. In our case, an example is the TopBraid Examples Geo Ontology. TopBraid Examples Geo Ontology extends SKOS, defining custom classes and properties designed specifically to support geographical concepts. This ontology is provided as a sample.
Including Custom Ontologies
When creating taxonomies, one may want to use custom properties that are specific to the concepts they are working with. In the Geography Taxonomy examples of custom properties are calling code, language and capital. Since these custom properties may not be applicable to all taxonomy concepts, one may want to create custom classes and define some of the properties only for certain classes. In our example, we have custom classes such as Country, City and Continent. Countries can have capitals, but cities do not have capitals. These are the properties and classes that are the custom extensions to SKOS defined in the Geo Ontology.
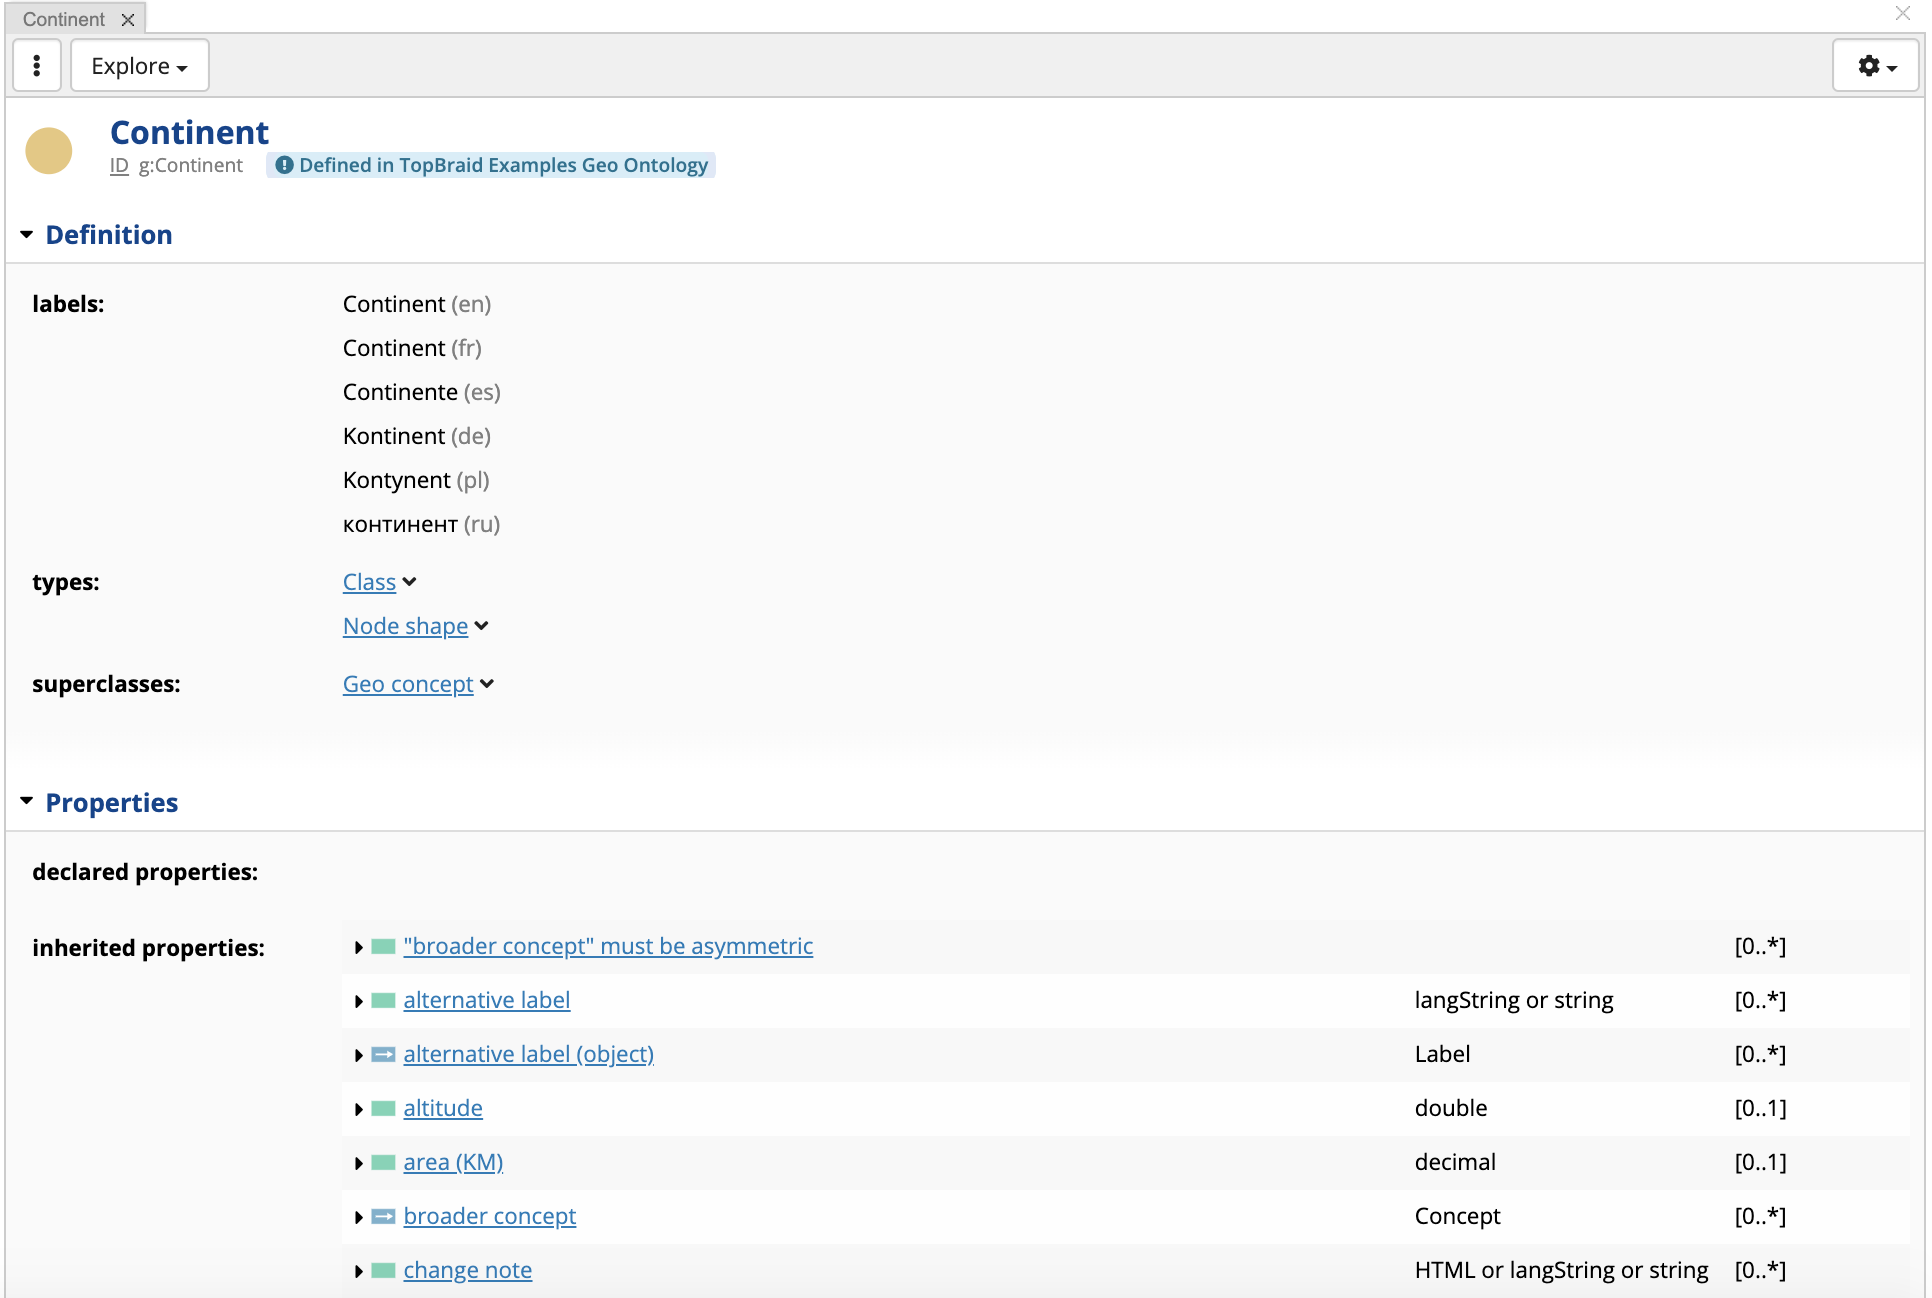
Click on Africa and mouse over its type – Continent. As shown below, this lets you know where it is defined.
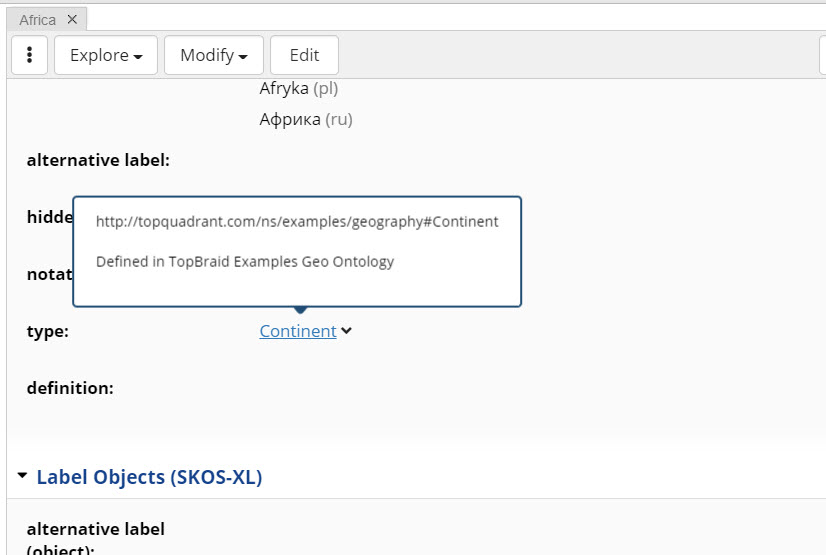
TopBraid EDG Custom Ontology
You can also click on the class name and see it displayed on the form. If a resource being displayed is defined in a different asset collection, you will see a clickable link on top of the form e.g., Defined in TopBraid Examples Geo Ontology.
The form shows information about the class including its properties. Classes and properties can only be modified in an ontology so the form will be not editable as long as you remain in a taxonomy.
Note
The Modify menu and the Edit button are not shown.
TopBraid EDG Class Informtation View
If you click on the blue Defined in TopBraid Examples Geo Ontology link, TopBraid EDG will take you to the Geo Ontology.
To include a custom ontology in to your taxonomy, go to the Settings tab of Geography Taxonomy. Take a look at the information listed under Includes heading: Geography Taxonomy includes TopBraid Examples Geo Ontology.
In TopBraid EDG, includes are used to combine asset collections.
Note
The Geography Taxonomy also has a “system includes”. Click to see what it is. It is the SKOS model which is automatically included when a new taxonomy is created.
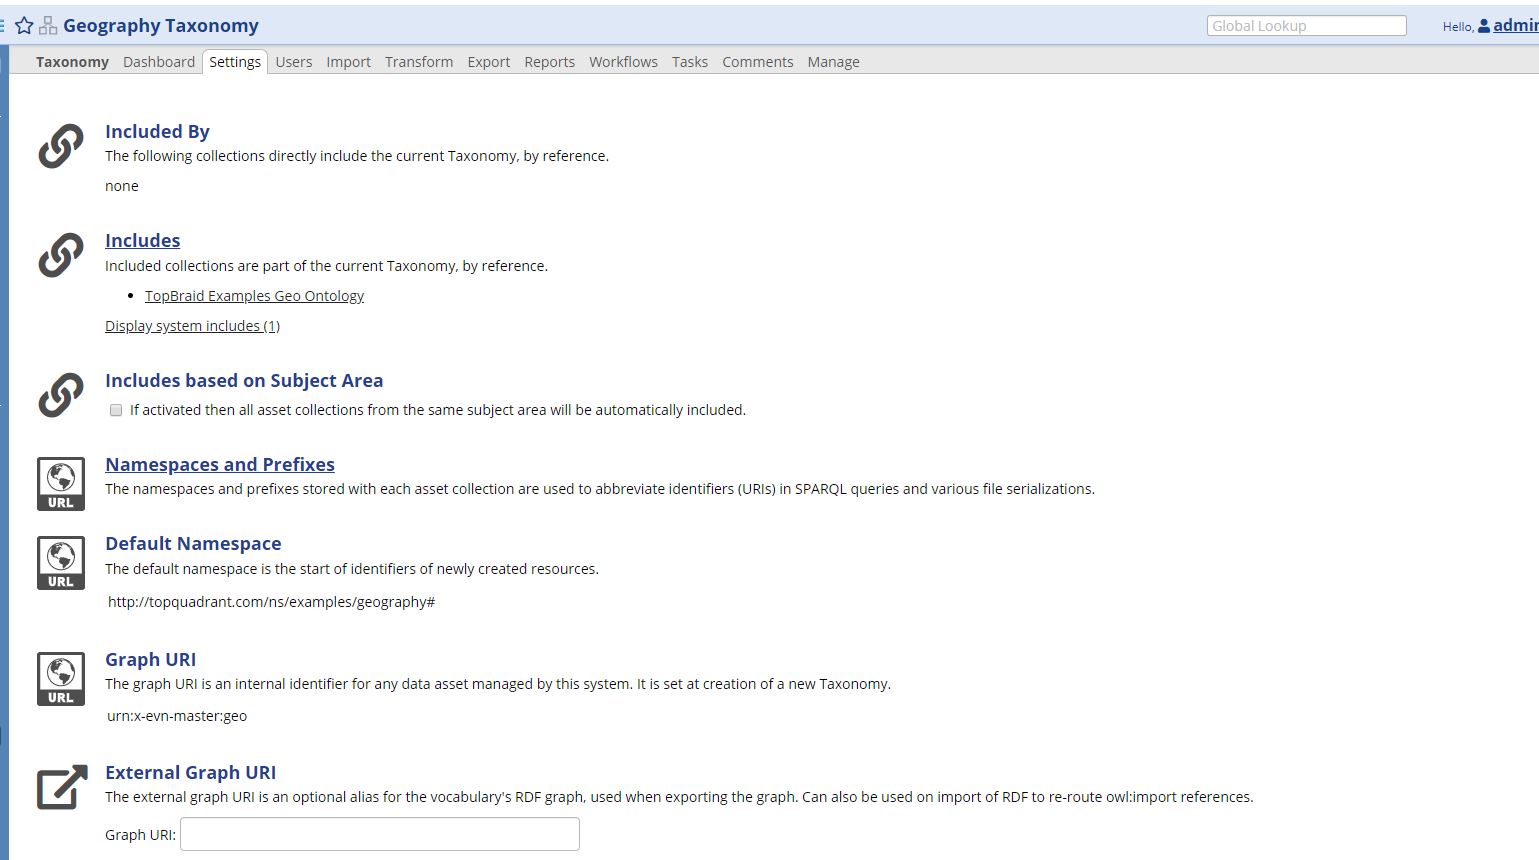
TopBraid EDG Geography Taxonomy Includes
If you click on the Includes link, you will get a dialog that lets you add and remove included asset collections. You can use it to add a custom ontology to your taxonomy – in order to use custom classes and property. You can also use it to combine other taxonomies with the Geography Taxonomy.
A “system include” is always there. It does not need to be added and can’t be removed.
Should you want to combine two taxonomies, you would do this by either including one of taxonomies into another or by creating a third taxonomy and including two taxonomies into it. You will not be able to delete any content from an included taxonomy because it is included by reference. You can only add to it. For example, if you include another taxonomy, you will not be able to remove any of its concepts nor change pre-existing concept descriptions, However, you can add additional descriptions and build new links between your concepts and the concepts in the included taxonomy.
Note
If you need to have some common inclusions apply automatically to all taxonomies created in EDG, an administrator can set them via EDG Configuration Parameters section Configure Asset Collection Types.
We are now ready to go to the Geo Ontology. You can click on its name in the Includes section. You can also use the “Collections” menu drop-down in the header. This menu lets you navigate quickly to any asset collection.
Exploring Classes and Properties in an Ontology
When you navigate to an Ontology, you will see the Class Hierarchy panel. As with the Taxonomy Concepts panel that displays a hierarchy of concepts, you can expand the Class Hierarchy by clicking the arrows next to each class (concept type) name. You see in the Class Hierarchy panel that some classes are displayed with a lighter icon. These classes are pre-build and come from SKOS which we have included in the Geo Ontology so that we could define specialized classes under the SKOS Concept class.
Selecting a class will display it on the form on the right. And the Property Groups panel below the Class Hierarchy panel will show properties defined for a class. This panel organizes properties into groups representing sections that will appear on the concept’s forms. All properties are also displayed on the class form. Most of the properties come from SKOS. They are displayed using lighter colored icons.
Below we see that the Country has several custom properties that are specific to it. On the form, they are shown as declared properties e.g., calling code, language and capital. Other properties are inherited from the parent classes – the Geo concept (e.g., altitude) and Concept (e.g., alternative label).
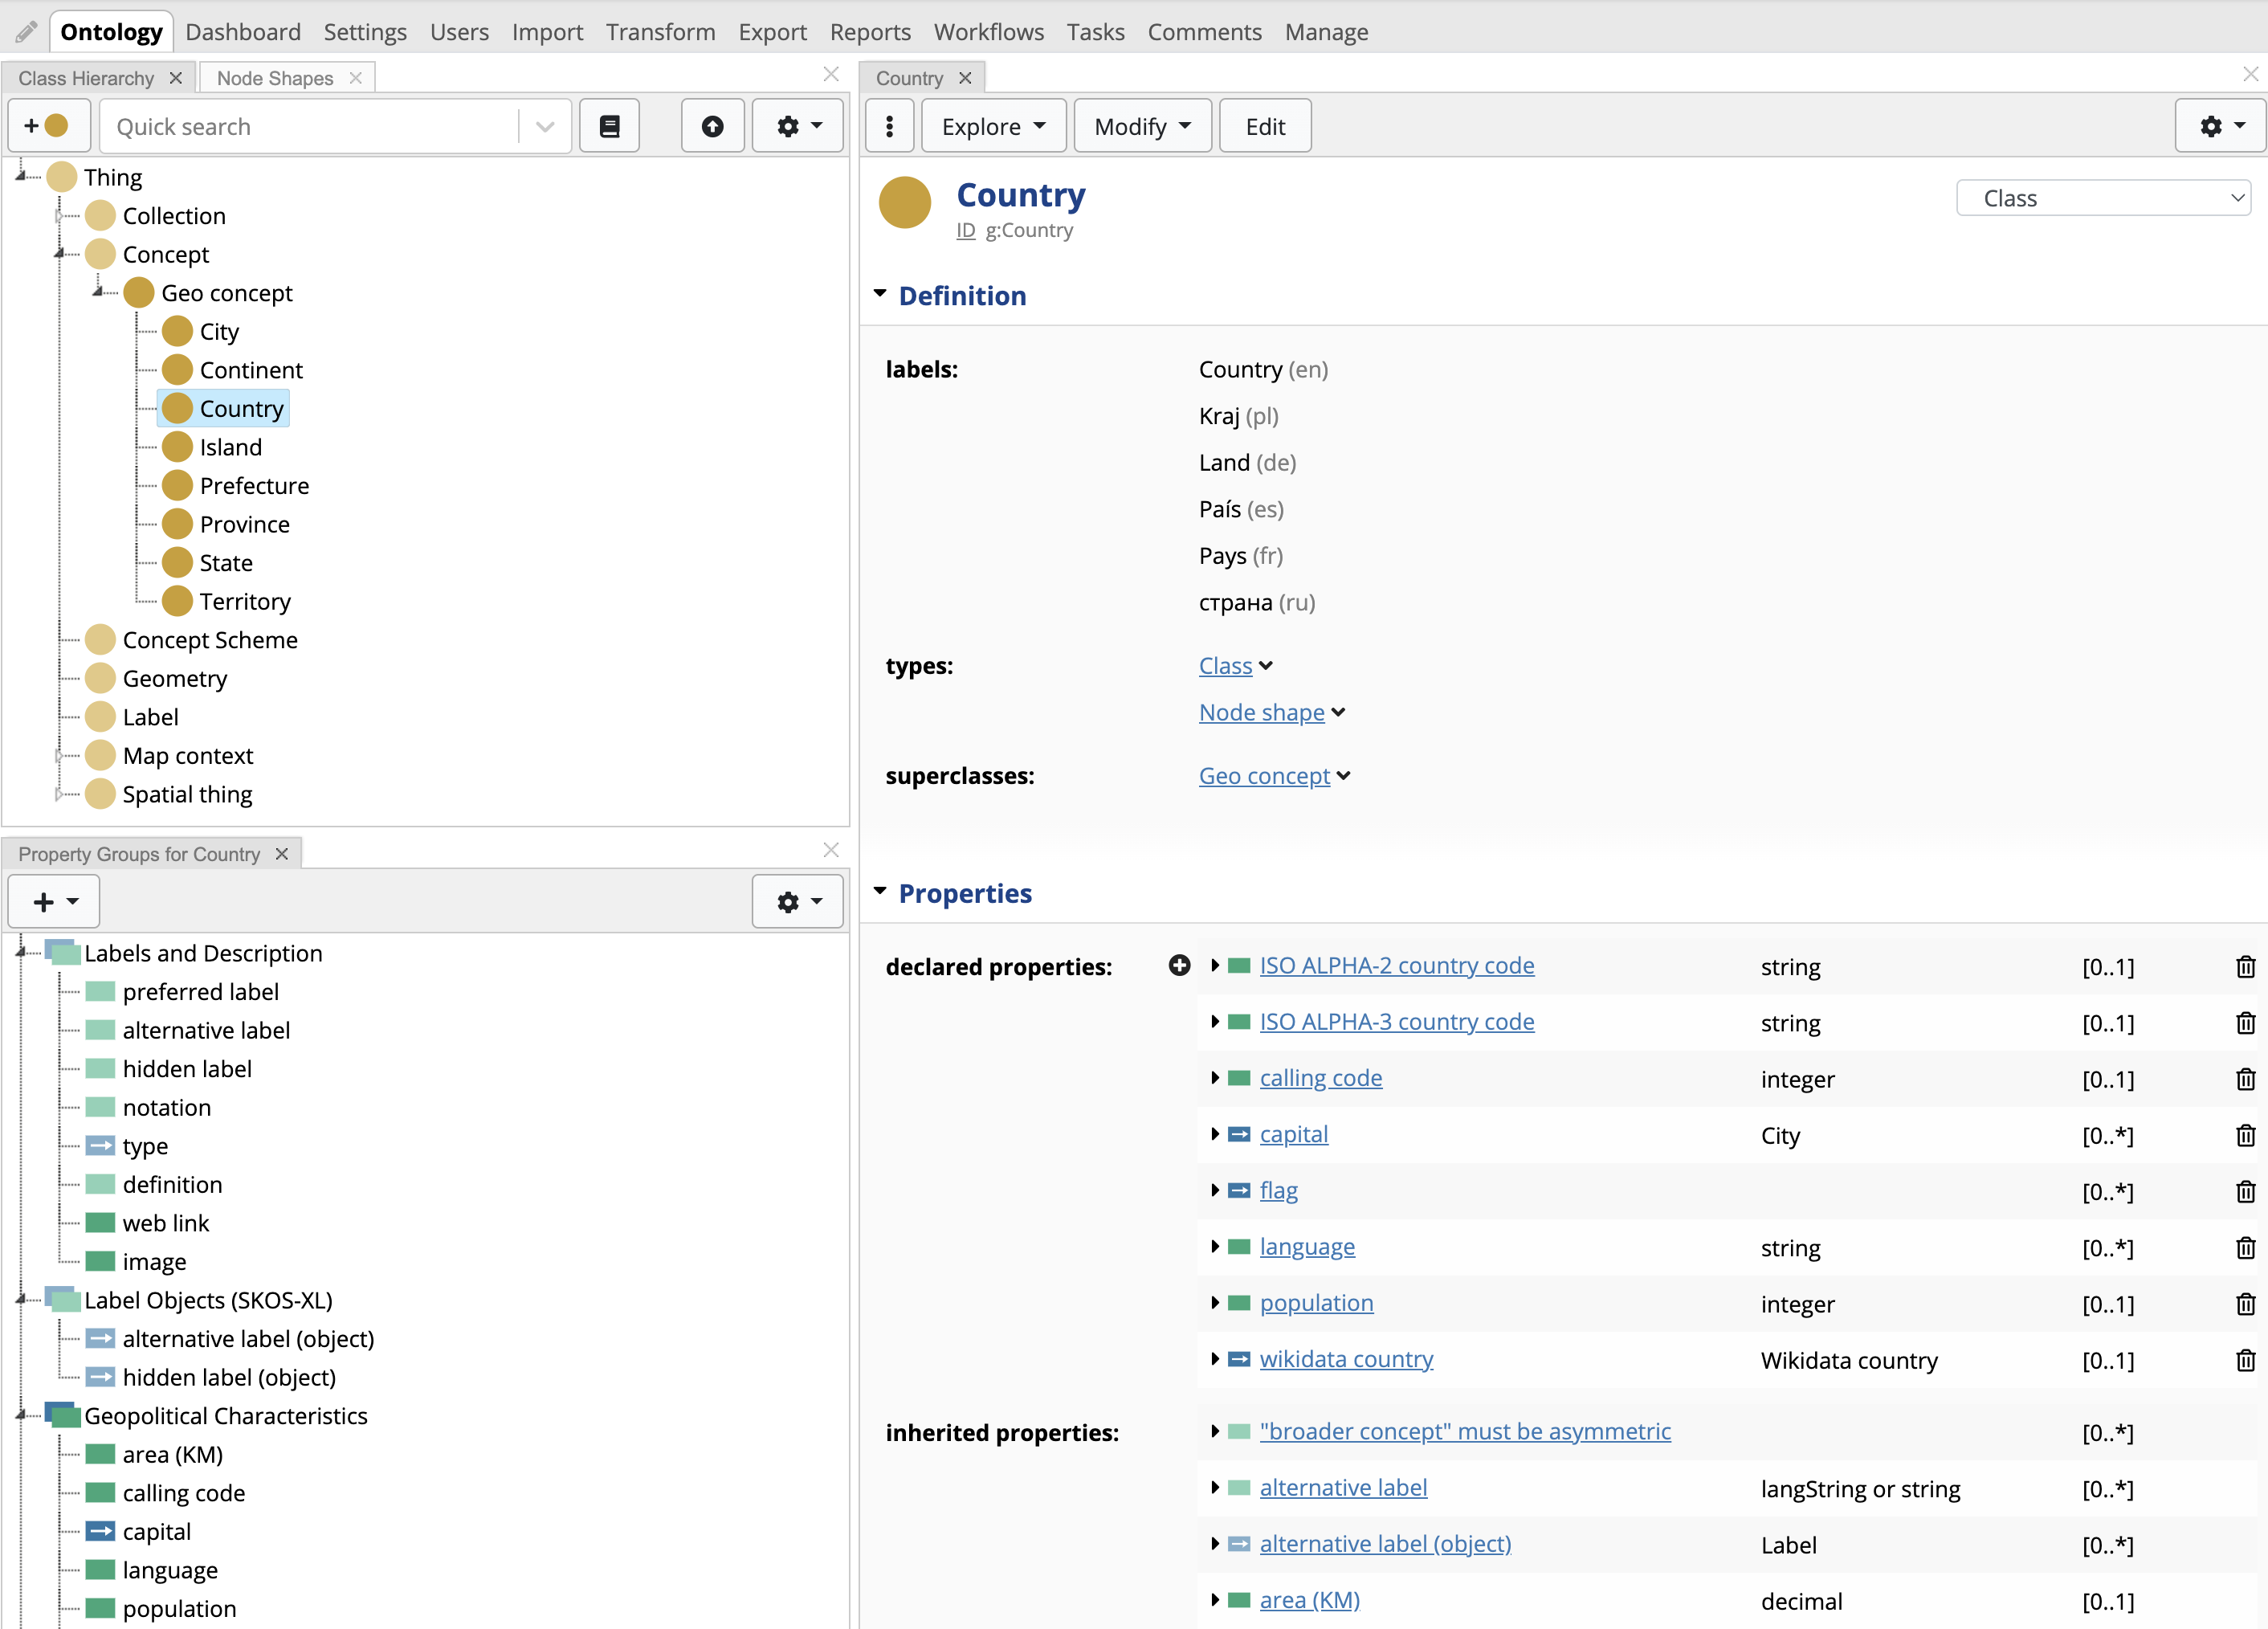
TopBraid EDG Geo Ontology - Declared Properties
You can add new classes and new properties. You can also delete classes and properties – unless they come from SKOS.
Warning
You need to be very careful about deleting classes or properties from ontologies that are already in use because there may be data that is using these classes or properties. For example, if you delete the class Country, all countries in the Geography Taxonomy will loose information associated with their type. Countries will still be there, but without type information, you will not get useful forms to edit data and to create new countries. Also, the names of the fields such as “capital” will disappear since they are defined in the ontology. You will still see the capitals, but instead of the human readable field name “capital”, you will see a long URI – id of the “capital” property used in the taxonomy.
See also
For more details on using ontologies, please see the user guide page for Working with Ontologies.
Disabling SKOS Attributes and Relationships
While editing, you may have noticed that there are a lot of fields (properties) available for concepts. Many of these come from SKOS. You may not want to use all of these properties in your taxonomy. While you can’t delete SKOS properties, you can disable them. To remove (disable) some of the fields for Geography Taxonomy or any other taxonomy that uses Geography Ontology, click on a property you want to disable e.g., editorial note.
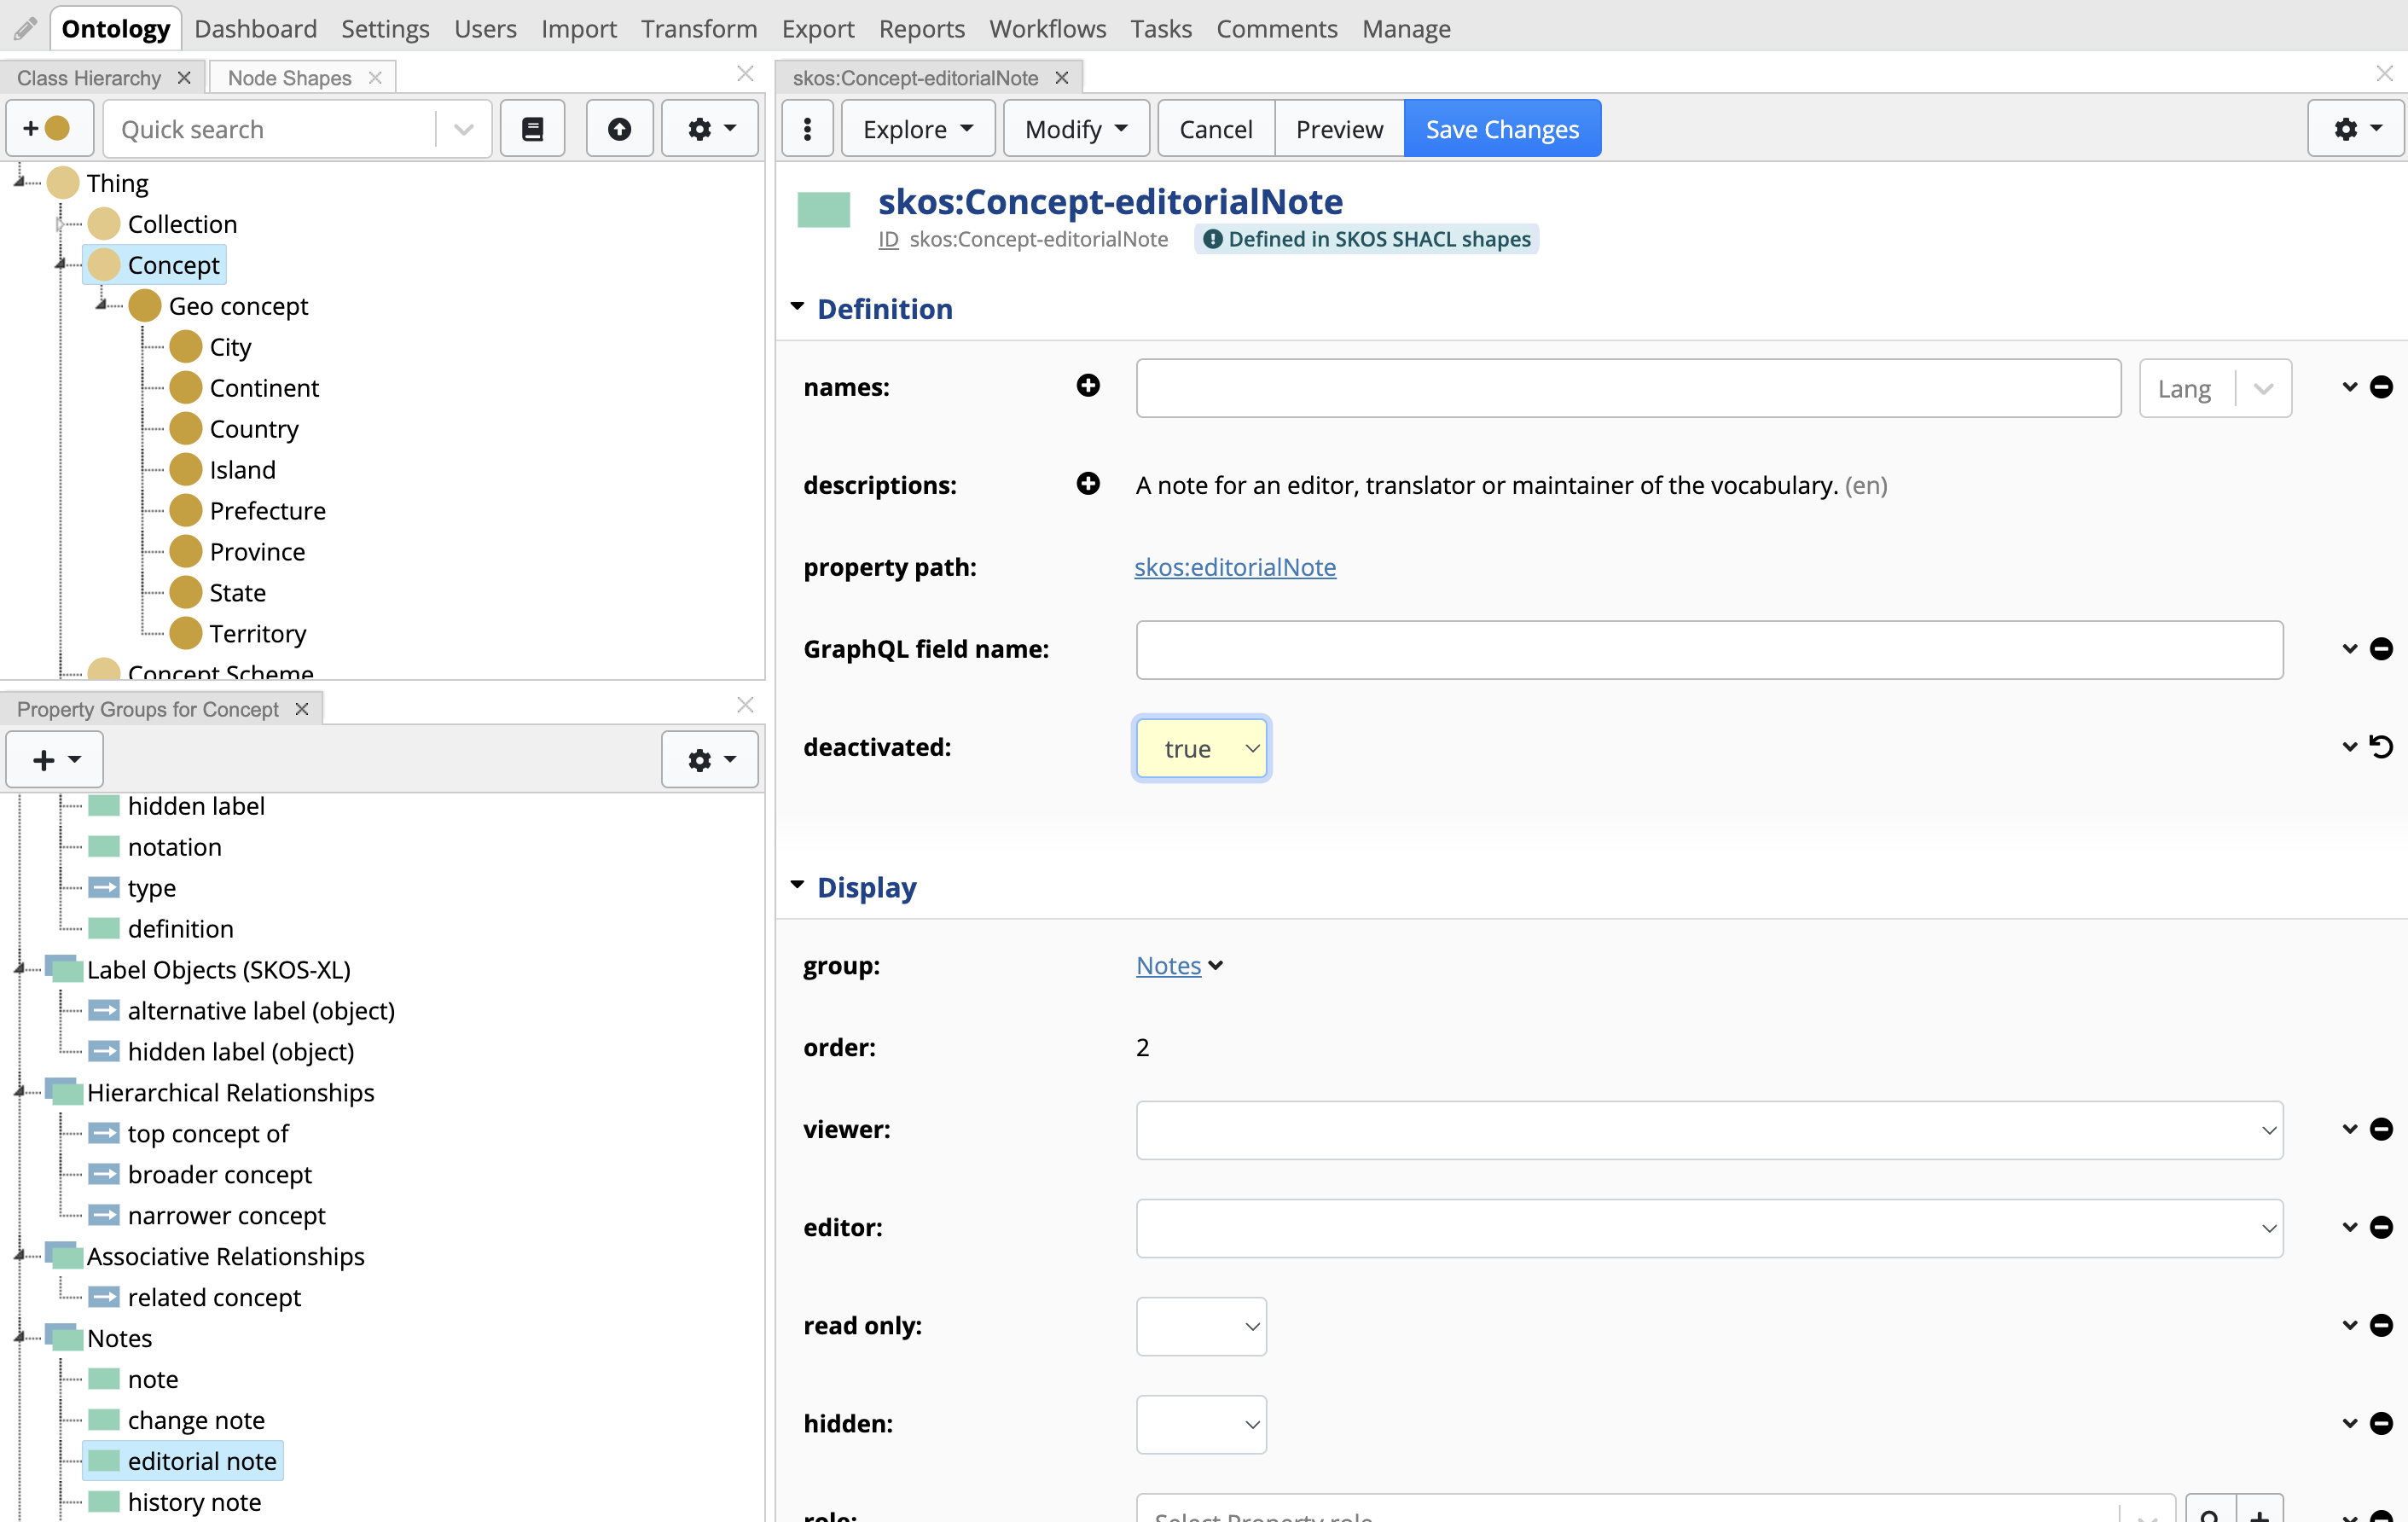
TopBraid EDG Disable SKOS
Information describing values of a property for a specific class is called a “property shape”. When you click on the property, the form will display its shape information – as shown above.
Click on the Edit button and set deactivated to ‘true’. This will disable the field for all instances of Concept.
If you do not see deactivated field, click on the Settings icon at the top of the form and make sure that Also show properties that have no values option is on.
If you later decide to enable this property again, simply remove “true” from deactivated.
Creating an inferred or calculated property
You can define additional classes as sub classes of Concept. You can also define new properties by clicking on the + icon in the Property Group panel. The new classes and properties will be available to you in a taxonomy as long as your taxonomy includes the ontology defining these schema elements.
Some of the properties you define can be inferred or calculated from the values of other properties. Let’s create such property now.
Select Concept class to refresh the properties panel. Click the plus to add an attribute. Call it “number of parents”.

TopBraid EDG Create Attribute Menu
Selected integer as the datatype. Click Save Changes.
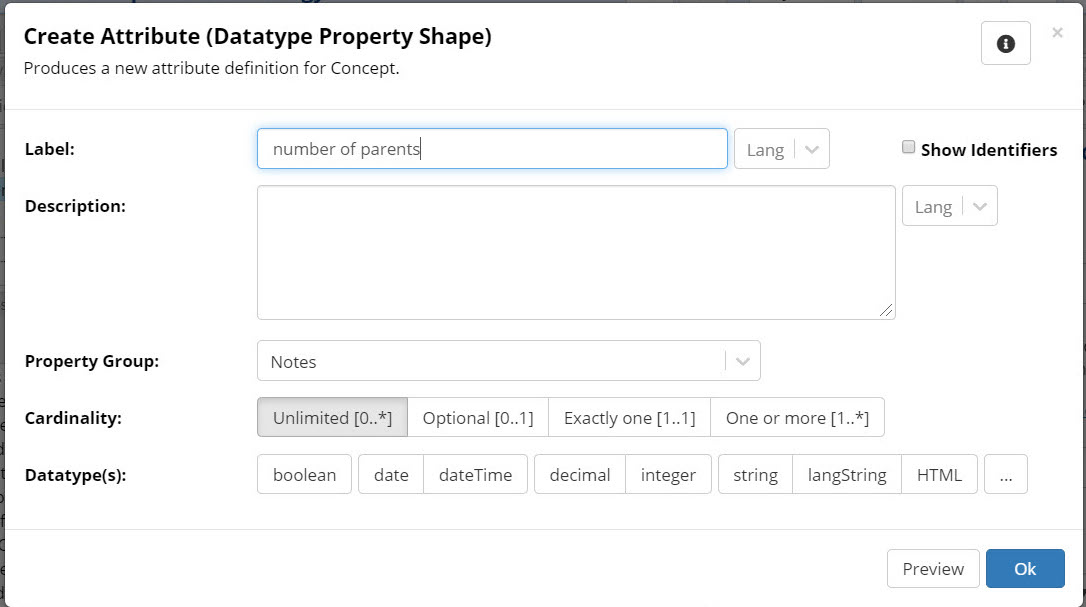
TopBraid EDG Create Attribute Form
Click on the newly created property to refresh the form panel.
Click the Modify Menu – Create property value rule from template ….
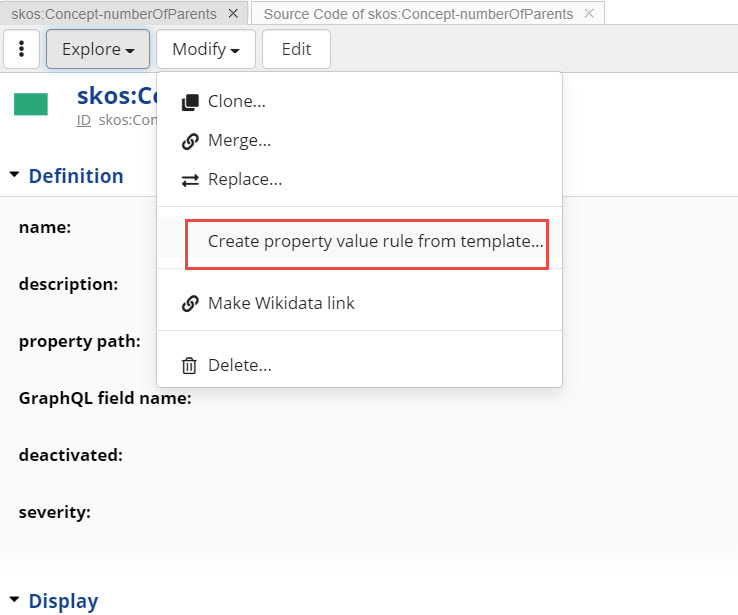
TopBraid EDG Create property value rule from template Option
Select Number of property values template and then select a property to count the values of – “broader concept”.
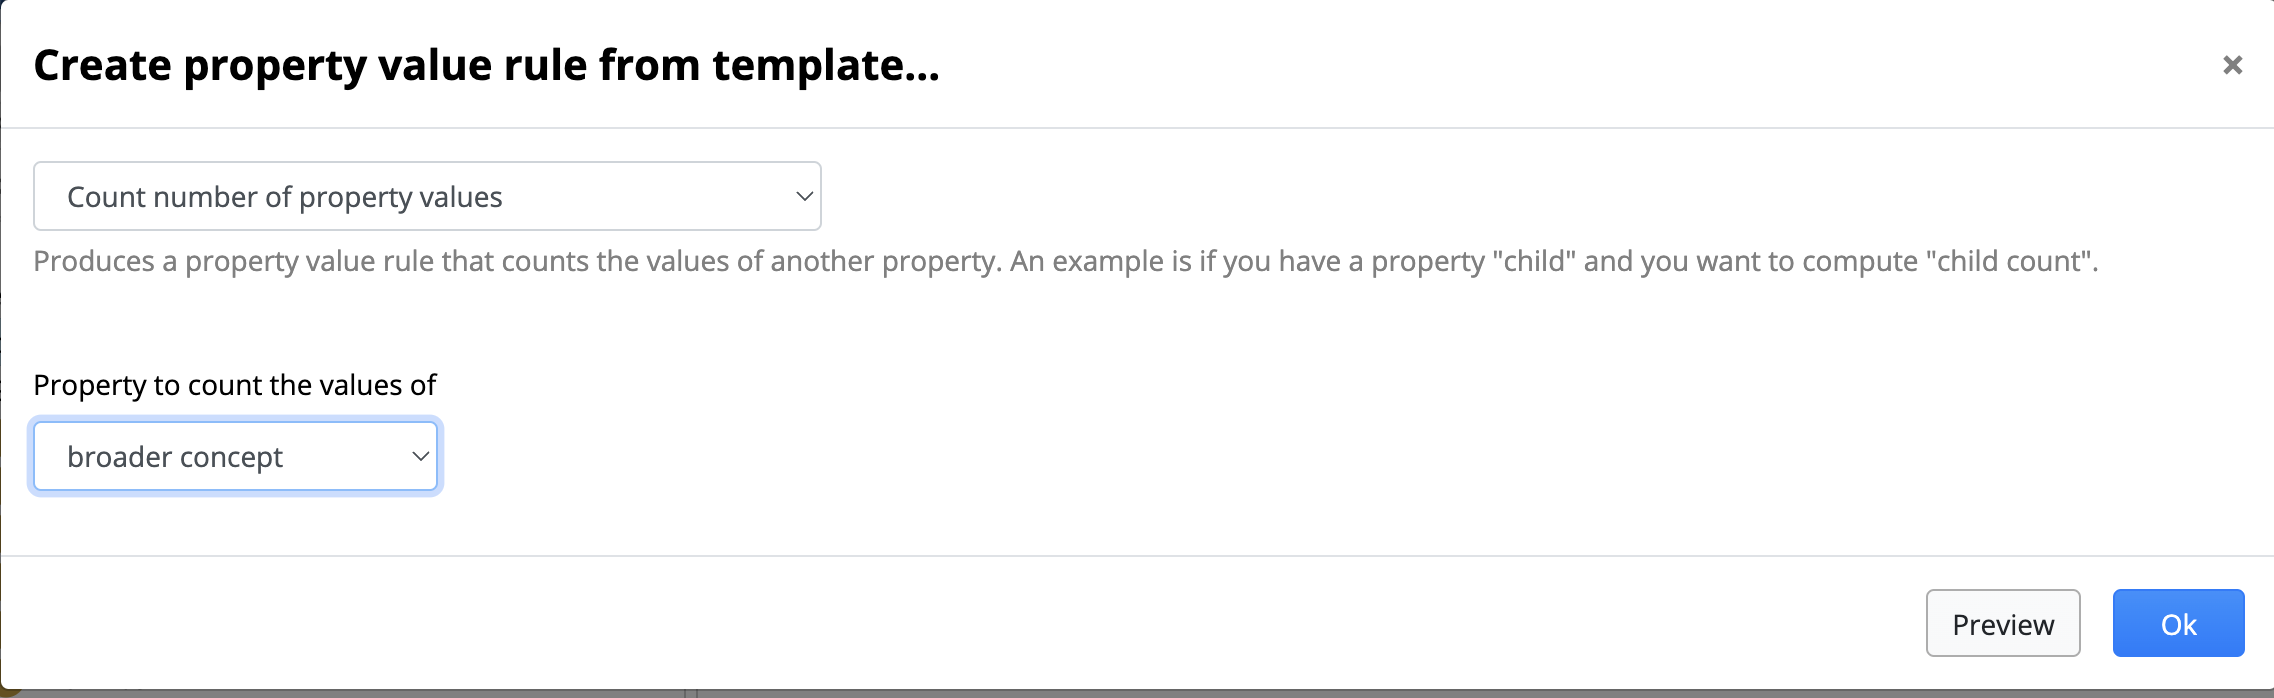
TopBraid EDG Create Property Value Rule View
Click Finish. Your inference rule is complete and will be displayed pictorially in the form for the property.
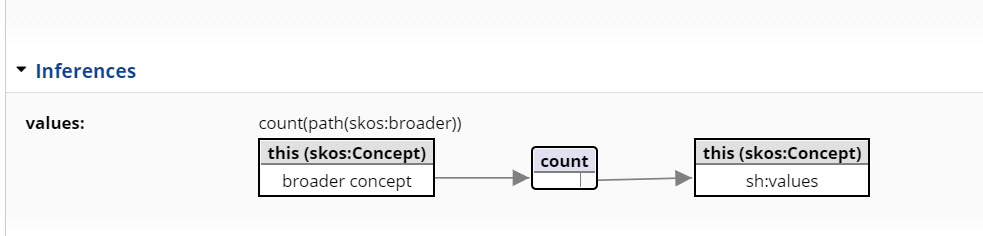
TopBraid EDG Inferences Section
Mouse over the values label to see the textual definition of the rule. It is defined using W3C standard SHACL. We will not be making any changes, but any user that knows SHACL can make updates to the rule. Further, power users can define additional templates for the rules your organization will commonly need.
Navigate to the Geography Taxonomy. Click on any concept. You should now see a new property. Because you have not associated it with any of the group, you will see it added at the bottom of the concept’s form in the section called Other Properties. If desired, you could go back to the Geo Ontology and associate the new property with one of the pre-defined groups/sections and you can even create a new group for it. This is done property panel.
For most of the concepts, the value of the property will be “1”. The very top concepts like Africa will have the value “0” since they do not have any broader parents.
Note
You will not be able to edit this value since it is calculated.
You will be able to search on it – just like on any other value. Open the search pane, select the property from the Filters drop down and search for concepts with at least two parents. You will see that there are a few concepts with multiple parents.
For example, Belfast appears under both, Ireland and Northern Ireland.
Learning More
You’re now ready to explore the User Guide to learn about all the other features available as you use TopBraid EDG – Vocabulary Management package. You’ll find out how to view reports on vocabularies, how to export them to and import them from spreadsheets and other formats, how to perform batch operations on them, and more.