How-to Guidance
Refactoring Ontologies
If you have an ontology that contains both schema and instances or a file that contains both and you want to separate them, the option on the Transform tab > Copy or Move Instances from Other Asset Collection lets you separate instances from schema definitions.
Create an asset collection that should contain the instances if one does not exist already. Navigate to its Transform tab and select Copy or Move Instances from Other Asset Collection. In the displayed dialog, select the ontology that currently contains instances. Then, select classes which instances you want to move.
Example: You may have RDF file that contains classes, properties as well as instances and you want to separate them. Create an ontology in EDG and load RDF file. Create another asset collection such as Taxonomy, Reference Dataset or Data Graph. Base it on your ontology. Use Copy or Move Instances from Other Asset Collection to move instances to it from the ontology.
See also
For additional discussion on the use of Node Shapes that are not classes see https://www.topquadrant.com/classes-and-node-shapes-when-to-separate/.
Converting OWL ontologies
To Transform OWL to SHACL see shacl_enablement_target.
To add SHACL declarations to a class that is not yet defined to be a Node Shape, select it and then use Modify > Enable SHACL constraints for this class.
Working with RDFS/OWL
EDG is optimized for using SHACL to describe characteristics of class instances. You can export an ontology in either RDFS or OWL using Export > Export Ontology as RDFS file or Export > Export Ontology as OWL file. It will translate SHACL expressions in to either RDFS domain/range statements or into OWL restrictions.
You can also create RDFS/OWL expressions directly in EDG. Besides using the Source Code panel and typing in Turtle, you can also use forms and OWL Manchester syntax in the fields for rdfs:subClassOf and/or owl:equivalentClass and/or disjointWith values. If you decide to use this option, make sure to turn on Manage > Also create global OWL Properties. You may also want to:
Make the RDFS/OWL view of the class Form a default. This can be done by selecting RDFS/OWL class view Node Shape in the Node Shapes panel and making this shape a default for some or all governance roles – Edit the node shape to see this option. In this view, you will not see any properties declared using SHACL, but you will see some additional OWL fields e.g.,owl:equivalentClass and fields to select properties a class is in rdfs:domain and rdfs:range of. In this view, the class form is shown in the figure below.
Add RDF/OWL Properties List Panel to your default layout and, possibly, remove the Node Shapes and Property Groups panels from it
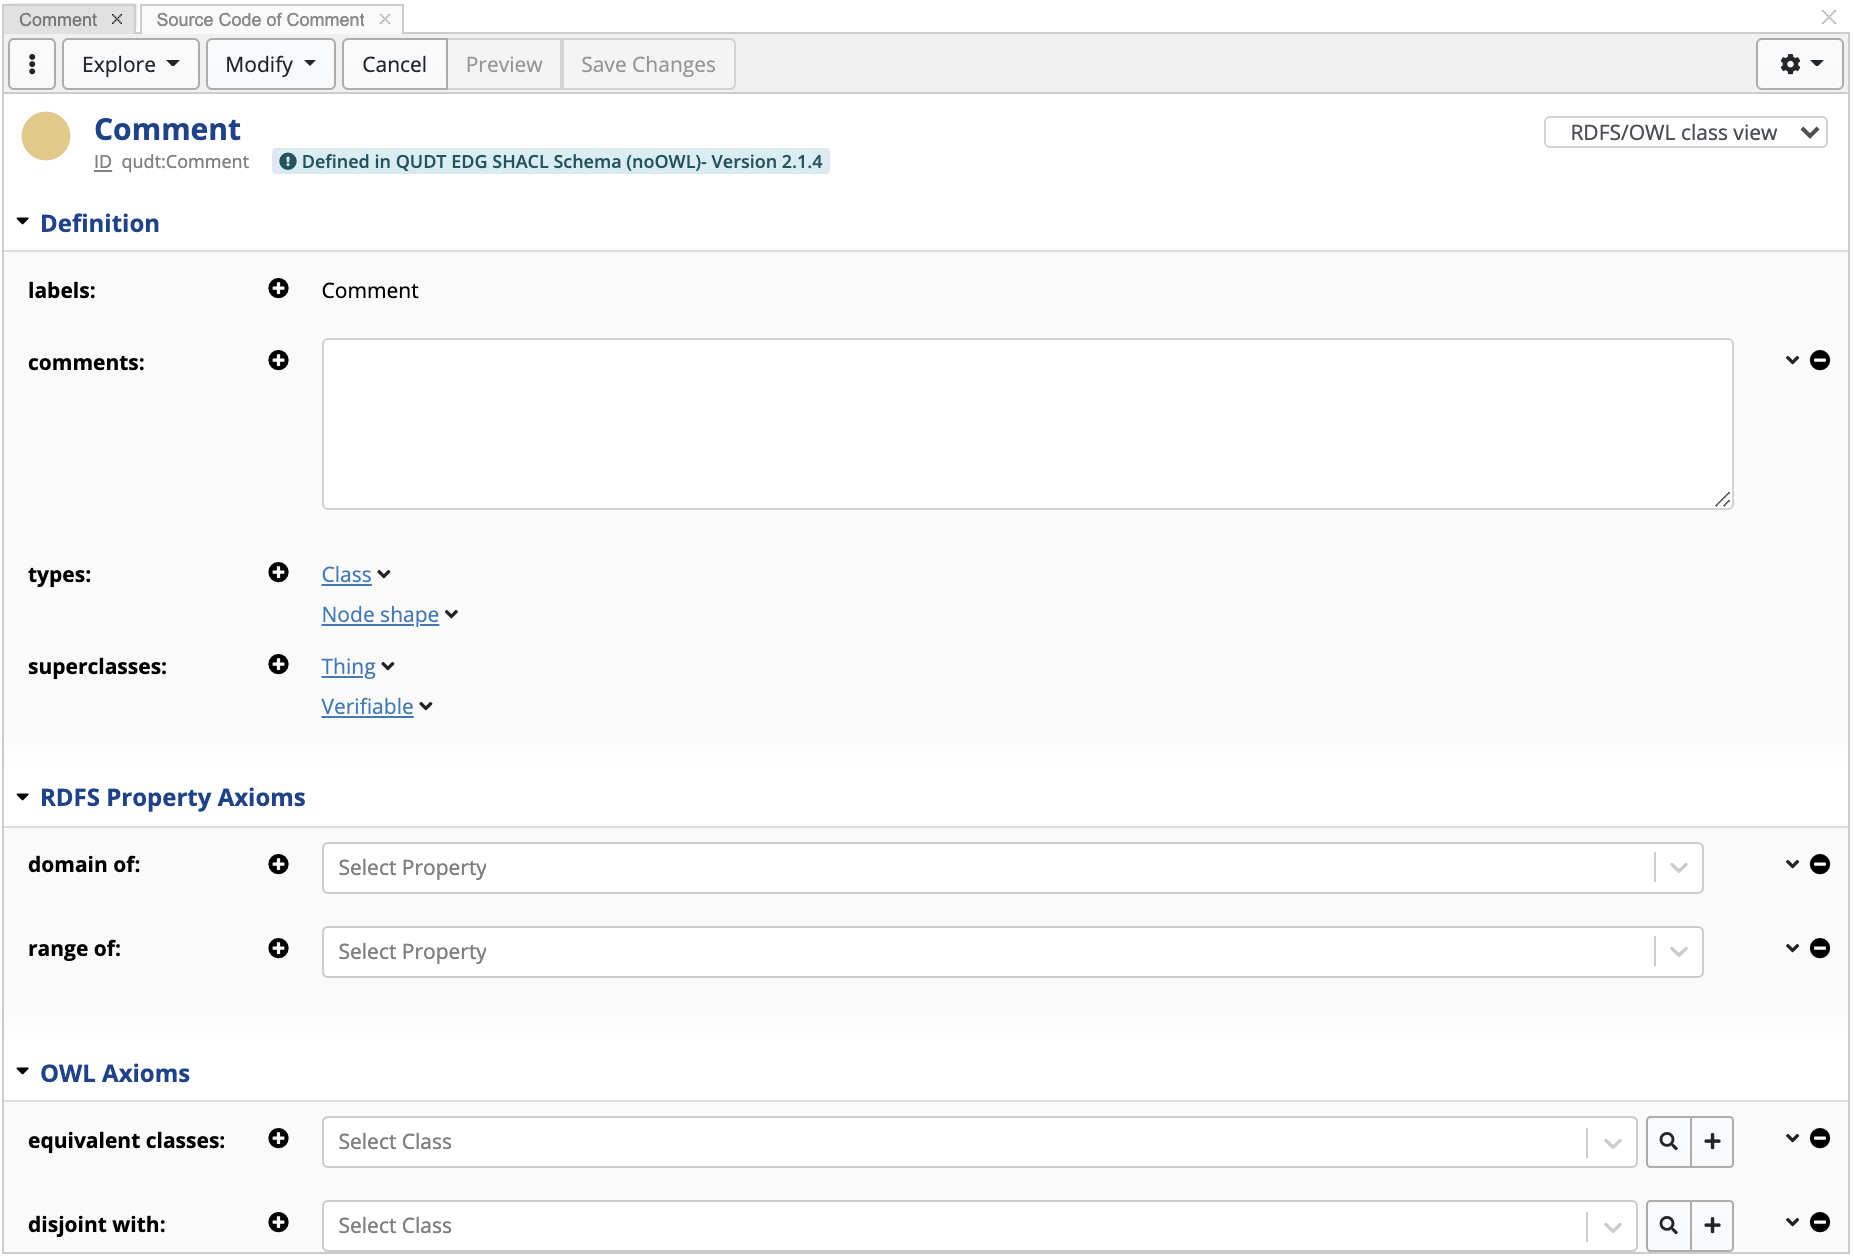
TopBraid EDG RDFS/OWL Class View
Working with Classes
Classes describe characteristics (properties) of class members or instances. For example, a class Person is used to describe what properties a person may have e.g., first name, last name, data of birth, etc. Properties defined for a class are shown in the form displaying class information.
In EDG, classes are typically created in the Classes panel using either “Add (create) New” icon at the upper left of the panel or Modify > Create subclass menu option. Also see information in Creating New Assets and Classes Panel.
Classes are organized in hierarchies. Each class will have a parent or superclass. Relationship between a child and a parent class is rdfs:subClassOf. These relationships by editing information in the class’s form to change a class’s parent:
Select a class in the Classes panel.
Once it is displayed on the form, change the “superclass” value by entering a new one.
You can also change a class’s parent by dragging it in the hierarchy displayed in Classes panel. A class can have multiple parent classes. Any property defined for a parent class appears on the form for the child class as “inherited” property.
Classes vs. Node Shapes
When you create a new class in TopBraid EDG, it will always be also typed as a Node Shape. This is because you typically create classes in EDG in order to describe instance of the classes – also known as class members. Instance data needs shape definitions and Node Shapes provide such definitions.
You can also create Node Shapes that are not classes. This is possible in the Node Shapes panel. Node Shapes define the shape of data, but, unless they are also classes, they can’t have instances or class members. If you create a Node Shape that is not a class you will need to target it to connect it to instances that the shape is defining.
Creating Abstract Classes
Sometime, you may need to define classes that have no direct instances. Instead, their instances are always members of subclasses. For example, in EDG ontology for data assets, there is a class Data Asset. It is an abstract class with many subclasses such as Database, Dataset and numerous others. When creating instances, EDG will not let you create an instances of an abstract class and, instead, will make you select one of its subclasses.
To define your class as abstract, set the value of abstract to true. Internally, this is stored using dash:abstract property.
Creating Node Shapes
Node shapes are used to describe characteristics (properties) of other resources. This sounds similar to classes and, indeed, a class created in EDG will also be a node shape. However, there are also node shapes that are not classes. Unlike classes, these node shapes do not have any members. Such shapes define characteristics of resources that are “targeted” by a shape. There are various ways to specify shape’s target. Targets of a node shape that is also a class are always members of the class.
To create node shapes that are not classes, use either Add (create) New icon at the upper left of the Node Shapes panel or right click and use Modify > Create subshape menu option.
Also see information in Creating New Assets and Node Shapes Panel.
Working with properties and property groups
The starting point for creating properties is selecting a class/node shape. With a class/node shape selected you can:
Create a property by using Property Groups Panel. This panel also lets you create new property groups that will organize properties into form sections.
Create a property directly from the form displaying a class or a node shape – as described under Form Panel (schema assets).
When you use either of these options, EDG will create a new property shape associating it with a class. By default, EDG will simply reference the property by using sh:path in the property shape. No other statements will be created for the property itself. This is done to ensure that when a property shape is deleted, no unused property declarations remain. And to ensure that there is no discrepancy between a property and property shape in terms of its display name and description.
When creating a property shape, EDG will generate its URI by combining QName of the selected class/node shape with the property name you enter in the create dialog e.g., if you select a class with the Qname example:Country and enter population as the property name, TopBraid EDG will create a property shape with the Qname example:Country-population and will set the value of its sh:path property to example:population. Thus, we get a property shape example:Country connecting a class example:Country with a property example:population.
This means that the property shapes created using these methods can be fully referenced and re-used in the ontology they are created in or in other ontologies. If you want a property shape to be created as a blank node, you can press None button to the right of the ID of Definition field in the Create dialog.
The Create dialog will let you select the most commonly used constraints for the values of the property (e.g., cardinality and type of values). After the property shape is created, you can add more information as described under property_shape_forms. This information will guide how values of a property are displayed on a form, how they are available for query and how they will be validated.
The default mode of property creation can be modified in the Manage tab by checking Also create global OWL Properties option. If this option is activated, EDG will also produce an owl:DatatypeProperty or owl:ObjectProperty for a property when creating a new SHACL property shape. If you delete all property shapes referencing a property and want to remove all statements about the property, navigate to the property (e.g., by using RDF/OWL Properties List Panel or by looking up the property by QName or URI) and delete it as explained under Deleting Properties.
Finally, you can create a property by clicking New on the RDF/OWL Properties List Panel. This action will not create a property shape.
Creating Property Shapes for already Existing Properties
There are several options for accomplishing this.
One option is to first, identify the URI of the property you want to create a shape for. It is best to copy it into the copy buffer. Then:
Click on Create Attribute or Create Relationship – as appropriate.
In the create dialog, make sure that Show Identifiers is checked. In the ID/Path of Property field, copy the URL or the Qname of the property. You could also see CTRL-Space to auto-complete existing property identifiers.
Enter any display characteristics (name, description, group, order) and constraints.
If the property has a type statement i.e., it would show up in the RDF/OWL Properties List Panel, you can also click on the button to the right of the ID/Path of Property field – it will let you look up the property by name.
Another option is to re-use an already existing property shape. This can be done by using Add existing property definition … option in the Property Groups Panel. You will need to start typing the Qname of an existing property shape and then pick it from the list – as shown below.

TopBraid EDG Add Existing Property Definition Dialog
This action will associate your selected class/node-shape with an already existing property shape. In other words, the same property shape will be used in two places and any modifications you make to it would be effective in two places.
Yet another option is to copy a property shape and modify the copy.
For example, you could select a property shape, clone it and then associate the clone with a class different from the class associated with the original shape (this will require you updating two classes: the class that the original shape was connected to and the class that a clone should be connected to).
Or you could select a class/node-shape and then select Modify>Clone property shapes from …
See Property Groups Panel and Classes Panel for more information.
Creating Property Shapes from Spreadsheet Columns
Select a class/node shape for which you want to import property definitions. Then select Modify>Add property shapes from Spreadsheet columns … .
The input spreadsheet must have at least two rows. The top row must list properties. Other rows should contain data.
Select a file and click on Upload. You will see mapping options as shown below.
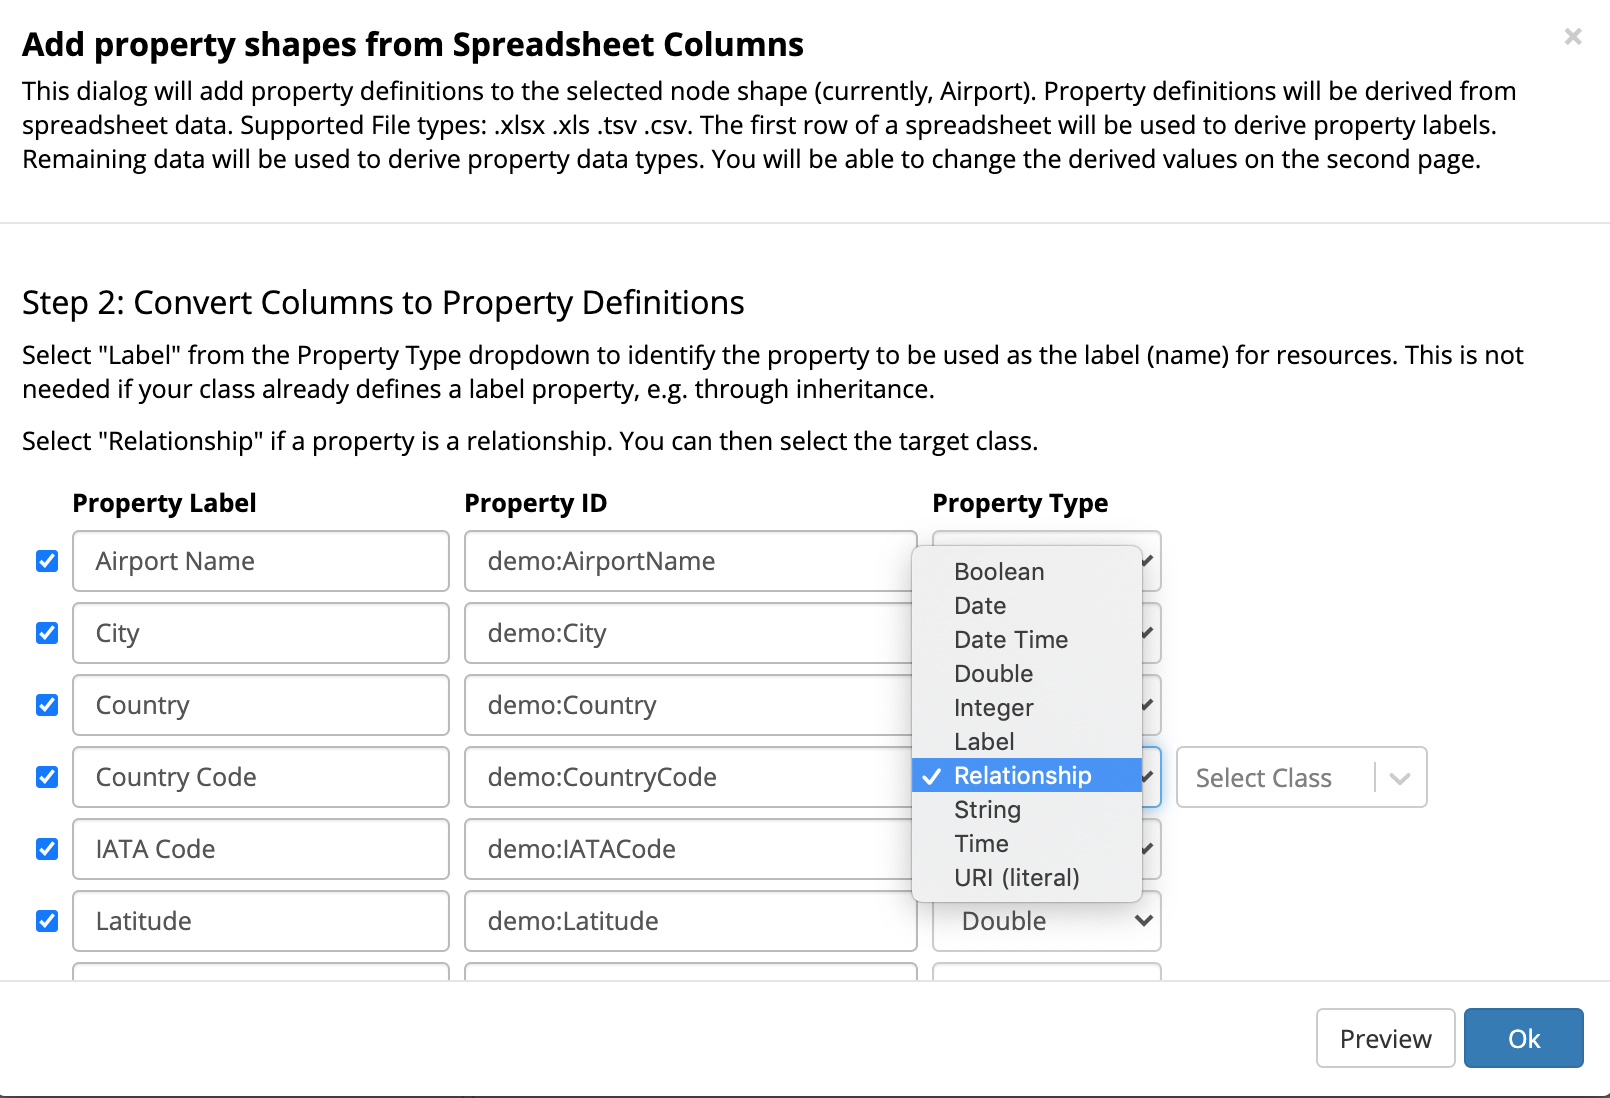
TopBraid EDG Adding Property Shapes from Spreadsheet Columns Example
Deselect any column for which you do not want to create property definitions
Optionally, change Property IDs – they will be pre-filled from the column names
Optionally, adjust Property Type. EDG will guess the type based on the data in the spreadsheet. Adjust to indicate that a column represents a relationship. You will then need to select a class of the related resources. Your target class must already exist. Also adjust the property type to Label if a column contains names of your resources.
After mapping you can click on Preview to examine property definitions that will be created and or click on OK to execute.
Creating Classes and Property Shapes from Data
If you have data that contains property values for which no property shapes exist in an ontology, TopBraid EDG can auto-generate property definitions. Data that will be analyzed must be located in one of the asset collections.
Select a class for which you want to import property definitions. Then select Modify>Derive property shapes from instances … .
EDG will display a dialog where you will:
Identify an asset collection containing data
Specify the max number of instances to analyze – default is 1,000
Optionally, specify a Property Group for the newly created properties
You can also create missing classes and property shapes for multiple classes at once by clicking on the Home icon for an ontology and using Modify>Derive missing classes … This operation will create a SHACL class for each type used in the data. It will then create property shapes for each class.
Creating Inverse Relationships
Relationships are always directional. For example, the column of relationship goes from a Column to a Table that contains a column. Using it, you can, for example, say that Customer ID is a column of Customer Master Table.
Sometimes, you may want to name (give a label) to a relationship that goes into another, inverse direction. You may want to display on the form showing information about Customer Master Table all its columns. Strictly speaking you do not need to do anything to see this information in the EDG UI as you can use the References panel to show all incoming links for any asset. Nevertheless, there are situations where you may want this info to be displayed in line with other data and/or want to search on this information.
To give a name to the inverse connection, click on the property shape for which you want to create an inverse, then select Modify>Declare inverse property … . You will get a dialog where you can specify a name for the inverse e.g, “columns”. Now, you will see that there is columns relationship from a Table to Column and if you go to, for example, Customer Master Table, you will see columns: customer ID.
The data is stored in only one direction but you will be able to see and edit it in both.
You can also create an inverse property by following the approach specified in the Creating Property Shapes for Complex Paths and enter “^” plus a Qname of a property e.g., ^edg:columnsOf.
This process does not create a new property, it only gives a human readable name to the inverse.
There are cases where you already have an inverse property with its own URI and you want to use it. In this case:
Click on Create Relationship
In the ID field provide the URI of the inverse property
Type the name of the relationship e.g., columns
Provide a description, display and constraint information just as you would normally do
In this case, EDG will create a property shape, but there will be no connection between let’s say edg:columnsOf and edg:columns. When editing, you will be able to populate links in both direction, but they will not be synchronized.
To define a connection, create a Property Value Rule that will calculate values for let’s say edg:columns based on the values for edg:columnsOf. The underlying SHACL expression will look as follows:
sh:values [
              sh:path [
                          sh:inversePath edg:columnOf ;
                      ]
          ]
When you define a rule, the inverse (e.g., edg:columns) becomes a calculated or inferred property. You will not be able to enter its values nor will EDG store values for the edg:columns property. Instead, it will generate them on demand at query time. You can query for them and, if necessary for external systems, you can run the rule (use Transform tab) to populate these values for export.
Setting a Primary Key for a Class
Primary key constraint tells EDG how to generate URIs for class members. EDG will use values of a property selected in the constraint and pre-pend to them a string you specify as the “URI start”. This constraint takes priority over the URI construction method set for an asset collection.
A property that has a primary key constraint is expected to have unique values across all instances of the class. When you create a new member of a class, if it has a primary key constraint, EDG will always ask you to provide a value for the primary key.
To set a primary key constraint on a property, select the appropriate class in the Class Panel, then select the property in the Property Groups Panel. The Form Panel will refresh allowing you to edit constraints for the property. Find URI start on the form, enter the beginning of the URI pattern that will be used to construct the individual URIs e.g., http://example.org/MyClass-. Click Save Changes. URI start value must be such that combining it with the values of the property you selected will generate valid URIs.
To use a class as the main entity of any reference dataset, the class must have exactly one property designated with the primary key constraint, which may be specified either on the class itself or on one of its superclasses.
Creating Property Shapes for Complex Property Paths
Sometimes, you may want to define a connection between an asset and another asset or a literal (e.g., a string or an integer) value using a complex set of connections. Property paths support retrieval of information that is connected to a given asset through a chain of relationships.
For example, a grandparent is a parent of a parent. Country of birth, can be thought of as a relationship that traverses a connection between a person, a city/town they are born in and a country the birth city belongs to. Financial applications often ask applicant to provide a maiden name of their mother. “Mother’s maiden name” can be reached by first going to person’s mother and then to mother’s maiden name.
To create a property shape for a complex property path:
Click on Create Attribute or Create Relationship depending on whether the final value in the path is a literal or another resource
In the create dialog, check Show Identifiers.
In the ID/Path of Property field, enter a path. You can use URIs or qname and enter property path expressions in SPARQL syntax. For example:
Enter ex:parent/ex:parent for a path expression to reach the grandparents of a person or ex:parent/ex:maidenName to reach a maiden name of a parent – this will deliver a value only for a parent that has a maiden name.
For inverse links use “^” e.g., ^ex:parent. This will deliver children of a person.
To say that a a given relationship may occur one or more times in a path use “+” e.g., ex:parent+. This will deliver all ancestors of a person.
To say that a a given relationship may occur zero or more times in a path use “*” e.g., rdf:type/rdfs:subClassOf*. This will deliver a class that a given asset belongs to and, if this class has parent classes, will deliver all the parent classes.
To specify alternative paths use “|” e.g., skos:broader|^skos:hasTopConcept. This will deliver, for a concept, either a broader concept or, if it is a top concept of a concept scheme, a concept scheme.
Use CTRL-Space to auto-complete existing property identifiers.
Enter the rest of the information as usual (e.g., name, datatype)
Enabling Indexing of Property Values
Users can specify that property values should be ordered. To do so, edit a property shape and scroll down to the Reification (Statements about Statements) section and set its indexed constraint value to true.
The index starts with 0. This should be set only for properties with stored, not calculated or inferred, values.
Working with Rules
SHACL Triple and SPARQL Rules can be created using the Source Code panel. For more on SHACL Rules, see W3C SHACL Advanced Features Specification.
You will also be able to create a Property Value Rule from a template or by editing the source code and you will be able to set default values for a property.
Property Value rules are used by EDG to dynamically calculate (infer) values for the selected property.
With a property shape selected, click on Modify and pick the option to create property value rule from template:
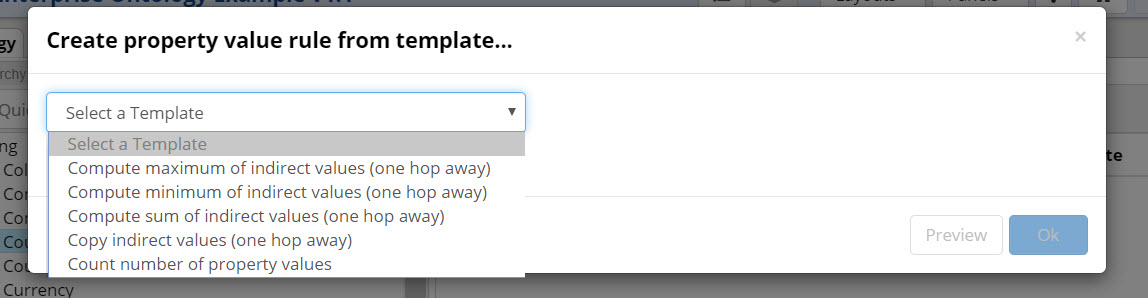
TopBraid EDG Create Property Value Rule from Template
When you select a template, you will be able to enter additional parameters. For example, if you want to populate a number of related concepts for a selected taxonomy concept:
Create a new attribute e.g., “number of related concepts”
Select it and using Modify>Create property value rule …
Select Count number of properties template
Type “related concept” in the template field or pick it from the dropdown
Press OK
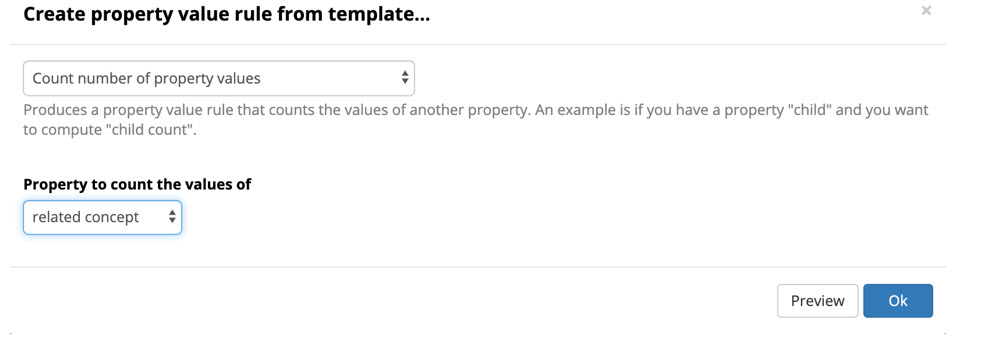
TopBraid EDG Count Number of Property Values
You will see the following rule in the Inferences section.

TopBraid EDG Property Value Inferences
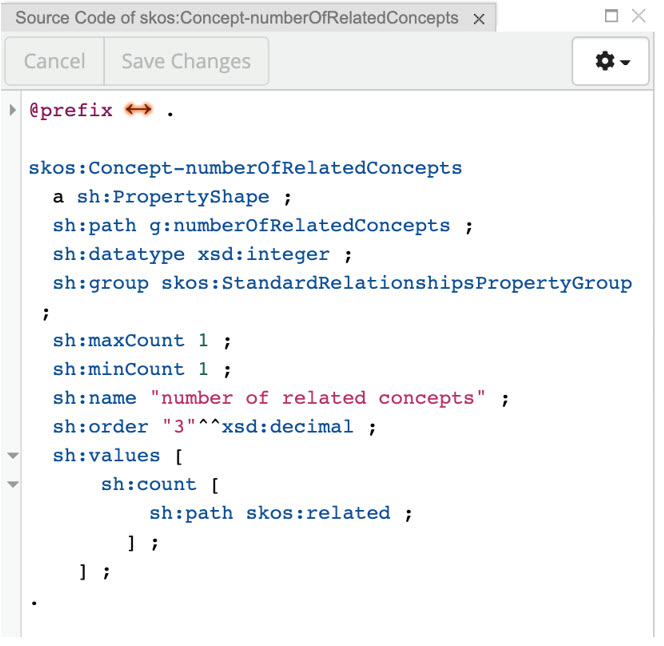
The source code will show the following.
TopBraid EDG Property Value Source Code View
You can edit the source code to create more complex rules than those covered by available templates. Power users can also define additional templates to cover your most common rule patterns.
Now, if you navigate to a taxonomy based on this ontology, you will see a number of related concepts – as shown below.
TopBraid EDG Number of Related Concepts Example
Calculated (inferred) fields are not editable.
You can set a default value using a similar approach. Default value can be a constant or an expression such as ones using for sh:values field. There is no form-based UI for entering default values. Use source code and sh:defaultValue. For more information see https://www.topquadrant.com/graphql/values.html
Working with Wikidata and other external Knowledge Graphs
For classes and node shapes, EDG can auto-create property shapes using Wikidata resource as an example.
To do this, use an option in the Modify menu and provide an ID (e.g. Q84) of a wikidata.org resource. EDG will return its properties for selection by the user.
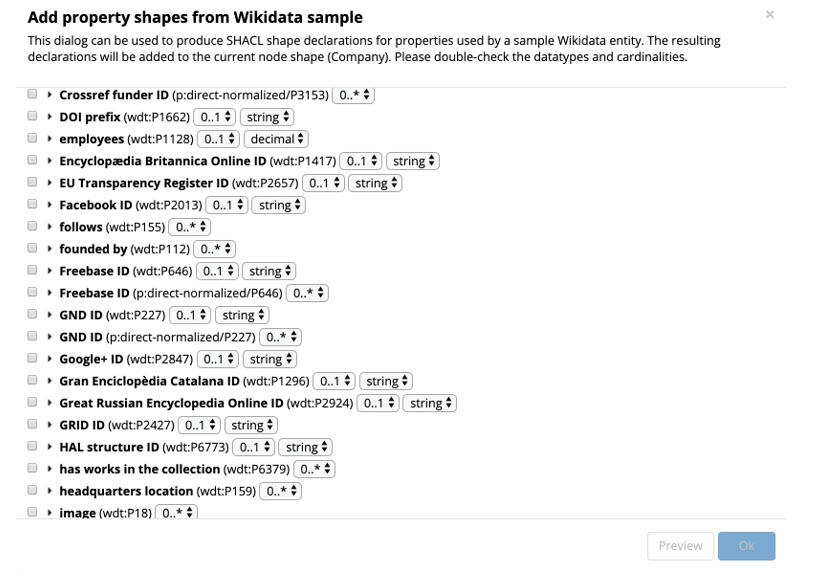
TopBraid EDG Add Property Shapes from Wikidata Sample
For property shapes, you can create a Wikidata link (or a link to another SPARQL endpoint) by selecting an option in the Modify menu.
The form panel will not change, but in the Source Code panel you will see dash:detailsEndpoint https://query.wikidata.org/sparql.
You can use Source Code panel edit the detailsEndpoint link to refer to another endpoint.
Whenever a property shape carries a value for dash:detailsEndpoint, TopBraid EDG will understand that the values of the property are URIs and that more statements for these URIs can be queried from the given SPARQL endpoint.
If the endpoint happens to be exactly the https://query.wikidata.org/sparql URL, then additional features for Wikidata get activated.
See also
For more on how to use this feature, see the EDG and Wikidata Tutorial .
Deactivating Property Shapes
Click on the property shape you want to deactivate, then click Edit. Select “true” in the deactivated dropdown. Internally, this is stored using sh:deactivated property.
After you do this, you will no longer see this property and its values on the instances forms. If you still want to use the property and only wanted to deactivate some specific constraints, create another property shape using the same property and specify constraints you want to keep.
Creating Alternative Views
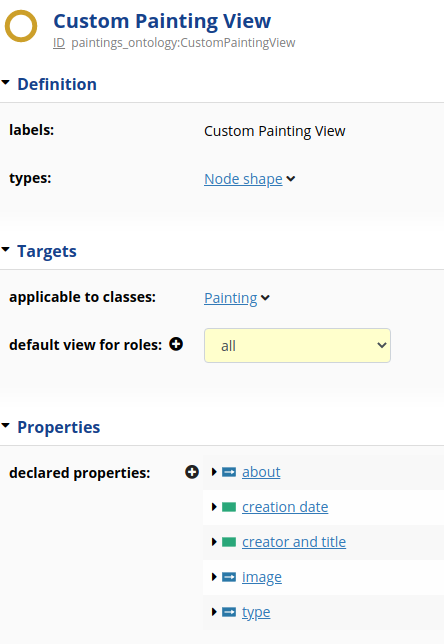
There might be situations were the quantity of properties on a class are overwhelming and it might be beneficial to create alternate ‘views’ that can be defined with a subset of properties. This is especially useful when different groups of users only need a portion of all available properties for their work functions. TopBraid EDG allows you create multiple views into assets to facilitate this and other similar needs through the creation of a Node Shape ‘view’ that is not a class.
To get started, open the Node Shapes tab inside the Ontology editor, then create a new Node Shape.
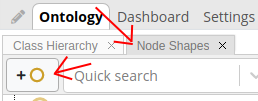
TopBraid EDG Ontology Node Shape Tab
Give the new view a name and make sure ‘Node Shape’ is selected as the type, then confirm by pressing ‘Ok’.
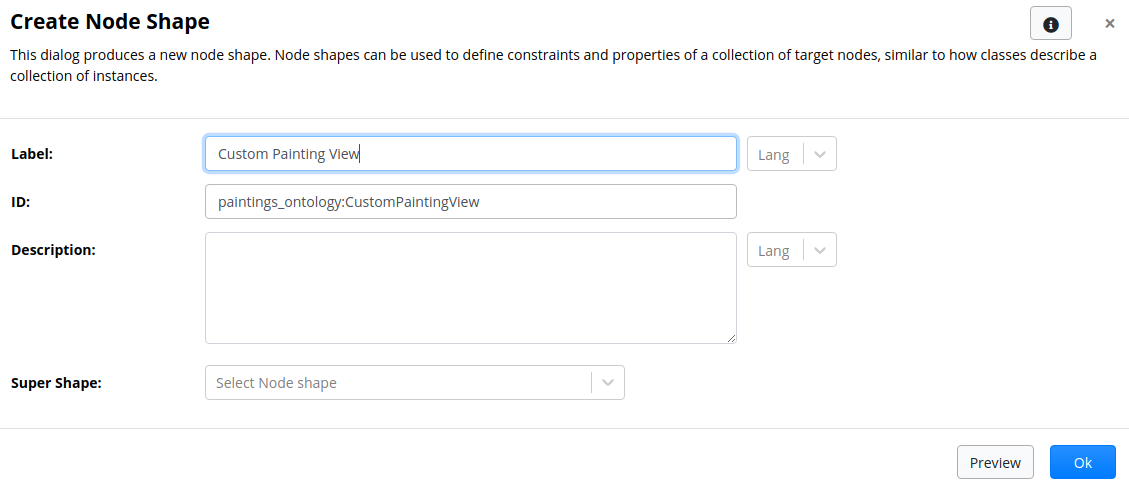
TopBraid EDG Create Node Shape Page
To make the new Node Shape view target members of the desired class, set the target for the dash:applicableToClass property by selecting the custom view in the Node Names panel. You might have to make sure properties with no value are shown to see this property.
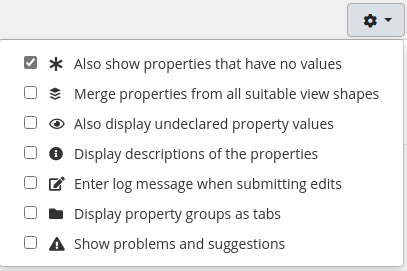
TopBraid EDG Properties with No Value Selection
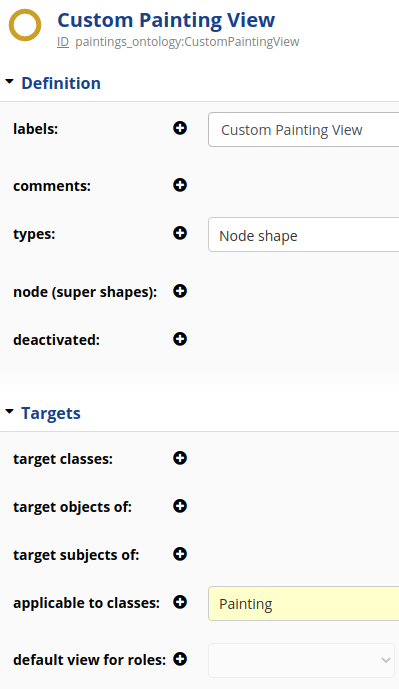
TopBraid EDG Custom Painting View
To quickly build the new view, clone property shapes from the ‘base class’. To do this, press the + by ‘declared properties’ and select ‘Add existing Property Definition (Shape)…’.
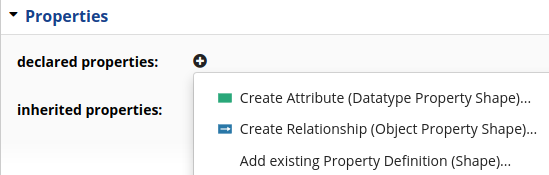
TopBraid EDG Properties Section
In the dialog that pops up, search for the properties.
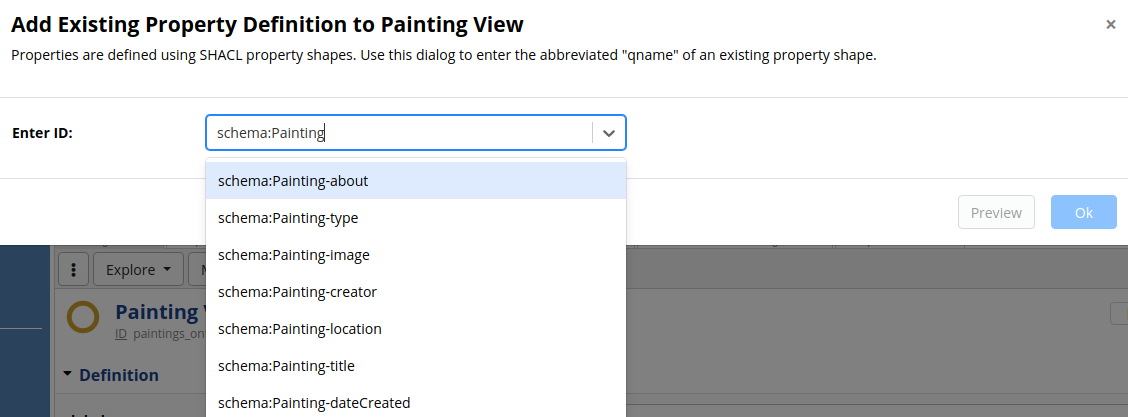
TopBraid EDG Add Existing Property to Painting View
Repeat the process for each property from the ‘base class’ you want to appear in the view.
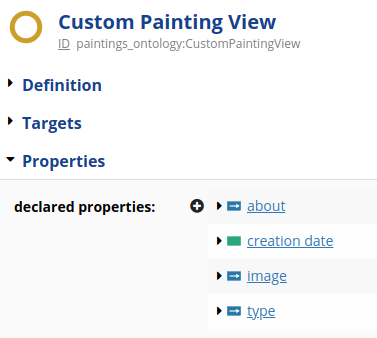
TopBraid EDG Custom Painting View Properties Section
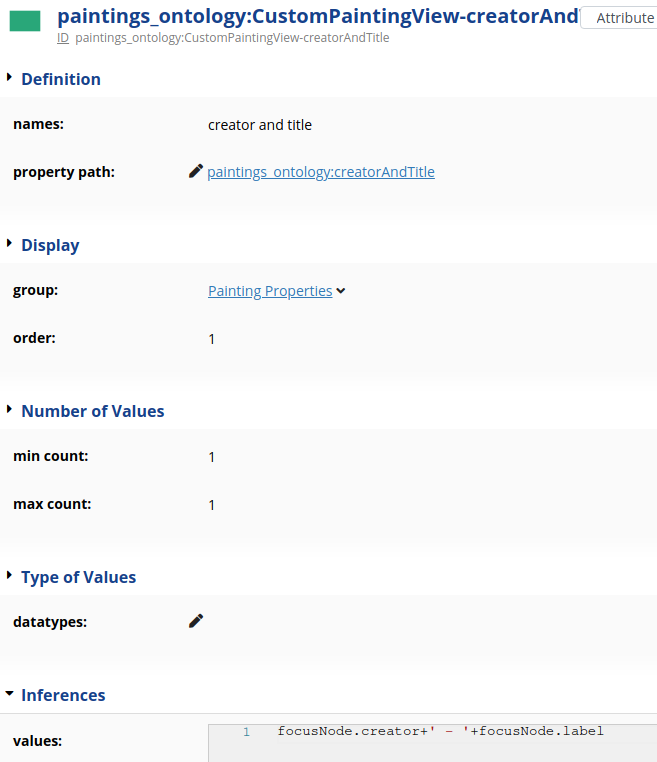
You can also add new properties, but typically, these should be inferred properties backed by rules. This is because the base class should normally already have all the applicable properties. Start with creating a new Property Shape from the same ‘declared properties’ + drop down menu.
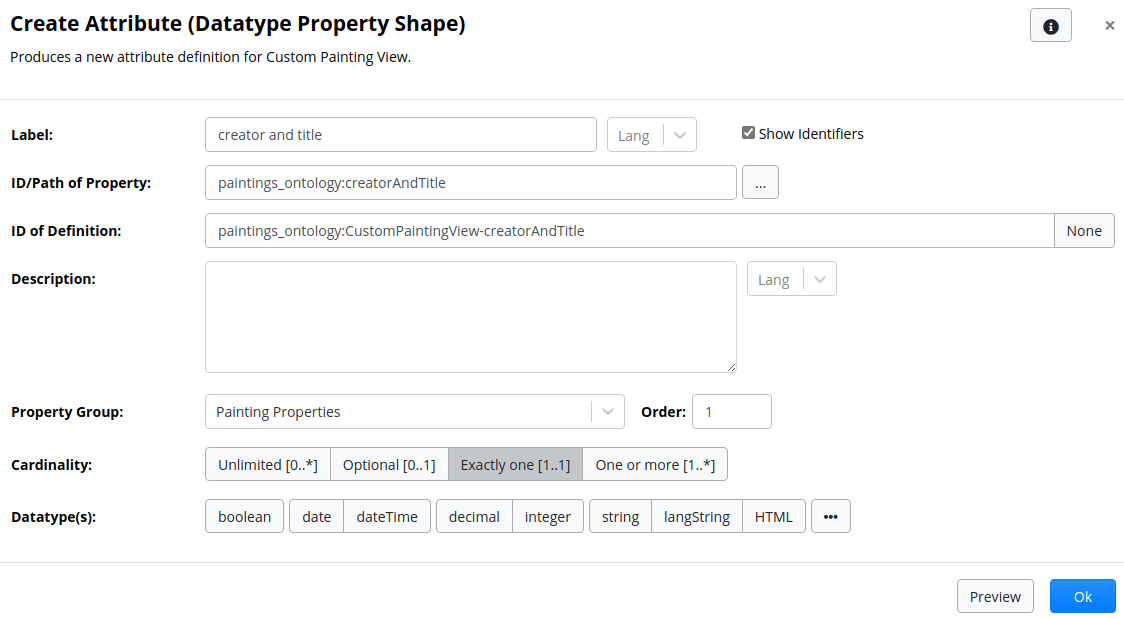
TopBraid EDG Create Attribute Page
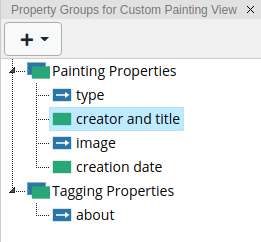
Then in the Property Groups panel, select the new property.
TopBraid EDG Property Groups Panel
In the Inferences group, add a ‘values’ inference using ADS syntax.
TopBraid EDG Add Values to Inferences Section
You can set the alternative view as the default one for all users or you can specify it as a default for users in certain roles.
TopBraid EDG Set Default View for Certain Roles
Then you can navigate to the data asset view for the target class and you can see the new view in the views drop down in the upper right. With the new view selected, you will see only the properties assigned to the view.
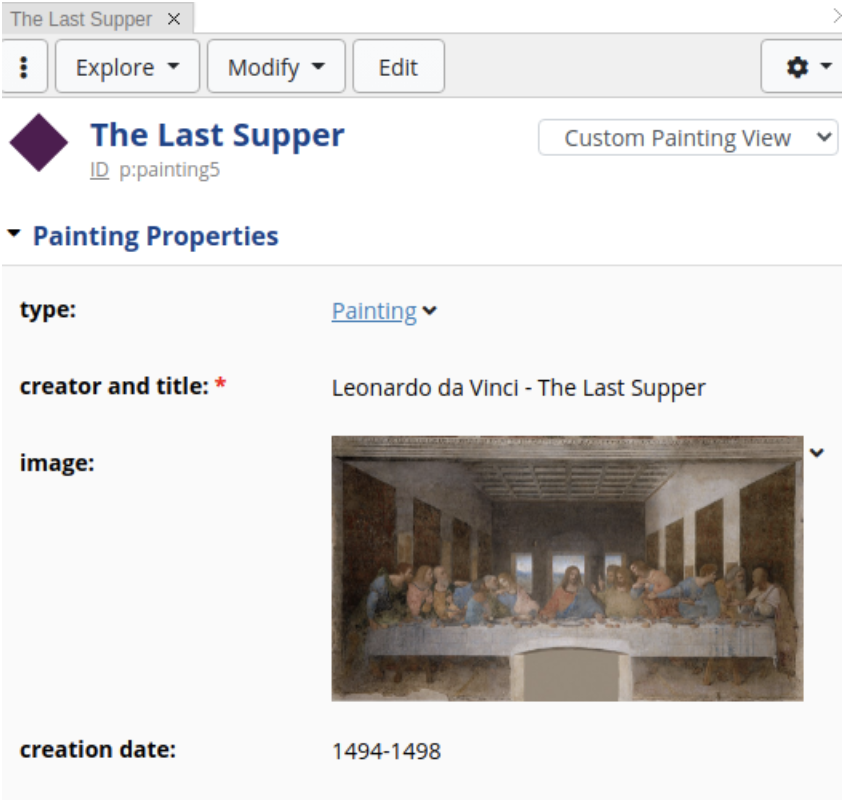
TopBraid EDG Painting Properties View
Deleting Classes and Node Shapes
Deleting a class does not remove its subclasses. If a child does not have any parents it will no longer appear in the Classes panel, but you will be able to find it in the Search panel and/or navigate to it using Navigate to… .
Deleting a class or a node shape does not delete associated property shapes if they are defined as independent resources with their own URIs. It will remove property shapes that are blank nodes.
Deleting Property Groups
Deleting a property group does not remove any property shapes associated with the group.
Properties that used to be grouped under the deleted group will now appear under “catch all” Other Properties group.
Deleting Property Shapes
A property shape can be deleted using Delete action in the Modify menu.
If multiple property shapes are defined for the same property, deleting one property shape does not impact any other property shapes. Nor does such delete operation remove any data that may be using a property. If you know that a property has been used to store some data, prior to deleting a property shape use either Modify>Delete all Property Values across Graphs… or Modify>Replace Property Values across Graphs.
Deleting Properties
Typically, it is sufficient to delete property shapes. If a property has any information associated directly with it (outside of what is in a property shape), it can be deleted by displaying it on a form and then selecting Modify>Delete.
Deleting a property does it remove any data that is using it.
Enabling Reification of Property Values
There are situations where an organization may need to capture facts about a specific thing having a specific property value - i.e. make statements about statements. A common approach/modeling pattern that supports that need is called reification. For example, it may be useful to add facts about a statement such as Joe has job title Software Developer. In order to do record those facts, Joe has job title Software Developer needs to have an identity. Giving statements identity is the meaning of reification. An organization may need to reify people’s job titles in order to capture the source of the statement about Joe’s job title or specify its effectivity date.
To specify this in an ontology:
Create a Node Shape (e.g. Effectivity Shape)
Add properties to store the facts to capture (e.g effective start and effective end dates) to the node shape
Navigate to a class having properties to be annotated with these facts (e.g. class Person)
Select a property to which the facts are applicable (e.g. effective start and end are applicable to the job title property). Edit it and scroll down to the Reification (Statements about Statements) section to add the node shape (e.g., Effectivity Shape) as a value of the reifiable by property. Internally, this is stored using an EDG dash:reifiableBy property.
Note
For more technical details and RDF syntax for reified values see DASH Reification.
Now, when using the ontology as the basis of another asset collection (such as a data graph, taxonomy or reference dataset), users will be able to add effective dates to statements that store job titles of people.
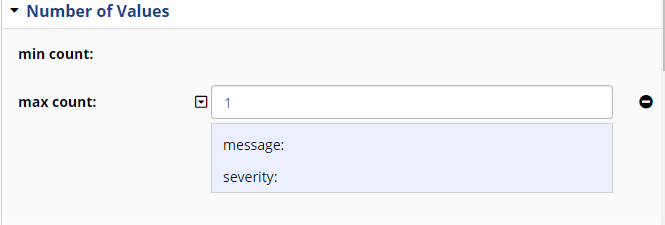
Most constraint components now have the ability to reify triples as shown in following example. These local message and severity will override the message and severity defined at shape level.
TopBraid EDG Number of Values View
Working with Rules
SHACL Triple and SPARQL Rules can be created using the Source Code panel.
See also
For more on SHACL Rules, see SHACL AF.
You will also be able to create a Property Value Rule from a template or by editing the source code and you will be able to set default values for a property.
Property Value rules are used by EDG to dynamically calculate (infer) values for the selected property.
With a property shape selected, click on Modify and pick the option to create property value rule from template:
TopBraid EDG Creating Property Value from Template Dialog
When you select a template, you will be able to enter additional parameters. For example, if you want to populate a number of related concepts for a selected taxonomy concept:
Create a new attribute e.g., “number of related concepts”
Select it and using Modify>Create property value rule …
Select Count number of properties template
Type “related concept” in the template field or pick it from the dropdown
Press OK
TopBraid EDG Count Number of Property Values using Related Concept
You will see the following rule in the Inferences section.
TopBraid EDG Inferences Values Section
The source code will show the following.
TopBraid EDG Source Code View
You can edit the source code to create more complex rules than those covered by available templates. Power users can also define additional templates to cover your most common rule patterns.
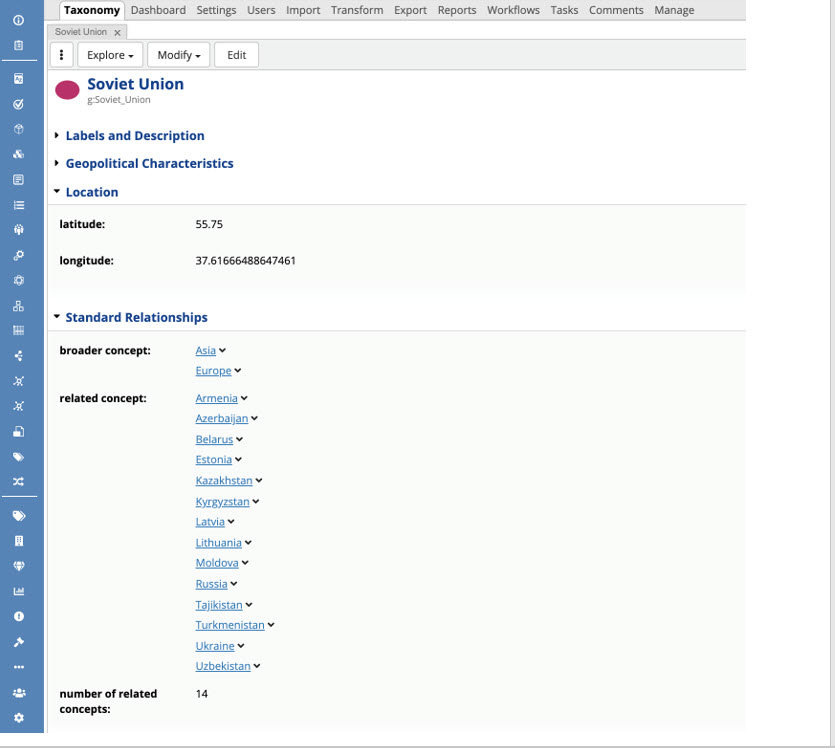
Now, if you navigate to a taxonomy based on this ontology, you will see a number of related concepts – as shown below.
TopBraid EDG Taxonomy - Soviet Union
Calculated (inferred) fields are not editable.
You can set a default value using a similar approach. Default value can be a constant or an expression such as ones using for sh:values field. There is no form-based UI for entering default values. Use source code and sh:defaultValue.
See also
For more information see https://www.topquadrant.com/graphql/values.html